Roswellianism
New Member
Hiya, folks! Welcome to my first-ever build thread. Hope it's up to snuff!
So I've been hooked on Marvel's cinematic endeavors since Raimi's Spider-Man (his SP2 remains the best Spidey IMO), but since they started tying everything together, I've been champing at the bit for each new release. The Avengers remains my favorite, but the Captain America films are running a close second.
But lately, what's really kept my attention going has been "Agents of S.H.I.E.L.D." on ABC. It's become my new favorite show, one I make it a point to sit down and watch live every week. There's been something about it that's really kept me going and made me more and more eager for Marvel stuff.
Last year, I missed out on the spectacular S.H.I.E.L.D. badge at NYCC, but I still want one. I found a replica online and ordered one, but I still wanted to make one myself. I'd picked up some Sculpey last month to make a Ghostbusters badge (similar to another poster's over on GBFans), but not having any experience with actual sculpting, I wanted to start off with something simpler.
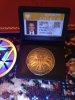
Enter my new fandom, and next thing I know, I'm making my own customized S.H.I.E.L.D. badge. First things first, I picked up a few of these pewter keychains:

I snapped off the chain, and started sculpting the clay around it:

After a few mistakes, I ended up with this:

I tried to replicate the raised edges as on the official badge...

...but I hit a roadblock. I suddenly had no idea how to do the lettering. The script on the official badges is tiny as hell, and the sculpey wasn't strong enough to support such tiny lettering, especially with my skill level of zero.
Stumped, I mentioned this on Facebook and an artist friend of mine offered a suggestion: letter stamps. They're available at Michaels, so they shouldn't be too pricey. Last week, I stopped in and hunted around all over the store for the stampers. I found some in the clay aisle, but they were too big. There was no way I'd fit the entire "STRATEGIC HOMELAND INTERVENTION LOGISTICS DIVISION" on the badge with 1/4 inch letters.
Luckily, fortune favors the, well, doggedly determined, and I found a smaller set in the dollar bin. Happy with my prize, as well as some Testor's model paint matching the original pewter fob, I purchased and bopped on home to work with my new plunder.
Unfortunately, the letters were still too large for what I had in mind. The full wording still wouldn't fit. I screwed up with the stamping and had to start from scratch. After a few hours of wrestling the clay back into shape, I had my badge crafted:

The scripting around the badge reads: FIELD AGENT - PGH - S.H.I.E.L.D. I was happy with how it came out and got super-stoked to toss it in the oven and get it all baked up.
Until... this happened.

Wrong temperature. Accidentally had the oven set at 350 instead of 275 like it's supposed to be. Instead of baking properly, it kinda... It kinda became this crazy cookie-like... thing. The script was still there(ish), but as a badge? Nooope. At least the added mini-shield emblem in the middle came out okay. But... back to square one.
Today I started again, and instead of free-handing, I used a screw-on lid from a Parmesan cheese container to ensure the perfect circumference of the badge instead of it looking all wobbly when I did it by hand the first time.
Take two:

Once I got that taken care of, I whipped up a second one for my girlfriend. I ended up having to bake them a bit longer than written on the packaging due to the age of my family's oven, and they look even better than they did the first time.

Next step is getting 'em painted up. I'll post the finished results tomorrow.
So I've been hooked on Marvel's cinematic endeavors since Raimi's Spider-Man (his SP2 remains the best Spidey IMO), but since they started tying everything together, I've been champing at the bit for each new release. The Avengers remains my favorite, but the Captain America films are running a close second.
But lately, what's really kept my attention going has been "Agents of S.H.I.E.L.D." on ABC. It's become my new favorite show, one I make it a point to sit down and watch live every week. There's been something about it that's really kept me going and made me more and more eager for Marvel stuff.
Last year, I missed out on the spectacular S.H.I.E.L.D. badge at NYCC, but I still want one. I found a replica online and ordered one, but I still wanted to make one myself. I'd picked up some Sculpey last month to make a Ghostbusters badge (similar to another poster's over on GBFans), but not having any experience with actual sculpting, I wanted to start off with something simpler.
Enter my new fandom, and next thing I know, I'm making my own customized S.H.I.E.L.D. badge. First things first, I picked up a few of these pewter keychains:
I snapped off the chain, and started sculpting the clay around it:
After a few mistakes, I ended up with this:
I tried to replicate the raised edges as on the official badge...
...but I hit a roadblock. I suddenly had no idea how to do the lettering. The script on the official badges is tiny as hell, and the sculpey wasn't strong enough to support such tiny lettering, especially with my skill level of zero.
Stumped, I mentioned this on Facebook and an artist friend of mine offered a suggestion: letter stamps. They're available at Michaels, so they shouldn't be too pricey. Last week, I stopped in and hunted around all over the store for the stampers. I found some in the clay aisle, but they were too big. There was no way I'd fit the entire "STRATEGIC HOMELAND INTERVENTION LOGISTICS DIVISION" on the badge with 1/4 inch letters.
Luckily, fortune favors the, well, doggedly determined, and I found a smaller set in the dollar bin. Happy with my prize, as well as some Testor's model paint matching the original pewter fob, I purchased and bopped on home to work with my new plunder.
Unfortunately, the letters were still too large for what I had in mind. The full wording still wouldn't fit. I screwed up with the stamping and had to start from scratch. After a few hours of wrestling the clay back into shape, I had my badge crafted:
The scripting around the badge reads: FIELD AGENT - PGH - S.H.I.E.L.D. I was happy with how it came out and got super-stoked to toss it in the oven and get it all baked up.
Until... this happened.
Wrong temperature. Accidentally had the oven set at 350 instead of 275 like it's supposed to be. Instead of baking properly, it kinda... It kinda became this crazy cookie-like... thing. The script was still there(ish), but as a badge? Nooope. At least the added mini-shield emblem in the middle came out okay. But... back to square one.
Today I started again, and instead of free-handing, I used a screw-on lid from a Parmesan cheese container to ensure the perfect circumference of the badge instead of it looking all wobbly when I did it by hand the first time.
Take two:
Once I got that taken care of, I whipped up a second one for my girlfriend. I ended up having to bake them a bit longer than written on the packaging due to the age of my family's oven, and they look even better than they did the first time.
Next step is getting 'em painted up. I'll post the finished results tomorrow.