Radioman
Active Member
Hello all,
I wanted to share a modification I made to my 3D printed Rey's staff. I'm making this for my daughter and I was very concerned about it breaking at the con. I made it in pieces so individual components could be replaced if necessary, but she's 14 and I know she's going to "Gandalf" this through WonderCon and Comic Con.
My original thought was to print the bottom cap at 60% infill to make it really strong. That would probably work, but I was still worried about it hitting the cement floor for five days. Then, I came up with a solution that won't be Rebel Legion approved, but I think is elegant and should work well.
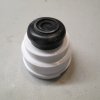
I started with my end cap.

I originally thought I could glue a rubber chair pad on the bottom but that would fall out. So, I found these at Home Depot for pretty cheap. (Enough for 3 more staffs!)

I went into my staff design file and recreated the chair foot. My staff pieces are designed to fit on a 1" wood dowel. Coincidentally, the chair foot is also based on a 1" center hole. It's a simple matter to "subtract" one piece from another. When I bored out the end cap, I left enough of a ridge to seat the rubber foot.


When the cap slides onto the dowel, there's a nice little space for the foot.

I let the foot stick out about an inch so leaning the staff forward or backward won't clip the end cap on the floor. The other thing I like about this solution is that any pressure placed on the staff will transfer through the rubber foot to the wood dowel instead of the plastic. I've some tap testing and it's holding up really well. It'll be interesting to see what the foot looks like after a couple of cons.
Once this is painted, it should blend in pretty well. I can also tell my daughter not to high stick anyone for pics because they will see the foot.")

That's it! If you made it to the end, thanks for reading.
Mark
I wanted to share a modification I made to my 3D printed Rey's staff. I'm making this for my daughter and I was very concerned about it breaking at the con. I made it in pieces so individual components could be replaced if necessary, but she's 14 and I know she's going to "Gandalf" this through WonderCon and Comic Con.
My original thought was to print the bottom cap at 60% infill to make it really strong. That would probably work, but I was still worried about it hitting the cement floor for five days. Then, I came up with a solution that won't be Rebel Legion approved, but I think is elegant and should work well.
I started with my end cap.
I originally thought I could glue a rubber chair pad on the bottom but that would fall out. So, I found these at Home Depot for pretty cheap. (Enough for 3 more staffs!)
I went into my staff design file and recreated the chair foot. My staff pieces are designed to fit on a 1" wood dowel. Coincidentally, the chair foot is also based on a 1" center hole. It's a simple matter to "subtract" one piece from another. When I bored out the end cap, I left enough of a ridge to seat the rubber foot.
When the cap slides onto the dowel, there's a nice little space for the foot.
I let the foot stick out about an inch so leaning the staff forward or backward won't clip the end cap on the floor. The other thing I like about this solution is that any pressure placed on the staff will transfer through the rubber foot to the wood dowel instead of the plastic. I've some tap testing and it's holding up really well. It'll be interesting to see what the foot looks like after a couple of cons.
Once this is painted, it should blend in pretty well. I can also tell my daughter not to high stick anyone for pics because they will see the foot.
That's it! If you made it to the end, thanks for reading.
Mark