Catching Fire Arena Bow Replica

AlexGordon

Active Member
Alright, so I barely churned any interest with my "The Hunger Games Arena Bow" thread, and rather than continue posting in a seemingly already dead thread, I figured I'd go ahead and compile my research for my Catching Fire bow in a new thread. This will be pretty comprehensive, as not as much building is actually required for this one. I've compiled all of the useful pictures I can find so far, and I'll be posting them below.

The Basics:

-The bow is a Hoyt Buffalo
-The riser is silver, and so are the limbs
-The limbs are then covered with diagonal pattern carbon fiber vinyl/tape
-In the movie, the limbs used were custom 20 lb limbs, but they appear to be the same shape as the normal limbs
-There is an added piece on the front of each limb at the base that covers the mounting and tensioning hardware on the bow.
-The bow is most likely 58" long. it could be slightly shorter with the custom limbs, but I was comfortable ordering 58" by my measurements.
-There are also tip covers on the ends of the limbs that hold the string about 2" from the actual tips.
-Where there should be visible screws on the sides of the riser, there appears to be a triangular shaped piece added to cover them.
-The arrows used were easton x7 eclipse arrows with custom tips. I've looked and no such broadhead tips exist for those arrows.
-Fletching?
-Nock?

So, with that in mind, I've gone ahead and ordered the silver and black hoyt buffalo (the closest you can get to the movie prop) and begun the research phase. Once the bow arrives, I'll whip up a 3d model for the extra pieces on the limbs. I've already found a suitable carbon fiber vinyl, but I'm waiting to hear back from the seller about which way the lines go on the tape. It would suck to have to order a 60"x60" piece just so I can cut it the way I want it when a 12"x60" piece will be more than enough if the lines are oriented correctly. So, with all of that in mind, here are the reference pictures.


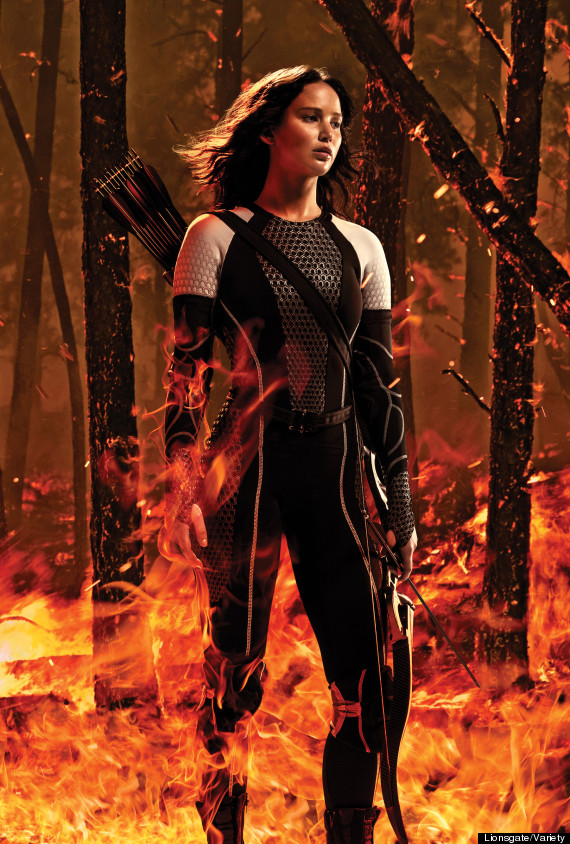
..... I just now noticed that the quiver we are looking at here is impossible. You can't put a broadhead into a round hole like that. at any rate, this will help identify the nock and fletching of each arrow.


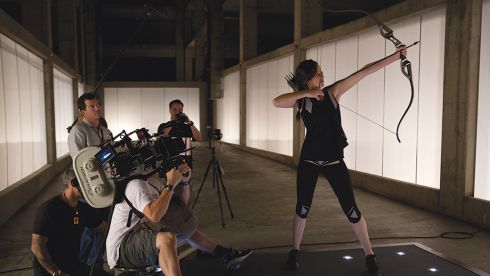
this one shows the cover for the tension tuning screw the best of any that I have seen so far. it also helps show the cover for the screws.


and that's the bow I ordered. At least the riser is the right color, but it's very clear from the screenshots that they made a silver bow to try and match the one from the first movie and decided they didn't like it, so they added the carbon fiber on the tops and bottoms, leaving the silver to show on the edges of the limbs.

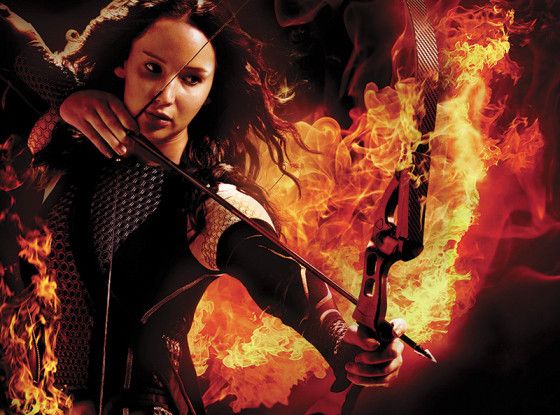
EDIT: Just took a close look at the frame where president snow is watching katniss as she is about to shoot the dome. Looks like it's hero and v2 all over again. The bow handle in that shot appears to be black with a silver front rather than the silver with a black front that it is everywhere else.

DOUBLE EDIT: Even further still, the black front on the bow handle seems to only be in the promo shots. the movie stills all show a plain silver handle with a black grip (there is an actual grip section on the riser). This is the part that's the most fun phase of research. Identifying all of the details that will need changed and figuring out how to change them.
 
Last edited:
thanks! Unfortunately, I just checked my order status and it says "awaiting inventory". I'm really hoping that it won't be long. I'm kind of pissed off too because there was nothing about a "preorder" or "backorder" so I'm not sure what the deal is with that. They can't sell me a bow without telling me they don't have it in stock before I buy it. these may very well not be in stock anywhere yet, but they at least need to tell me that before I purchase it. :mad:
 
it really is. I mean, if it's gonna be a week, I can handle it. I've waited months and years for props, so I can handle a week. But for $750, if it's gonna be more than that, then they can hold my slot and have my money after they have stock. I hate playing that game.

Might sound unreasonable to some, but since it didn't say anywhere on the page that it was a backorder or preorder, that's already one strike against them.

EDIT: okay, so some further research shows that the promo pic bow has a painted or skinned black section on the entire front of the grip, but looking through some actual film stills, that colored part isn't there, which makes my job much easier. I'm hoping there isn't as much covering of screw holes on the sides of the grip on the actual film prop either, as that would be another step easier. I'll likely be able to finish the add ons to the bottom front of the limbs once the bow arrives, but I may have to wait for bluray stills to get anything further on the handle. I can live with that.
 
Last edited:
So, I got a response to my email and they said they have a few other color and # options available if I want to call and change my order (the alternative was "about 4 weeks from hoyt") so I changed it to a black 40# 58" bow. In the end, I may have wound up painting the siver riser anyway because I may have wanted the limbs and the riser to match, so it worked out for the best I think.

anyone happen to know of a good paint to use that won't crack on the limbs of the bow?
 
Alright, so the bow arrived, and the string is too long. go figure. Next, the carbon fiber vinyl arrived, and the lines are going the wrong way. I'll have to order a 60"x60" piece just to cut it the way I want I guess.

Anyway, I'm getting a new string direct from the factory, and I got a head start on painting this. I painted the sides of the limbs and the grip, but I took one look at the painted grip and decided I have to do this the hard way. In the movie stills I keep seeing, it looks like they actually kept the bare aluminum riser. I didn't believe it at first, but in the production captures, I can definitely see that sheen that aluminum has. So, I'm gonna hand sand all of the paint off of the riser. It's a rough textured powdercoat too, but I don't have enough stripper to drop this 19" riser in to strip it, plus, I'll wind up sanding it after it's stripped just for the right texture anyway.


There's the original length of the string


and there it is looped at both ends to eat up the slack


painted


My sister was holding the bow limb for me while I took a picture to load into my 3d modeling software so I could trace these complex curves.


There's no substitute for bare aluminum.


about 10 minutes of sanding


getting ready to 3d model the add on piece


and there's the 3d model over the screencap. For some unknown reason, my 3d modeling software pixelates the images when I zoom in way before it should.


same piece against the picture of my bow


didn't take me that long to model. Maybe an hour last night after I came in from the shop. Just need to model the covers for the proprietary quiver holes and have the lot 3d printed. I'll need 2 of the covers I showed above. One for the top and one for the bottom of the riser.

I'm also probably going to take this in and have the stabilizer hole tig welded over to match the prop. They probably just omitted the piece for the prop, so I'm going to try to grind it flat and then have it filled in with weld so I can give it a perfect, homogenous finish. I almost feel bad doing that, but even if I do use this bow, it's not like I'm going to go hunting or competing with it. It's first and foremost a movie prop, so accuracy is key.
 
finished polishing up the riser for the bow. I don't want chrome like finish, but I did go to 1500 grit wet sanded before polishing. The finish is identical to what I can see in the screencaps and b roll footage I've seen. I'm going to see the movie again tonight to be sure about one last detail (I'm not sold that the carbon fiber is actually what's used in the movie. It may only be the promo bow) and then I'll order my 3d printed parts and set this aside for a bit. Hopefully I'll also get some insight on the tip covers, since I can't seem to turn up any results that look anything like the ones used in the movie.


I also am double checking the shape of the 3d printed parts from the front (I'm not sure if mine is too round or spot on yet) but this is coming along nicely. I only painted the sides of the bow limbs, and so far there has been no cracking in the paint from stringing or drawing back the bow (haven't fired it since I don't have any arrows yet, and dry firing a bow is about the worst thing you could do to it).
 
Still working on this a few minutes at a time. 3d printed parts have been ordered and will probably take 2 weeks to arrive. The models were tweaked heavily from what I posted above (I just don't have a picture of the new one on photobucket) and I should point out that 2 separate pieces had to be made as the top and bottom of the bow aren't completely symmetrical. Also, I took this in to the shop to have the stabilizer hole filled in (turns out that it's a threaded part on the outside, so a screw extractor will take it right out). I'm 99% sure that they just asked for the bow to come unpainted and without that extra hole straight from hoyt, but being that I'm not a movie producer, I don't get special treatment like that. Anyway, here's the end results of that.


Can't tell where the hole was? Good, that's what I was going for. :)


A good shot confirming the carbon fiber pattern (and yes, it's consistent throughout the film, this is just the easiest shot to see it in).


A good shot showing the shape of the hardware covers at the base of the limbs.


That's a good shot of the tip covers that the bow uses


A good shot of the arrow tips


This one shows serration on one side of the arrowhead.

From the top picture, the tip covers appear to be nothing more than some seriously heavy duty heatshrink. It looks like the very tip is still exposed in that shot. I thought about heatshrink before due to how the material appeared, but I never saw that hole in the top, so I didn't think it was possible.
 
what are you doing for the carbon fiber? I thought I saw you mention carbon fiber vinyl? you should take a look at hydro dipping .. look up mydipkit on youtube.. I think it would make it look cleaner...
 
Yeah, I'm sticking with the vinyl. it looks absolutely perfect and comes out absolutely clean, even around edges. Just needs some heat from a hair dryer and it will stretch perfectly, but it doesn't look warped when it's done. I wrapped my phone backing last night just to see what was possible, but I'm still waiting on my 60"x60" roll to arrive to do the bow limbs. The seller ignored my messages requesting that the 12"x60" roll be cut the other way (and didn't even have the courtesy to tell me that it wouldn't be right) and I got stuck with a roll of the wrong stuff.

I'm almost 100% sure this is the same stuff they used in the movie. The pattern is exactly the same. They figured an all silver bow looked crappy when the handle was polished and the limbs were painted, so they put this stuff on just the front and back of the bow limbs. You can even see a small separation line between the added covers at the base of the limb and the limb itself, which tells me they even put carbon fiber vinyl underneath that cover, and then decided they needed to make it (hence the defined separation line, you can easily see the black edge of the vinyl between the parts). The pattern is the same throughout the front and back of both limbs.


I just emailed easton to see if they will help me identify the nock and whether or not the arrow shaft is stock or uses their bushing system (both the stock arrow and the super "whatever" bushing that they offer look just like the prop).

The arrow tip company got back to me within 3 minutes of my email yesterday, and they said they will provide pictures of all 4 broadheads in the range that I've found next to each other so I can see the actual shape (and not the crappy angle that the store photos show) and determine which tip was the right one.
 
Carbon fiber vinyl arrived today. I'm really mad at the seller, because my first roll was cut oppositely of my second roll (which I ordered in 5'x5' so I could cut it either way), and if the first roll (12"x5') had arrived the same way as the second, it would have actually worked. Forgive the screw bumps, but they will be covered when the 3d printed parts arrive from shapeways.


my parts from shapeways will be in next week (or maybe early the week after), but until then, I'm working on finding the fabric for the quiver. I pretty much know what the arrows are (minus the fletching) and once I find the length, I'll just need to figure out the quiver. It looks to be made of two different types of fabric. I don't have a good shot of the front yet, but the first step is finding the fabric. I've never had to find a fabric before, so I'm kind of at a loss on how to go about it. I did find one site that looked like it had some pretty close stuff, but they don't take paypal. :(

Black Gabardine Fabric - $4.85 | onlinefabricstore.net

40 Denier Black Nylon Tricot Fabric - $7.1 | onlinefabricstore.net

Black Bull Denim Fabric - $7.75 | onlinefabricstore.net

and the strap

Black 600x300 Denier Recycled PVC-Coated Polyester Fabric - $3.85 | onlinefabricstore.net

again, I know nothing about fabric, and I'll probably be having someone sew this for me, but just locating the fabric is probably going to be the hardest part. Plus, the trim around the edge of the strap is really weird. The thread doesn't go through it at all, at least not from the top. I can get a piece of aluminum for the top and bottom trim and make some wood inserts like nothing, but the fabric is gonna take some time. If anyone has any ideas where to start, it would really be appreciated. Me trying to search for a fabric is like a 5 year old trying to find a book in a library.

http://i1099.photobucket.com/albums/g384/agordon117/hgcf15_zpsaffc0bde.jpg]
 
Last edited:
By the looks of the photos, the arrows aren't fletched. They have plastic vanes. Pretty standard on modern carbon and aluminum arrows. My guess is that they are 4" parabolics. Several manufacturers make them. Plastifletch has similar ones in all black with no writing, barring or color splashes.
 
the shape is exactly right on the FFP-250, but I have a really hard time believing they are only 2.5" long.

Flex Fletch FFP Vanes

Looks like I'm going to have to individually find every company that has ever made vanes until I find the right one. *sarcastically* yay!
 
found the correct fletching, and pretty much everything else. I've made wooden inserts for the top and bottom of the quiver, as well as the metal trim pieces. I've got 2 yards by 60" of 1000d cordura nylon on order as well. The only thing that's got me stuck still is the heatshrink that's used on the ends of the bow limbs (having trouble finding stuff with no logos that's matte black and strong enough to hold the string in place) and the buckle piece on the quiver (shown below). The main strap looks to have no buckle, but the waist strap has some kind of slider that I can't seem to identify. If anyone has any clue what that is, I'd really appreciate some help with it.


Also, the shaft of the arrow she shoots is 34.5" in most scenes (not including the tip or nock) and the entire quiver is only 32" long from bottom of quiver to top of the nock on the arrows. I hate actual propmakers sometimes. Just please, once give me some consistency and don't freaking make me choose between accurate in the quiver and accurate when drawn. Is that too much to ask?
 
The only thing that's got me stuck still is the heatshrink that's used on the ends of the bow limbs (having trouble finding stuff with no logos that's matte black and strong enough to hold the string in place)
Can you pull heat shrink tubing inside out and still shrink it down?


Sent from my Nexus 4
 
Alright, it's update time. So, my arrows arrived, and I immediately began trying various things on the logos to remove them. My paint/powdercoating stripper turned out to be the winner (I had read that it would damage anodizing, but I figured if I have to send them to get re-anodized, no big deal. It wound up working fine, but I didn't soak the arrows in it for any extended period of time). The logos are completely gone, and the entire arrow is the same black (purple) anodized color. I also shortened the bezels for the nocks since the ones in the movie had shorter bearings and I installed the nocks. I don't think I'm going to sand the logo off of the nock. seems like a lot of work for a detail as small as that (the logo on the shafts was a different story, however).

I made the wooden inserts for the top and bottom of the quiver, and made the aluminum bands that will go on the outside. As luck would have it, I was going to surprise my sister with a mockingjay pin from neca, and simply told her that I had a surprise for her. She then happened upon the book that has all of the production shots in super high quality, and decided to surprise me with that. That book supplied clear shots of the buckle for the lower belt on the quiver (it's a 1" standard cobra buckle in shiny black, turned backwards) and the attachment points for the straps themselves to the quiver.

Part of my shapeways order arrived (the top piece) and I immediately painted it and applied the vinyl. I couldn't be happier with how this is turning out.


one arrow with and one without the logo


the movie book


my part from shapeways


the original vs the shortened length of the nock bezel. I'm sure they used two different size arrows in the movie (one for actually drawing back and one for fitting nicely in the quiver), so this modification wasn't needed for the production staff. The smaller arrows that are in the quiver probably came with the shorter bezel whereas mine had to be shortened as I want the actual quiver arrows to be usable and as accurate as possible.


the skeletal view of the quiver. Obviously the metal trim rings will be squeezed into their final position prior to installation on the quiver. I just didn't want to do it before I know how thick the fabric will be. Only in one spot in the movie can I see black trim rings instead of silver, so it's no question these will stay silver.


Looking pretty sweet if I do say so myself.


and the buckle.

I'm ordering the buckle right now and some heatshrink (found some double wall stuff that's got a 3:1 ratio for shrinkage with no logos. Standard heatshrink could be reversed, but not adhesive lined). Still waiting on the broadhead company for the pictures to determine which head was used in the movie. I'm probably only going to end up with 3 of them since they won't work in the quiver, and if I took out the insert, they would scratch up the shafts on the way in and out of the quiver. What's the point of a dozen arrows for display if they won't fit in the quiver right?
 
wow really really nice work :) on the CF vinyl.. is it a sticky back? how does it adhere?

The vinyl does have an adhesive back, and by heating it with a hair dryer, you can force it to adhere to the rounded edges.

Thanks for the compliments. The quiver fabric arrived, but i haven't had a chance to look at it yet. Hopefully I can get it set in motion this week. The good thing is that it's a pretty simple thing to sew, even if the fabric is tough. I also fletched the arrows. I give myself a B+, but the ones that I'm not happy with are just gonna be redone. More to come soon. I just haven't taken any pictures of the progress i've made in the last day or two.
 
Back
Top