Kandosii
New Member
Hey folks!
Some of you may have seen the FB post I made of this project, but I want to post here as well because it’s sort of a better way to keep updates together!
So about a year ago I decided I wanted to try and make some metal Mandalorian armor. Bought a printer and started play around with it.
Looking around I wasn’t able to find anyone else that had casted Mandalorian armor and didn’t have anything to go off. But after a year of failures, fires, and other calamities, I was finally able to make it happen.
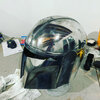
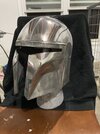
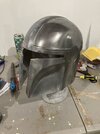
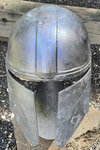
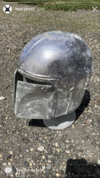
So here it is. Solid cast aluminum Mandalorian Helmets.
The cast came out well, and now I’m going to play around with finishing it. I’ve got a little bit of porosity on this one, but I’m going to try and fill it, and prime it, then blend it into the polished metal by using Duralumin over it.
Stay tuned for more!
Some of you may have seen the FB post I made of this project, but I want to post here as well because it’s sort of a better way to keep updates together!
So about a year ago I decided I wanted to try and make some metal Mandalorian armor. Bought a printer and started play around with it.
Looking around I wasn’t able to find anyone else that had casted Mandalorian armor and didn’t have anything to go off. But after a year of failures, fires, and other calamities, I was finally able to make it happen.
So here it is. Solid cast aluminum Mandalorian Helmets.
The cast came out well, and now I’m going to play around with finishing it. I’ve got a little bit of porosity on this one, but I’m going to try and fill it, and prime it, then blend it into the polished metal by using Duralumin over it.
Stay tuned for more!
Attachments
-
 D93FAA4D-45E5-407D-B48B-3A0242261C58.jpeg2.5 MB · Views: 822
 -
 FFEAB942-B001-4C5F-8496-EA177A5CE42D.jpeg1.8 MB · Views: 578
 -
IMG_4210.MP415.4 MB
-
 6D006D65-B0AB-4E30-9539-6151BC98C75D.jpeg1.4 MB · Views: 619
 -
FullSizeRender.mov43.5 MB
-
 3FAE2410-0B7C-4F95-AAD6-B602185BB5A5.jpeg495 KB · Views: 541
 -
 7FEC08E0-7734-41B2-B23E-496972F1164A.png4.4 MB · Views: 618
") Fill us in, and keep working on it!
Fill us in, and keep working on it!