Callahan Full Bore Auto Lock Build

I think I'm also going to try just using a really thinned out metallic lilac over a silver base and then gloss clear over that and see what that looks like. unfortunately there's not much i can do about repainting the barrel as it would be really hard to mask every slot in it before repainting but I might even do that if I can get the lilac to look right
 
so I decided to spend the day to try an fix the lilac color on the barrel block. JOATRASH FX's comments about the liliac color helped to reverse my thinking that it wasn't "that bad" and so I needed to do something about it ...
Not sure the pics do it justice but I manged to get this really nice anodized aluminum color like I did for the blue on the magazine. It really looks good and changes the entire look of the piece.
Still not sure I want to tackle masking off every hole in the muzzle brake so I can repaint it to be more aluminum than chrome but we'll see once I get everything else completed. I've managed to get all the bolts I need at Ace except for a threaded female rod to be able to bolt the vertical picatinny butt rail to the back of the shell carriage rail. I'll have to get that from Amazon. I'm aso happen to have a 2nd picatinny rail 3D printed and so I'm going to paint that gloss black & then a silver/chrome to try and make it look aluminum by not adding a gloss clear after the black as JOATRASH FX says and a much lighter chrome finish as well ...
 

Attachments

  • lilac fix.jpg
    lilac fix.jpg
    3.5 MB · Views: 20
  • lilac fix1.jpg
    lilac fix1.jpg
    2.9 MB · Views: 19
That lilac looks very nice!

My chrome vs aluminum methods (mainly with Alclad or Alumaluster paints) are virtually identical. The only difference is that with aluminum, I lightly scratch the surface of the gloss undercoat with a 1000 or 800 grit wetsanding paper. I don't dull it completely, just add a little "brushing".

When I get around to it, I'm going to try mixing in transparent "heat" colors from Alclad with their chrome. They have both blue and purple tints.
 
Thx! I'm really glad you "suggested" I redo it ...lol. I was wondering how to get that brushed aluminum look so I'm going to do some testing with your sandpaper technique to see what I can produce.
I used their burnt carbon over their chrome to show heat scoring on the ports of my Mandalorian heavy infantry tri barrel and it gave a nice effect
 
This is what the effect looks like. The idea is that machined aluminum usually isn't mirror-polished, but still has evidence of tooling.

When you scratch with the wetsanding paper, do it in ONE direction, straight motions, and VERY lightly. You don't want to take away all the gloss... just add some light surface damage to emulate the tooling from a CNC.
Jan252024import 079.jpg


boo2.jpg
 
Thx! So let me make sure I have the sequence correct ...
Gloss black
Alclad mirror chrome not too heavy
Gloss clear (what brand? Alclad?)
Wet sand lightly with 1000 grit in one direction
 
Not quite:

  1. Gloss black
  2. Wet sand lightly
  3. Alclad Chrome (misted)
  4. Urethane-based clear. There are different brands. Vallejo even makes a water-based variant. For a 2-component (also called a 2K), which is extra durable, I use House of Kolor UC35. (Note that auto paints need more safety precautions... breather masks and so on.) You can also use Alclads "Aqua Gloss". If you're not going to "troop" with your Vera, I would recommend AG, as it goes on very thin and isn't too glossy, making the most realistic appearance... the above photos have AG. The downside is that, while you CAN handle the props, it's not very durable.
 
thx! I've already been using the Alclad aqua gloss & like how it goes on with an AB.
So the wet sanding in one direction with 1000 grit to get the machined aluminum look is done over the black & then just mist the chrome over it?
 
thx! I've already been using the Alclad aqua gloss & like how it goes on with an AB.
So the wet sanding in one direction with 1000 grit to get the machined aluminum look is done over the black & then just mist the chrome over it?
Yes, exactly. The aim is to get a surface that is "striped" (with scratches) where the scratched "stripes" have lost their gloss, but the other ones are still glossy. Obviously, using 800 or 1000 grit the scratches are so thin you can barely see them with the naked eye. That's what creates the look of tooling/machining marks

Another thing you can do is experiment with undercoats... like using a grey of white gloss undercoat instead of a black one. (Aluminum is in some ways a "brighter" metal than chrome or steel.)
 
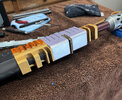
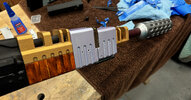
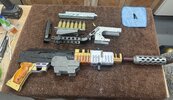
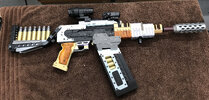
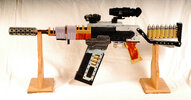
Some more progress while I wait on the final steps from recovering from some buffoonery on my part ...
First came when I was attempting to attach the shell carrier to the carrier rail. To ensure the best possible bond you always want to have bare plastic to plastic for CA glue. After removing a painted area to make the bond while test fitting i saw that a part of the rail would be exposed that I didn't think would be and so i had to re prime, re paint & re clear that piece. The 2nd came when i was doing the same thing for the magazine and after exposing a nice edge of bare plastic on the top I realized it wasn't the top but the bottom! So then I had to mask that area, re prime, re sand, re paint & re clear that. All that is done now & tomorrow I can re clear each piece and get on with final assembly ...
 

Attachments

  • IMG_1126.jpeg
    IMG_1126.jpeg
    815.8 KB · Views: 22
If you're printing with PLA, I strongly recommend using acrylic cement (plexiglass glue). It bonds PLA pretty much like model glue does with styrene. CA is (at least to me) much too brittle to use on larger props.
 
If you're printing with PLA, I strongly recommend using acrylic cement (plexiglass glue). It bonds PLA pretty much like model glue does with styrene. CA is (at least to me) much too brittle to use on larger props.
Hmmm ... I've always wondered about that. I need to look into that for the last few pieces, particularly the magazine, thx!
 
Hmmm ... I've always wondered about that. I need to look into that for the last few pieces, particularly the magazine, thx!
I've been using it since I started with PLA, around 2012. Have yet to find anything that can match it. (Though I've heard that chloroform... yes chloroform can be used as well, but I've never seen it tested!)

Aside from that, some of the best stuff I've used is JB Weld Plastic BONDER (not "plastic welder") on painted surfaces and resin prints (when your parts are too thick for uncured resin+UV light). It stays just a little, tiny bit flexible when it cures, so that it can take 'shocks' well, plus you can still sand it. CA glue has great pull-strength, but cracks easily under stress- especially if you use kicker because that introduces micro-fractures in the bond.
 
I'll look into the JB WEld stuff as well. I've noticed that too about CA glue and try to avoid using accelerant whenever possible
 

Your message may be considered spam for the following reasons:

If you wish to reply despite these issues, check the box below before replying.
Be aware that malicious compliance may result in more severe penalties.
Back
Top