Solos blaster
Sr Member
Well, I've finally been able (after many, many years of wanting one) to build a Proton Pack! Like many other fans, I wanted one since I first saw Ray power up Egon's Ghostbusters as a kid. This is going to be a long and slow build, for 1: parts and doing it right and 2: I don't have much free time in my job. As far as I've gotten now is only happened over Christmas because I was on leave and their were no students.
I plan to do a GB1 Hero build with full lights and sound. I am also a newer member on GBfans and have read and continue to read the tons of builds for months before starting.
Now for the(just starting) progress pics!
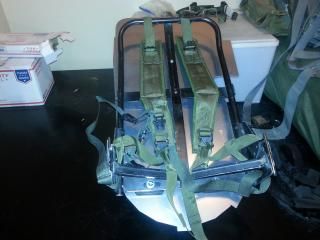
I bought the straps off of ebay, the correct LC1 quick release strap and waist strap. The waist strap is plastic though but it works as a stand in until I can get a metal one. I live on a military base so off post there were plenty of surplus stores to check for the right LC1 Alice pack and sure enough I found one in pretty good shape. It was torqued a bit at an angle(may even have been run over at some point), but I was able to straighten most of it out and then once mounted that took care of what little was left.
I didn't start taking pics until I was almost done, so sorry for lack of them but for the spacers, I liked the idea of using the hockey pucks for them so I bought a set of 3 off ebay and went to work cutting them up to the sizes for the spacers seen in screencaps. I already have the bottom two on and here I think I just finished with the half moon spacer, or just finished tapping the hole for the center one.
I only had a hacksaw to use so I gave a little "extra" on the edges and then cleaned them up with my dremel. I still need to do a little more cleanup on the bottom two as I paid more attention to the half moon and getting a nice "trough" for the curve in the middle of the frame to fit into. Not the curve of the frame either, I mean the metal hump that runs up the middle of the frame.
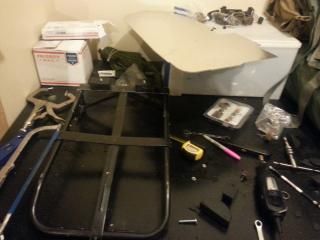
I tapped the the hole in the frame using just a hand powered tap and die set and I worked up from a 1/6"bit to 1/8", etc up to the 1/4". This wasn't as hard as I thought it would be and though it was slow going, I didn't mind lol. I need to replace the battery for my drill though as it's long since died and will not charge anymore.
Afterwards, I put on the straps, all except the kidney pack that I still need to buy the correct LC1 verison.
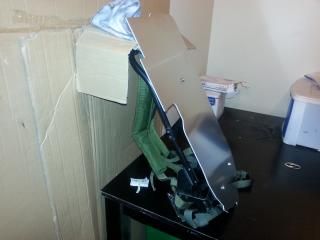
And well, here she sits, just the Motherboard mounted to the frame, until I get a shell. I will continue to buy parts here and there though so that once I do get my shell I can continue to work at slowly and surely. You can see the few boxes of parts I have collected and consolidated together in the background on my "workbench".
I bought 1/4-20 bolts. 2" and 3" versions. I think I might use either the 3" or the 2.5" for the bottom though so I can mount the speaker on them. I wasn't sure how long they should be and they just barely thread the nuts completely.
I guess that's it. I wish I had taken more pics while I was doing but I guess you just get so wrapped up in doing the steps you forget to take them lol. I can't wait to continue to build on this as much as I can't wait to power it up for the first time once complete.
Thanks for reading!
I plan to do a GB1 Hero build with full lights and sound. I am also a newer member on GBfans and have read and continue to read the tons of builds for months before starting.
Now for the(just starting) progress pics!
I bought the straps off of ebay, the correct LC1 quick release strap and waist strap. The waist strap is plastic though but it works as a stand in until I can get a metal one. I live on a military base so off post there were plenty of surplus stores to check for the right LC1 Alice pack and sure enough I found one in pretty good shape. It was torqued a bit at an angle(may even have been run over at some point), but I was able to straighten most of it out and then once mounted that took care of what little was left.
I didn't start taking pics until I was almost done, so sorry for lack of them but for the spacers, I liked the idea of using the hockey pucks for them so I bought a set of 3 off ebay and went to work cutting them up to the sizes for the spacers seen in screencaps. I already have the bottom two on and here I think I just finished with the half moon spacer, or just finished tapping the hole for the center one.
I only had a hacksaw to use so I gave a little "extra" on the edges and then cleaned them up with my dremel. I still need to do a little more cleanup on the bottom two as I paid more attention to the half moon and getting a nice "trough" for the curve in the middle of the frame to fit into. Not the curve of the frame either, I mean the metal hump that runs up the middle of the frame.
I tapped the the hole in the frame using just a hand powered tap and die set and I worked up from a 1/6"bit to 1/8", etc up to the 1/4". This wasn't as hard as I thought it would be and though it was slow going, I didn't mind lol. I need to replace the battery for my drill though as it's long since died and will not charge anymore.
Afterwards, I put on the straps, all except the kidney pack that I still need to buy the correct LC1 verison.
And well, here she sits, just the Motherboard mounted to the frame, until I get a shell. I will continue to buy parts here and there though so that once I do get my shell I can continue to work at slowly and surely. You can see the few boxes of parts I have collected and consolidated together in the background on my "workbench".
I bought 1/4-20 bolts. 2" and 3" versions. I think I might use either the 3" or the 2.5" for the bottom though so I can mount the speaker on them. I wasn't sure how long they should be and they just barely thread the nuts completely.
I guess that's it. I wish I had taken more pics while I was doing but I guess you just get so wrapped up in doing the steps you forget to take them lol. I can't wait to continue to build on this as much as I can't wait to power it up for the first time once complete.
Thanks for reading!