Building my 1/144 Bandai Falcon in preparation for the 1/72 PF Falcon

skahtul

Sr Member
RPF PREMIUM MEMBER
Last year for Christmas I picked up the 1/72 PF Falcon from Bandai. I was so excited, I couldn't wait to build it and paint it... As soon as I opened it I realized that not only did I have no idea what I was doing with a model like this, I had no business in even attempting this model... It was too much for me. I had not built models since I was a kid (and that was a looooooong time ago). And even the ones I did built I never patined, I was always afraid to mess it up.

Anyway, fast-forward almost a full year, and I have been building all of the Bandai models this entire time. I started with the X-Wing and I have built over half of what Bandai offers, the other half is sitting on my shelf, including the new Star Destroyer (still not sure what to do with the clear parts..) waiting to be built. I have been watching other modelers on Youtube and of course a lot of perusing the forums here looking for ideas. I felt that the time was right and that I had gleamed a tiny amount of skill to take on the small falcon.

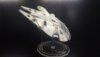
Below is my 1/144 Falcon build, this was basically a test to see if I was ready to build the big brother. Now that the weather is turning cold where I live, I can spend some serious time with the 1/72 which I am looking forward too!

Here is my first post on this amazing forum, be nice to the noob :)
 
Last edited:
Once assembled, here is the basic process I followed:

Primed with Tamiya Fine Surface Primer
Used Tamiya XF-1 black to pre-shade (I think in the 1/72 I will individually shade the panels, but at this scale, this method worked for me)

1.jpg
 
Last edited:
Once that was dry I used a combination of XF-2, XF-55 and a touch of XF-53 for the base color. I have only used an airbrush a hand full of times, so I am still getting the hang of it.
3.jpg
4.jpg
5.jpg
6.jpg
2.jpg
 
Once I let the base coat dry for a few days, I hit it with a few light coats of Tamiya TS-13 in preparation for adding the decals. When I get to this stage on the 1/72 build, I will paint all the panels instead of the decals, but at this scale, for me, the decals seemed the way to go.

I used a liberal amount of Microsol and Microset to get the decals worked into the details. I never actually used this product before, it's pretty amazing and seemed to work really well.

Once all the decals were applied I proceded to 'chip' them a bit with a razor blade, which I think worked pretty well.

7.jpg
8.jpg
 
Last edited:
Once everything was done, I put a few more coats of the TS-13 clear to seal in all the decals. This is something I have done on previous builds and seemed to really help when it came time to weathering.

With the shading done, base coat on and the decals applied, it's time for weathering. Weathering has become my favorite part of building these models! I used to be afraid to paint them, now it's my favorite part of the process. The level of satisfaction you get from the finished product is tough to beat!

I used a combination of some of the basics to get my desired effect, Vallejo washes, various oil colors from Abteilung (these are my new favorite paints) and finished it off with some of the Tamiya weathering master kits.

As soon as I posted these pictures, I realized that I had gone way too dark on the engine 'stripes'. In the middle of this post, I broke out the thinners and toned it back, a lot, so I think the final product will look slightly better.


9.jpg
14.jpg
15.jpg
 
Last edited:
The last part of this build was to do some custom electronics, along with a few photoetched pieces for the interior of the cockpit. I wanted to light up the cockpit and the engines, but I don't want to take the lower cover off every time I want to light it up. If you look closely there is a key fob on the desk next to the shot of the engines. I wired up a wireless remote so that I can turn the Falcon lights on at any time, without taking it apart.

I also ordered a display that I feel works a lot better than the factory stand.

Towards the end of this week, when everything is 100% dried out I will put the two halves together and give it a coat of Dullcote. I will post the final pictures then.

10.jpg
11.jpg
12.jpg
13.jpg
 
I was browsing through the forums today and suddenly realized I never really posted any finished pics, so here they are :)

20200402_134225.jpg
 

Attachments

  • 20200402_134246.jpg
    20200402_134246.jpg
    2.4 MB · Views: 93
  • 20200402_134328.jpg
    20200402_134328.jpg
    2.7 MB · Views: 95
waouh ! well done !
really like the paint quite subtle. ;^)

I've started mine today due to covid confinement
At least something positive out of it ...
 
This thread is more than 4 years old.

Your message may be considered spam for the following reasons:

  1. This thread hasn't been active in some time. A new post in this thread might not contribute constructively to this discussion after so long.
If you wish to reply despite these issues, check the box below before replying.
Be aware that malicious compliance may result in more severe penalties.
Back
Top