Build: 1:1 Anovos Vader Statue

darthwhitey

Sr Member
RPF PREMIUM MEMBER
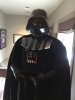
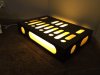
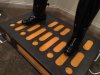
UPDATE: Added a couple finished pics here in first thread. More pics below...


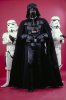
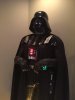
Encouraged by my good friend "Simmon M," here is a build thread on my 1:1 statue using (mostly) the ANOVOS Darth Vader armor.

I was excited to learn that Anovos was offering a FULL Vader ensemble for a reasonable price. I was confident that they'd deliver with an accurate suit and I've been very pleased so far. I should say at the start that I'm no Vader expert, but I've been a collector of life-size props for about 10 years now, and a huge SW fan my whole life. My goal is to have the most accurate Vader I can have.

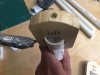
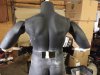
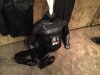
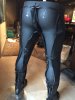
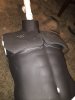
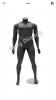
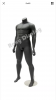
I sourced a headless fiberglass mannequin on eBay for about $265 shipped. The manny had a good pose, and was a good size to replicate David Prowse. At the very least it was a good starting point. The manny is almost 6' tall with no head. I estimated that with a head he would be about 6'6", which was Prowse's height. Once the Vader helmet is in place he will be about 6'9".

Shoulder:24''
Bust: 45"
Waist: 42"
Hip: 48.5"
Foot: 10.5"
Height: 71"

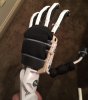
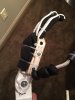
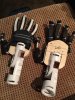
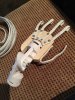
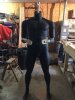
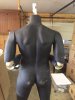
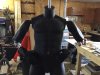
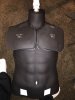
I decided fairly early that I wanted the "hands on the belt" pose for my Vader. I liked it for a few reasons. Firstly, it's a "power pose" that shows how awesome he is. Everybody does the hands at the sides Vader, because it's easy. You can can (mostly) do it with a regular manny. I was inspired by Gino to do better. Secondly, to capture this pose Vader has to have articulated shoulders, elbows, wrists and hands/fingers. With this in place, several other poses could be pulled off down the road.

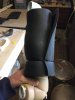
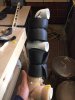
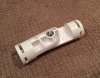
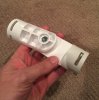
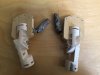
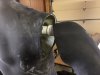
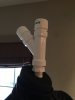
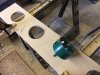
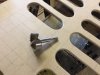
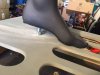
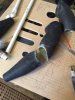
I began by taking off the hands. They are mostly garbage. Manny hands are terrible for realistic poses. They are small and the hand is in a weird position. Using a dremel, I cut the arms at the elbow joint and removed the "cap" at the wrist that attaches the manny hand to the manny wrist. So I basically deconstructed the arms so I could install a PVC skeleton...
 

Attachments

  • manny1.PNG
    manny1.PNG
    168.8 KB · Views: 333
  • manny2.PNG
    manny2.PNG
    186.7 KB · Views: 391
  • V1.JPG
    V1.JPG
    330.5 KB · Views: 378
  • F1.JPG
    F1.JPG
    1.7 MB · Views: 426
  • F3.JPG
    F3.JPG
    1.7 MB · Views: 923
Last edited:
Using 1" PVC, I began to build a "skeleton" for Vader's torso. Note: I would not need to do anything to the legs.

Mannequin Shoulders:

On a standard fiberglass manny, the shoulders allow the arm to move forward and back, but do NOT allow the elbow to move away from the side of the body.

I began the build hoping to use these standard shoulders. I cut sections of 1" PVC and wrapped them in yoga mat foam I had laying around. The foam isn't super hard, and was about 5/8" thick. I wanted something that would hold the PVC in the cavity of the arm.

I also cut a 1.25" hole in the top of the manny "neck" and slid a section of 1" PVC down it. This will be used later for the Vader helmet. :thumbsup
 

Attachments

  • V4.JPG
    V4.JPG
    573 KB · Views: 353
  • V3.JPG
    V3.JPG
    518.9 KB · Views: 246
  • V2.JPG
    V2.JPG
    568.8 KB · Views: 252
For the elbow bend, I used a really cool ratcheting PVC joint that accepts the 1" PVC pipe. You can tighten or loosen it with a wrench and control how tight it "ratchets" down. By playing with the tension you can keep it just snug enough to hold a pose even while it's supporting heavy clothing.
 

Attachments

  • J1.JPG
    J1.JPG
    491.8 KB · Views: 193
  • J2.JPG
    J2.JPG
    521.6 KB · Views: 188
These same ratcheting joints were used for the hands.

Hands are difficult to get to look just right. To me, they are one of the big "tells" that ruin the illusion and scream "Hey that's just a statue!" I know some guys sell rubber hands with wire inside. I've also seen some expensive but lifelike silicone hands on eBay. A couple years back I had some success making my own hands for a Darth Maul statue. I decided to take that design and improve on it where I could.

I cut out a "palm" shape out of wood and screwed it to the joint. I then used ROMEX electrical wire for the fingers. You need something that is flexible but will hold a pose and "grab" things. I added more of the yoga mat foam to flesh out the fingers, and added sections of it to the back of the hand. Using my own hand as a guide, I just played around with the positioning of the fingers and thumb. Remember, these will all be hidden inside the glove.

Note: The first two pics are my old design with no fingers and the old thumb in place.
 

Attachments

  • H5.JPG
    H5.JPG
    412.1 KB · Views: 254
  • H6.JPG
    H6.JPG
    505.7 KB · Views: 265
  • H4.JPG
    H4.JPG
    989.3 KB · Views: 257
  • H3.JPG
    H3.JPG
    1.1 MB · Views: 285
  • H2.JPG
    H2.JPG
    469.8 KB · Views: 220
  • H1.JPG
    H1.JPG
    527.8 KB · Views: 236
Test fitting the elbows, wrists and hands for proper position.

I suited up Vader to see how he'd look. It's hard to tell from the pics, but I had the forearm length too long by about 3". I also had the shoulder to elbow distance about 1-2" too long.

Also, you can see that by not having any shoulder movement (allowing the elbow to move AWAY from the body) makes him look like he's holding his elbows in too much.
 

Attachments

  • V9.JPG
    V9.JPG
    538.9 KB · Views: 378
  • V8.JPG
    V8.JPG
    563.7 KB · Views: 454
  • V7.JPG
    V7.JPG
    642.8 KB · Views: 290
  • V6.JPG
    V6.JPG
    524.1 KB · Views: 242
  • V5.JPG
    V5.JPG
    564.2 KB · Views: 279
FYI: I'm purposefully focusing on the pose and the skeletal and mannequin details now. I'll need help with tweaking the armor and costume in the very near future. :D

It became pretty apparent that I had to have full shoulder articulation. I would use two more of the ratcheting PVC joints in the shoulders. I got out out the Dremel again and cut a hole in the shoulder of the torso and each arm. This allowed me to install a "spine" down through the torso that both shoulders could then plug into, this also now holds the PVC that goes down through the neck. It basically makes a big "T" inside the torso of the manny, but with the "neck" attaching too. :lol If that makes any sense.

You can kind of get the idea from pic V12. I opened up an access hole in his lower back to add these PVC supports to keep it all rigid and secure.

Another test fitting...

Now that his elbows can move away from his body it's a much more natural look. This also gives me the ability to make subtle adjustments on the exact position of the hands on the belt much better than before.
 

Attachments

  • V14.JPG
    V14.JPG
    473.7 KB · Views: 265
  • V13.JPG
    V13.JPG
    1.5 MB · Views: 319
  • V12.JPG
    V12.JPG
    600.3 KB · Views: 258
  • V11.JPG
    V11.JPG
    1.9 MB · Views: 236
  • V10.JPG
    V10.JPG
    579.7 KB · Views: 219
Thanks guys!

Here are a few pics of "hands on the belt" poses. I've included Gino's great statue that was the prototype for the (sadly) failed Sideshow 1:1 statue. One of the pics is of the 1:6 scale HT figure, but I liked how his hands are on the boxes and not on his belt directly.

If anybody else has any cool pose ideas please post them! :thumbsup
 

Attachments

  • P1.JPG
    P1.JPG
    86.6 KB · Views: 264
  • P2.JPG
    P2.JPG
    371.7 KB · Views: 319
  • P3.PNG
    P3.PNG
    1 MB · Views: 273
  • P4.PNG
    P4.PNG
    2.1 MB · Views: 259
Cool progress. I would actually suggest altering the legs as well. Prowse rarely stood with spread legs. They were very much together, unlike Chris Reeve's Superman pose - and that was one of the things that gave him that particular look. Of course, it is not needed, but I think it would give it that extra *Prowse in the suit* look.
 
Cool progress. I would actually suggest altering the legs as well. Prowse rarely stood with spread legs. They were very much together, unlike Chris Reeve's Superman pose - and that was one of the things that gave him that particular look. Of course, it is not needed, but I think it would give it that extra *Prowse in the suit* look.

Yeah, great point. I wondered about that!

I'm trying to think about how this could be done!?
 
Time for more test fitting. Here is a picture of the Anovos body-suit. It's one piece. (Well, it WAS one piece.) I purposely ordered the XXL because I knew I'd be doing a statue, and I knew it would be Prowse size. I'm no tailor, but the body-suit is undersized. I'm 6'2" and 180lbs and it fit me. There was NO WAY it was going on this manny. I got out the scissors and chopped it up. (Yeah, I know)

I was able to squeeze the top on the torso of the manny, still a tight fit. The pants still didn't fit, so I cut them up the back of each leg and used velcro strips to hold them on the manny legs. Of course none of this is ever seen anyway with the cape, etc.

I also decided to beef up his chest area. Using more of the yoga mat foam, I cut out new pectoral muscles and velcroed those on. This helped the shoulder armor sit better.
 

Attachments

  • IMG_8494.JPG
    IMG_8494.JPG
    691.8 KB · Views: 252
  • IMG_8501.JPG
    IMG_8501.JPG
    656.4 KB · Views: 247
  • IMG_8509.JPG
    IMG_8509.JPG
    823.5 KB · Views: 222
  • IMG_8510.JPG
    IMG_8510.JPG
    743.8 KB · Views: 231
Here's a shot of the "head." I went with 1.5" PVC here and added some extra support so the helmet doesn't fall off.

I got the boots on eBay for about $50. Nothing fancy, but they are hardly seen and I knew I had to drill through the bottom of one. I didn't feel comfortable drilling through $300 super accurate Vader boots and potentially screwing it up! Drilling the hole was harder than I thought, these things have a thin piece of metal in them! Maybe all shoes do?! Anyway, after trying a couple different bits I got through, and amazingly I was spot on. I used a 1/2" bolt (about 8" long) from Home Depot and anchored it up through the stand. Then just slid the foot down over the bolt.

I also went ahead and bought some felt with adhesive backing for the bottom of the shoes. I didn't wanna ruin the nice finish on my stand!
 

Attachments

  • IMG_8492.JPG
    IMG_8492.JPG
    488.7 KB · Views: 173
  • IMG_8496.JPG
    IMG_8496.JPG
    968.9 KB · Views: 253
  • IMG_8499.JPG
    IMG_8499.JPG
    744.6 KB · Views: 166
  • IMG_8497.JPG
    IMG_8497.JPG
    832.5 KB · Views: 164
The Carbon Freezing Chamber Base:

Several people have done these over the years with great success. I've been keeping a watchful eye on design ideas and tutorials. I'd like to give a big shout out to MATTY MATT over on The Dented Helmet Forum for his tutorial which really helped me with this one!!

I chose to make it in 1/2" MDF. I used this stuff before on my HIC and was familiar with how to cut, sand and paint it. I also tend to overbuild the hell out of everything and I wanted something solid. I tried to not only incorporate the carbon freeze chamber floor in the design, but also the face of the stairs. These used a bigger hole and I liked the difference in scale from the top of the base.

The base is 24.5" deep x 36" wide x 7" tall. A normal stair step rises 7", and from looking at the reference pics this looked about right.

The holes in the top of the base were drilled with a 2" "Forstner" bit. With trial and error (and help from Google) I found this style of bit to work wonderfully. When drilling through 1/2" material like this a regular bit will bind up and won't work as well. With this many holes this Forstner bit was great.

The bigger holes in the stair step face were done with a 4" hole saw bit.

After the holes were drilled, I used a jigsaw to cut out the straight lines. Take your time and go slow. This is very tricky to get right. I'd recommend a couple test runs on scrap board.
 

Attachments

  • IMG_8112.JPG
    IMG_8112.JPG
    211.9 KB · Views: 196
  • IMG_8116.JPG
    IMG_8116.JPG
    525.2 KB · Views: 236
  • IMG_8125.JPG
    IMG_8125.JPG
    675.7 KB · Views: 193
  • IMG_8126.JPG
    IMG_8126.JPG
    532.6 KB · Views: 193
  • IMG_8129.JPG
    IMG_8129.JPG
    532 KB · Views: 197
  • IMG_8313.JPG
    IMG_8313.JPG
    534.6 KB · Views: 199
I found some 1/8" orange acrylic sheets (acetate) on eBay. I ended up using tiny screws to attach them to the MDF. I thought about adhesive, but I didn't want to risk getting it on the acrylic. I experimented with a few different thing to diffuse the light, but ended up buying a few sheets of a paper material I found at Hobby Lobby in the Art Department. It's pretty thick paper with a milky appearance. It worked great. I ended up using double-sided tape to attach the paper to the acrylic.

Obviously there are many different ways to light this thing. I found some "under cabinet" LED lights at Home Depot or Menards that were 24" long. I built a little frame to hold them up under the base. They have two settings, low and high.

Most people just paint these bases black. I've seen a few that are different shades of grey. I went with more of a oily brown look. I wanted something that would contrast with all of the black in Vader's duds. Plus the flooring in ESB has that brownish, oily look. After a couple coats of primer, I used a Rust-Oleum Metallic Oil Rubbed Bronze spray paint. I finished it off with a couple coats of clear protectant, and then hit it with a black (watered down) latex wash to dull it up and give it some grime.
 

Attachments

  • IMG_8477.JPG
    IMG_8477.JPG
    752.3 KB · Views: 226
  • IMG_8318.JPG
    IMG_8318.JPG
    638 KB · Views: 199
  • IMG_8309.JPG
    IMG_8309.JPG
    571.8 KB · Views: 199
  • IMG_8487.JPG
    IMG_8487.JPG
    650.5 KB · Views: 220
  • IMG_8307.JPG
    IMG_8307.JPG
    586.5 KB · Views: 213
  • IMG_8489.JPG
    IMG_8489.JPG
    462.7 KB · Views: 213
  • IMG_8503.JPG
    IMG_8503.JPG
    545.6 KB · Views: 236
A few thoughts on the Anovos ensemble...

All the hard parts are great. They seem well made and durable. They have really nice finishes inside and out. The electronics on Vader's chest and belt are powered with 9v batteries, which I think will last a long time.

I'm curious what others say about the cape and how it attaches to the shoulder armor? The cape has three snaps that attach to snaps on the armor. This is a great design and makes it easy taking the cape on and off the armor, but I feel like this limits how you can display the cape? Most pics I've seen of Prowse as Vader the cape comes DOWN OVER the shoulder bells? With the Anovos cape it's impossible to get that look. Anybody else had this issue?

I was a little disappointed with the bodysuit. For a bigger guy there is NO WAY this thing will fit. I ordered the "pleather" version and it suits my needs now. My guess is that I will upgrade to a leather suit down the road.

All the soft parts are nicely made as well. They have a great look and finish to them.

The Anovos gloves seem a little cheap to me. They feel kind of plastic. These came in XXL size and they are HUGE! I ended up ordering a pair of leather gloves from MAGNOLI CLOTHIERS. Indy is always great. Fast shipping, great communication and awesome workmanship. I ordered Large glove and they fit me, but I probably will upgrade to XL gloves that seem more Vader like.

I think Anovos really scored BIG with this Vader ensemble. Being in this hobby for awhile I've seen what guys pay for Vader stuff. Anovos offers an accurate product for a great price. Really pleased with the purchase.
 
Last edited:
This thread is more than 4 years old.

Your message may be considered spam for the following reasons:

  1. This thread hasn't been active in some time. A new post in this thread might not contribute constructively to this discussion after so long.
If you wish to reply despite these issues, check the box below before replying.
Be aware that malicious compliance may result in more severe penalties.
Back
Top