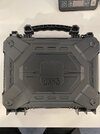
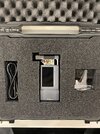
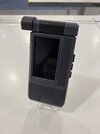
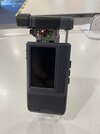
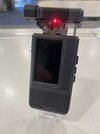
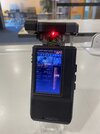
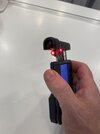
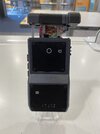
Blade Runner 2049 Voight Kampff Eye Scanner Tutorial / Buildup

Hi all, now finished :cool: I have slightly modded and added mesh to the back plate holes and cut out the front speaker hole and added mesh also. I have also painted and added the stand base to a pistol case to make it look more police departmental. I just want to say a huge thank you to Joe for bringing this amazing prop to real life and for all of his help and advice during the build. This was certainly the most challenging project that I have built so far but am very pleased that I have managed to finish it.


Attachments

  • IMG_3259.MOV
    12.8 MB
  • IMG_3250.JPG
    IMG_3250.JPG
    1.5 MB · Views: 165
  • IMG_3253.JPG
    IMG_3253.JPG
    3.7 MB · Views: 152
  • IMG_3254.JPG
    IMG_3254.JPG
    1.4 MB · Views: 154
  • IMG_3255.JPG
    IMG_3255.JPG
    1.4 MB · Views: 146
  • IMG_3256.JPG
    IMG_3256.JPG
    1.4 MB · Views: 165
  • IMG_3257.JPG
    IMG_3257.JPG
    1.6 MB · Views: 157
  • IMG_3260.JPG
    IMG_3260.JPG
    869.9 KB · Views: 165
  • IMG_3258.JPG
    IMG_3258.JPG
    1.5 MB · Views: 153
Hi all, now finished :cool: I have slightly modded and added mesh to the back plate holes and cut out the front speaker hole and added mesh also. I have also painted and added the stand base to a pistol case to make it look more police departmental. I just want to say a huge thank you to Joe for bringing this amazing prop to real life and for all of his help and advice during the build. This was certainly the most challenging project that I have built so far but am very pleased that I have managed to finish it.

Fantastic work on this prop! Really quite well done and such a cool piece to display. Thanks for sharing.
 
OK, it's been nuts behind the scenes, but I finally have time to show a full buildup of my 'final' version of this. Here we go. Apologies if I repost a photo or two that has been seen before.

First, let's kick off where we left it... METAL PARTS!
View attachment 1456286

Overall really happy with how these turned out.

Test-fitting to a shell:
View attachment 1456287

The laser took off maybe 0.3mm more than I thought it would, but it's fine. (The holes are not uneven... it's just he burn marks from the laser causing that illusion.)


Assembling the main popup arm. Making sure the plastic guide block slides freely.
View attachment 1456290

Glueing the buide block to the aluminum arm:
View attachment 1456291

Trimming the thin steel plates.
View attachment 1456293


Time for some paint!
View attachment 1456288

I gave the shell a black base coat (to stop any light bleed-through), then hit it with a bright metallic. Some "liguid green stuff" takes care of any places that need smoothing.
View attachment 1456289

Dark gunmetal on the back plates, then decals, then a satin clear coat.
View attachment 1456292

More to come!
So much engineering! Your work is breathtaking. Thanks so much for sharing your project!
 

Your message may be considered spam for the following reasons:

If you wish to reply despite these issues, check the box below before replying.
Be aware that malicious compliance may result in more severe penalties.
Back
Top