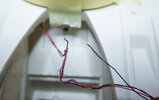
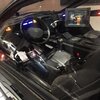
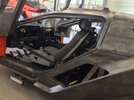
Blade Runner 2049 1/12 Scale K-Spinner

I'll echo the previous posts, but especially because I have one of these kits, and while I can't wait to start it, I'm finding it a little daunting.

This thread is fantastic, so I might work along with you? :)
It took me almost a year to take it out of the box and finally start working on it instead of just looking at the parts and gasping my breath. It is daunting indeed but once started, it is very enjoyable. :)

Seam Fix.jpg


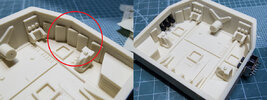
I fixed the little warpage on the right hand sidewall. It was too thick to just be pushed in and glued, or that was my assessment. To make sure the fix would work I drilled a hole, carved it a little to countersink the screwhead and once glued and fastened, I just covered the screwhead with some putty. This worked well. The area, doorwells and all that, just needs a few more passes with that filler to clean any imperfections.

Speaking of imperfections, there are some details that need to be fixed. In these photographs you see the gaps on the air grille detail below the hole for the screw. There are little things like that here and there, easy to fix but take some time.

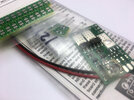
Oh, the custom programmed flasher driver for the leds arrived yesterday. Super! Some soldering ahead.

Boards.jpg
 
I'm not sure which company you got the LEDs from, but if looking for a custom kit, or plug and play flashers this company has been good Battery Powered LED Lights | Buy Small LED Lights - Evan Designs
I have used leds from smallscalelights in most of my models for the past decade. It’s been great, they’ve been fast and precise to deliver every single time. For me this is a super convenient source because it’s within EU, no customs issues with the inner market. Only, this will change in January with Brexit. I hope it doesn’t make things too difficult, I'd like to keep buying from them.

The custom programmed flash board is from Ngineering, I’ve used their services a couple of times before, will do again. I didn't want to use the lighting kit from Voodoo because it felt like the colours in that were too blue. The Voodoo kit seems to use "cool white" leds and they are difficult to work with when photographing models. I guess I could have negotiated some tweaks to that but eventually found it more interesting to design the whole thing myself from scratch than to start hacking the Voodoo kit. I'm sure it's a super useful kit though.

It is good to know alternatives in case the regular sources fall through for one reason or another. Thanks!
 
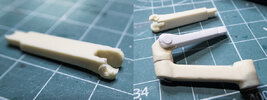
Working randomly on different areas here and there. One dashboard part needed to be replaced entirely. There were air bubbles at both end of one piece of the dashboard mounted monitor arm, the bubbles were in very inconvenient spots. I figured it was easier to just make another one entirely than to try to fix it. Here, the monitor arm and a replacement part in test fitting:

Bubble.jpg

This working around here and there approach was actually to avoid the part I dread the most (well, this and the final paintcoat): electronics! I originally thought this model woudn't be too difficult with lights but I was wrong. There number of leds that go in there is quite big and I had to sit down and really focus on designing the wiring to get everything right with the first attempt.

The model is being built for photography and I need to control the lights to a degree. They can't be all on all the time, I divided them into five banks on two circuits. Hiding the switches for them was a head scratcher but in the end I decided to sacrifice the flying drone well on the roof. Hidden in it now are the five switches I need. All I really had to do was scrape those wedges on the sidewalls off and make holes for the switches. This was the easy part.

Switches.jpg

When inserting all the wires necessary one easily gets them in a messy bundle. I wired one bank at the time (the steel tubes under the floor worked perfectly) and fastened each separately to the inner walls of the rear hull. This was to not get everything mixed further down the line.

There was one mistake I made when fastening some of the wires though. It was so stupid. I use tiny hot glue blobs, it's great for fastening items that needn't look too neat, it's fast and non corrosive. I glued some wires with it on the inside and at one point I pressed the almost cooled glue down to make a neater little blob. To my horror the glue stuck to my finger more than usual and as I pulled my finger out I pulled a wire too. This was in a very narrow passage behind the rear cabin wall, absolutely impossible to fix with a soldering iron. I coudn't even see the other end of the severed wire at first. After some cusswords I had a heureka moment. It was hot glue, I heated it a little with a heater gun with a narrow nozzle to direct the air current precisely and sure enough, as the glue melted, I was able to loosen the wires with a dentist's tool (a hook at the end of a stick, like a pen) and wiggle them out thru a hole in the back.

I hate when this sort of stuff happens but it's fixed now. Phew!

Wire.jpg

Next, some tiny scale soldering for the flashing leds on top and bottom of the model. X-acto blade for size reference. No shaky hands for this bit.

Circuits.jpg


The irony in this is that I don't need the lights to flash for photographs, this is just for fun. :)
 
Loving the build so far, I have a few R.Cooper kits (Ghost and Phoinex) so this is of interest to me as the K Spinner on my wants list.
I've also planned to light my kits 'my way' but had no idea how to do it, so I found a place in the UK called Welcome Aboard! (captainjacksmodels.co.uk) where I sent a scaled drawing of the model to a very helpful chap called Chris Williams who has helped me with all my needs...maybe of interest to you perhaps?
Good luck with the build (y)
Thanks for the tip. It is good to know options and different sources for all the various bits and bobs.

I prefer using small SMD leds for my builds, they're small and efficient but take very little room to install. Only on rare occasions I use 3mm or 5mm leds, I tend to shy away from their whites because the ones I have found have inconsistencies in colour temperatures. Even though the naked eye accepts some of that variance, the digital camera is merciless, it picks up even the slightest differences. It's very annoying. Red ones are good and quite handy if a more focused beam of light is needed.
 
Great so far and I’m glad that you’re enjoying the build. Your lighting work is outstanding, far beyond me, but it’s going to look phenomenal.
For supporting the front wheels, would it be possible to install a steel axle or anchor pin which could be engaged/ disengaged by an external magnet?
I’ll probably strengthen the kit’s major joints as you’ve done. It can be daunting, but is a long term investment.
I’ve found that replacing resin tubes etc with rod or tube is far easier than trying to round the resin part and it can help square, strengthen or bring symmetry to sub assemblies. Most of the details on my BTTF train were substantially modified and some scratch built. Your floor replacement is a great idea, I may end up doing the same.
I have not started my build, but think that I have identified the likely problem areas.
Keep up the great work.
 
Slowly going forwards.

The main electronics are installed and THEY WORK! It looks messy but it's really not. There is a system. On the top you see my notes, the markings are a reminder of the colour coded wiring. I need to be aware of what colour runs which set of lights. It has worked well so far.

There are still three set of wires loose to be connected to the lights on and in the ceiling of the chassis when it's installed, and to the dashboard.

Top View.jpg


The dashboard is tricky. It takes three wires to operate and I need to be able to have the roof element on before I can install the dashboard. That means wiggling the dashboard in thru the door and gluing it on inside the cabin. The sequence is a bit awkward but I don't see how else I can possibly do it. The dashboard will be connected to the wires by a simple connector plug during assembly. I'm confident it'll work just fine. Fingers crossed.

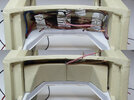
Here are the wires criss-crossing inside the front wall. Nothing will be visible when finished.

Front Wall.jpg

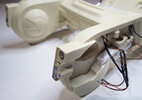
While figuring these out, I made progress with the front mandibles. Some of the numerous headlights are now fitted to their slots. Here you can also see the adjustable front tires, they were cut to pieces to make more room for the wires. They weren't rotating wheels so this doesn't matter.

Headlights.jpg

Now, these were the broad brushstrokes, so to speak. After this everything becomes increasingly more delicate, details need to be finessed with precision because everything will be seen in the final model. The model kit doesn't have all the details the actual filming vehicle has. I need to scratchbuild some to add some bits and pieces here and there. I do not have very good photographic reference of the interior. Well, I have the images I have found online but they're really not as good as I would like.

I have images like the ones below. Some are closer, some from slightly different angles but essentially not much better. There are also the screencaps from the movie but they're not really that extensive either. I may have to wing some of the details simply to my liking. Unless, of course, any of you have better references to share...

D5x7q8TUUAAMH0R.jpgSpinner-4 2.jpg

I still don't know what to paint the chassis with. There is time to figure that out yet.
 
Last edited:
Great so far and I’m glad that you’re enjoying the build. Your lighting work is outstanding, far beyond me, but it’s going to look phenomenal.
For supporting the front wheels, would it be possible to install a steel axle or anchor pin which could be engaged/ disengaged by an external magnet?
I’ll probably strengthen the kit’s major joints as you’ve done. It can be daunting, but is a long term investment.
I’ve found that replacing resin tubes etc with rod or tube is far easier than trying to round the resin part and it can help square, strengthen or bring symmetry to sub assemblies. Most of the details on my BTTF train were substantially modified and some scratch built. Your floor replacement is a great idea, I may end up doing the same.
I have not started my build, but think that I have identified the likely problem areas.
Keep up the great work.
I did swap the resin axles for the front wheels for steel ones but I didn't alter the functionality. There might be room for a locking pin, it's a great idea, I never thought of that.

For functionality of the front wheels I added strengthening material to the magnet extensions. Actually, I extended them to make them hold better and added more magnets. Now I think they will hold the weight when finished, but if not, I will find that out before gluing the mandible exterior on. If the car is too heavy for the magnets, I can simply add more before sealing everything in.

If you replace the floor, watch out for the little angle around the front edge of the door. I kinda missed that and my floor is straight. It won't show when finished if you don't know exactly where to look, but it's there and it's a flaw. I can live with it though and the good thing is that the floor is now solid as a rock, it won't be the first to crack if this thing falls to the floor.
 
  • Like
Reactions: JHY
Some screen captures here:


and

 
Last edited:
Some screen captures here:


and

Thanks! There are several sites for screencaps. The various sites have slightly different frames, going thru them just needs a moment.

The thing is that they don't show the car very well in the movie. It's just a prop, they use it only for telling the story.
 
Not much progress. It's Christmas time and it takes some steam off from these things.

I have successfully installed some of the lights and they all work. Even the red and white blinkers work fine:


On an earlier build I fried the blinker cirquits by wiring them wrong. This time I knew better. One learns as one does.

The rear reds have no lenses on, they beam quite a strong light there. The body top (doors, roof) is dryfitted, not glued on at this point but it shows a red light leak on the rear deck. Gotta mask it off before closing the body.

Need to work on the dashboard and interior lights next. That'll be a job for January. After that I need to tackle the opening doors, and that is the part I fear most.

The Lights So Far.jpg
 
Well, that was a longer break than planned. It happens. Getting back to the workbench, picking up the pieces, I'm contemplating using a rubber tyre in the rear instead of the resin one that came with the kit. The problem is that I have no information whether there is a rubber substitute for it at all.

I could make mould of the resin tyre and cast a rubber version of it but that would be very expensive. And frankly, although I have made moulds and casts succesfully before, I have not worked with rubber and I have doubts.

So, the rear tyre in question measures about 35 millimetres wide with a diameter of about 52 millimetres. I have done some research and I think there actually are tyres that are roughly about the correct dimensions. I'm trying to find one, ONE, tyre from 1:12 Tamiya Team Lotus Type 49 or a Porsche Racing Tyre as pictured here, I think either would do even though the tread is different. I'm not sure but the 1/12 Tamiya Lamborghini Countach may have a suitable tyre as well. The thing is, these are very expensive vintage kits, a problem all too familiar to any studio scale builder looking for just one kit part.

Any suggestions?

I can always paint the resin tyre but there is something about real rubber that is hard to replicate with paints. I'll try my luck with this first.

EDIT: I made a WTB to the Junkyard.

Tyres.jpg
 
Last edited:
Have you considered 3D printing the tyre in tpu? If you can't find a suitable stl model of the tyre I'll model it for you as practice to try out my new cad mouse. If so you'll have to allow me some time though as my current situation does not allow me much free time... Also good reference pics taken from afar (to minimize any lens distortion) + measurements.
 
Have you considered 3D printing the tyre in tpu? If you can't find a suitable stl model of the tyre I'll model it for you as practice to try out my new cad mouse. If so you'll have to allow me some time though as my current situation does not allow me much free time... Also good reference pics taken from afar (to minimize any lens distortion) + measurements.
Thank you for your kind offer.

I haven't really thought of printing the tyre. Oldschool, you see, but I have no objections to 3D tech as such. I don't know how this material works in terms of resolution and I wonder whether the resolution is good enough? The images I could find (quick search) showed too much grain in the finished product. Any visible grain would spoil it for me. Maybe I just didn't find the best samples.

Thank you for the tip, I'll look into this closer.
Generally it's RC people that 3D print tyres. That means function over finish and tpu is notoriously slow to print, so I can almost guarantee the pics you've seen are of the functional type. In general you can print very nice looking stuff with fdm if you prioritize high Res over speed, but I don't have any first hand experience with tpu so I can't swear on the finish.

You do have another choice though and that is printing with flexible resin. That won't show any grain on newer resin printers.

I looked up flexible resin. It is very promising. Thank you very much for this!

I think that the RC route might be the best for you pertaining to that type of tire.

R/C car tyres are the correct scale, I believe. I have looked into those but so far nothing suitable has come up.

I just found out that at least the rear tyre from a Tamiya Lotus 48B Ford F-1 kit is almost exactly the right size. This means I'm not chasing ghosts here. I will try to find a vintage tyre for a little while more. It is not only because it's a tested and working item (materialwise) but also because it adds a nice layer of old school modelmaking to this project. I am not hung up to that idea, but I'll give it a little more time before I will move on to other solutions.
 
Back
Top