AnubisGuard
Master Member
It's just spectacular. I can't even wrap my mind around how you're dong this.

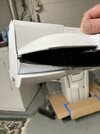

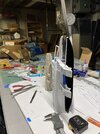
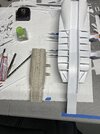
Well thank you my friend, most appreciated. But it’s really not that hard it’s just time consuming. I am measuring the kit parts with a digital caliper and then doubling the measurements and then of course when it comes to curved pieces that’s somewhat tricky but I seem to work it out pretty wellIt's just spectacular. I can't even wrap my mind around how you're dong this.
Not accurate to the images you posted but that’s the reason I did what I did. This thing will look a lot better because you sent those images, or posted them ratherLove the detailing on the pod arms!
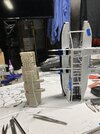
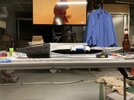
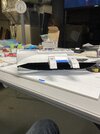
getting my evening fix of the show on peacock I think I’m doing the old girl right so far lol

So say we allSo say we all
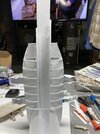
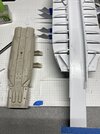
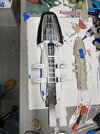
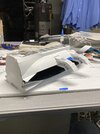
I thought about making the pods move in and out but I wouldn’t ever display it with them in, so I didn’t bother. As far as the head and ribs I’m not sure I understand what you mean. I’ve not done the center of the head yet or the plating for it. I’ve left that for later because I have to run wiring, LEDs and fiber optic yet. It’ll look like it shouldI think you are doing an amazing job with this, with all the complex curves and shapes. Those greebles are amazing. The only thing I would do differently is on the gator head, and all of the ribs for that matter, is to bring them all way over, left to right, over the top and back down the other side. This would better represent the way the hull plating sets on the ribs. Just my 2 cents.
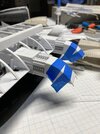
Also, too bad with this larger scale, that you did not make the pod arms retractable, or did I miss something??
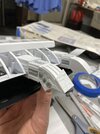
Yeah that makes sense, however the plates are on top of the ribs so in the places where the plates cover the ribs, why does there need to be ribs? Clearly I’m no where near being finished with this project. Perhaps wait till I’m done and then you are welcome to point out all the errors. Better yet, start your own and show the rest of us the proper way to do this.I understand. Those pod arms look so good, great job. As for the ribs, imagine all the plating removed. The ribs should cover the entirety of the ship, sans some areas of the rear engine deck. Looking at the CGI model, you can see where the hull plates set on top of the ribs in every instance. So the ribs literally run from one side of the ship, over the top then back down to the other side. There should be no instance where the ribs stop and butt up against any plating. Does that make sense?
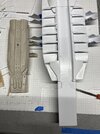
Ok, sorry if I have come across as nit picky. I absolutely love what you have created so far. It's just that you are at the perfect state to get the hull plating and ribs correct according to the CGI model. I will say that after closer examination it does appear that some of plating does have structure underneath them, particularly the plating on the head and top spine. But, I think you can achieve this by just making sure the plates run past the edge of the ribs, thus giving the appearance that they run underneath the plating. This is something Mobius got horribly wrong on their kit. I would have gladly paid double for the kit if all the plating was separate pieces that you got to place on the kit to achieve this correct look.Yeah that makes sense, however the plates are on top of the ribs so in the places where the plates cover the ribs, why does there need to be ribs? Clearly I’m no where near being finished with this project. Perhaps wait till I’m done and then you are welcome to point out all the errors. Better yet, start your own and show the rest of us the proper way to do this.
Well I’ll tell ya, I try to capture the spirit of things rather that beat my head against the wall trying to get every little detail addressed. Now in the case that I was doing this at twice the size, that’s another thing. I’m well aware that the ribs need to at least appear to be continuous. This only the second time I’ve attempted a scratch build. The first one was relatively easy, a1/72 snow speeder and a gantry thing that straddles an Xwing, which turned out pretty good. I’m only doing this as a personal challenge, that and I’m ticked off that the “kit” is so frackin small.Ok, sorry if I have come across as nit picky. I absolutely love what you have created so far. It's just that you are at the perfect state to get the hull plating and ribs correct according to the CGI model. I will say that after closer examination it does appear that some of plating does have structure underneath them, particularly the plating on the head and top spine. But, I think you can achieve this by just making sure the plates run past the edge of the ribs, thus giving the appearance that they run underneath the plating. This is something Mobius got horribly wrong on their kit. I would have gladly paid double for the kit if all the plating was separate pieces that you got to place on the kit to achieve this correct look.
Can't wait to see how you tackle the the pods.
however the plates are on top of the ribs so in the places where the plates cover the ribs, why does there need to be ribs?
Got itArguably because you can kind of see into the sides a bit. I think it will also occlude light better having "stuff" under the plates rather than leaving a big hollow space.
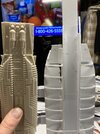
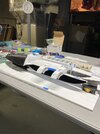
Thanks for the encouragement Fett!Who needs a 3D printer? Man this is coming along great and quick. Extremely impressed. I think it’s important for people to realize this was only ever a 3D asset and as such lots of cheats can be made,to actually scratch build this by hand is a crazy challenge.