Batmobile - 1966 Deluxe Edition**Finished Pics on Page 2

trekriffic

Sr Member
Got this kit some years ago as a contest prize on another forum. This is the deluxe edition Batmobile from the 1966 TV series starring Adam West and Burt Ward as Batman and Robin:

48049892662_1ac1340e7f_b.jpg
The Dynamic Duo
by trekriffic, on Flickr

The box lid has a beautiful illustration of the Batmobile speeding along:
48037981056_a759d08a08_b.jpg
Batmobile 1966 Deluxe Edition Box Art
by trekriffic, on Flickr

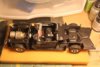
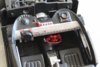
The bottom of the box has a lot of nice images of the completed model. For the engine you have two options a big block V8 or a jet turbine. I went with the jet turbine for this build, the car always made that jet turbine sound when it raced around the highways and spouted flames out the back on the TV show:
48038082757_f77d2dd6b2_b.jpg
Batmobile 1966 Deluxe Edition Box Art
by trekriffic, on Flickr

Comprehensive instructions showing steps to build either of the two engine options. The kit also includes two chassis depending on which engine you choose to build:
48037980871_dba389a51d_b.jpg
Batmobile Instruction Sheet
by trekriffic, on Flickr

All steps in construction are well documented. You can even build this as the Penguin Mobile by installing the optional umbrellas- you get one closed and one opened umbrella:
48037980836_3de2f0f3ba_b.jpg
Batmobile Instruction Sheet
by trekriffic, on Flickr

First things first...

All parts and sprue trees are soaked in a solution of warm water and TSP to remove any factory mold release:
48037981456_2d1a211a28_b.jpg
Batmobile Parts in Tub
by trekriffic, on Flickr

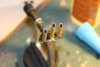
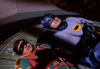
The Dynamic Duo get a bath! Pull yourselves together fellas! These are vinyl parts and will need to be painted with acrylics:
48037981101_84fa3f23a0_b.jpg
Batmobile - Batman and Robin Get a Bath
by trekriffic, on Flickr

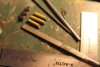
Chrome parts tree. I won't be using all of these parts:
48038020513_e90ec3bf36_b.jpg
Batmobile Chrome parts
by trekriffic, on Flickr
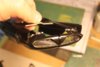
Clear parts tree:
48038020423_f7a6a13af5_b.jpg
Batmobile Clear Parts
by trekriffic, on Flickr

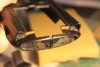
The clear parts tree includes two options for the rear canopy - one for over the arch and one for under the arch. I found an old photo of George Barris, the builder of the original 1966 Batmobile, standing beside the car which showed the arch. It was over the canopy in the rear and under the canopy in the front. That's how I'll build mine.

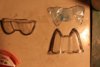
Kit included photo-etch sheet:
48038020573_9b48d8eb22_b.jpg
Batmobile Deluxe Edition Photo-Etch
by trekriffic, on Flickr

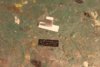
Stainless steel with three license plate options and tons of tiny nameplates. I loved how the Batmobile had signage all over it so you didn't mistake, for example, the radio controls for the buttons that fire the rockets!

Once the parts dried off I started on the priming using Duplicolor grey automotive primer:
48037979306_cb675bf8c7_b.jpg
Batmobile Body in Primer
by trekriffic, on Flickr
48038019868_52900fb4db_b.jpg
Batmobile Chassis in Primer
by trekriffic, on Flickr
48038082282_3203dc299a_b.jpg
Batmobile Parts Tree Primed
by trekriffic, on Flickr

After priming, I used a can of Krylon Colormaster Covermax Flat Black paint for all parts:
48038019503_0b816edcb8_b.jpg
Batmobile Rear Deck Painted Flat Black
by trekriffic, on Flickr
48038019743_d9db305052_b.jpg
Batmobile Painted Flat Black
by trekriffic, on Flickr

Some parts will get brushed with Testors chrome silver, Italian red, or steel enamel later on. I won't be using Penguin's umbrella though:
48037980441_50f872026e_b.jpg
Batmobile Parts Tree Sprayed Flat Black
by trekriffic, on Flickr

The body parts eventually got a second coat of Krylon Colormaster Covermax Satin Black giving them a nice semi-gloss sheen:
48038018378_d54d983bba_b.jpg
Batmobile Parts Sprayed Flat Black
by trekriffic, on Flickr
48037980386_50bcbe87e9_b.jpg
Batmobile Parts Shot with Krlyon Flat Black
by trekriffic, on Flickr

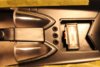
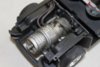
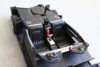
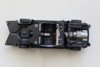
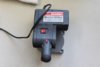
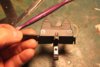
First thing I assembled was the jet turbine engine. The turbine consisted of only three pieces. Cables and hoses were brushed with Testors "rubber" enamel over flat black. Here it is installed in the chassis. I used Testors steel over Krylon flat black.:
48037980196_127e520210_b.jpg
Batmobile Jet Turbine Installed
by trekriffic, on Flickr
48038019333_de9189157d_b.jpg
Batmobile Chassis Underside
by trekriffic, on Flickr

Next I played with the tires...
 
Last edited:
The rims were pushed into the vinyl tires then the brake drum plates were painted steel before gluing into the backside of the rims:
48037980076_77c5123fa6_b.jpg
Batmobile Tires and Hubs by trekriffic, on Flickr

This is a curbside model meaning it's meant to sit at the curb - the wheels don't spin in other words. I wanted mine to spin so... I found these small picture hanging nails to use as axles for the tires:
48037979226_7eb944fcc4_b.jpg
Batmobile Tire Modifications
by trekriffic, on Flickr

The nails will be cut short and inserted into the spindles using CA. First I drilled the holes for the nails into the spindles using a pinvise:
48037979946_e4e4485ee3_b.jpg
Batmobile Drilling Holes for Axles
by trekriffic, on Flickr

After trimming to a half inch length the nails were inserted thru the center of each hub before being glued into the front spindles and rear transaxle:
48038081682_44cc17b741_b.jpg
Batmobile Axles Measured
by trekriffic, on Flickr

The nails I used worked great. All tires turn freely:
48038081487_a4fe6e4c0f_b.jpg
Batmobile Chassis with Tires Installed
by trekriffic, on Flickr

The front tires turn left and right too:
48038019078_c0e04abec8_b.jpg
Batmobile
by trekriffic, on Flickr

Matte Aluminum Bare Metal Foil was wrapped around the exhaust nozzle:
48037979691_5623b086b0_b.jpg
Batmobile Turbine Exhaust Nozzle
by trekriffic, on Flickr

The dashboard:
48037980316_29b94f1d97_b.jpg
Batmobile Dashboard
by trekriffic, on Flickr

Two sections of stainless steel photo-etch were attached to the dash using CA glue:
48038018833_df28756e67_b.jpg
Batmobile Dashboard Photo-Etch
by trekriffic, on Flickr

Part 32 consists of the clutch, brake, and accelerator petals:
48038018743_af104a6a24_b.jpg
Batmobile Photo Etch Detail
by trekriffic, on Flickr

I scraped off the black paint and glued the three pedals in place using CA glue:
48038018658_83eff945a8_b.jpg
Batmobile Pedals
by trekriffic, on Flickr

The rear canopy deck was modified to remove the rings representing the speakers. Each speaker will use two phot-etch parts to replace the plastic kit rings. Here the rings have been removed using an xacto chisel blade before being masked with Tamiya Tape for a second coat of satin black:
48038018583_82b2056676_b.jpg
Batmobile Rear Speaker Cover Mods
by trekriffic, on Flickr

A section of Matte Aluminum Bare Metal Foil was rubbed onto the interior of each door panel. After rubbing down tight the excess foil will be trimmed away using a very sharp xacto knife:
48038018523_388a4707cf_b.jpg
Batmobile Door Panel Foiled
by trekriffic, on Flickr

The Bare Metal Foil after trimming:
48037979041_d504b463f8_b.jpg
Batmobile Finished Door Panel
by trekriffic, on Flickr

More to come! Thanks for reading along!
 
Sorry for the long pause between posts guys. I've been a little tied up lately...

48171534601_a4f8bca325_o.png
Dynamic Duo Tied Up
by trekriffic, on Flickr

As you can imagine I've made some progress... after some minor hiccups.
Anyway, here are more pics taken with my Bat Camera...

Got this at Harbor Freight years ago. Inexpensive for my needs which is cutting tubing.
It's so old now the (rubber?) housing has gotten sticky:

48170018781_f507733ebd_o.jpg
Drillmaster Mini Cutt-Off Saw
by trekriffic, on Flickr

The kit instructions included a bracket and template for making your own rocket tubes using aluminum tubing. I masked the tubing with Tamiya tape to avoid scratches- hopefully:

48170093147_c8db6006c3_o.jpg
Batmobile 1966 - WIP
by trekriffic, on Flickr

The new rocket tubes glued to their bracket with CA.
The two outer tubes were a bit of a pain to get the same length but only took two tries and they were just right. I removed any burrs from the tube mouths using flat and round diamond files:

48170018581_8128ea5299_o.jpg
Batmobile 1966 - WIP
by trekriffic, on Flickr

The cockpit arch painted with Krylon Satin Black. This is after about three coats:

48170092977_dec916c039_o.jpg
Batmobile 1966 - WIP
by trekriffic, on Flickr

Canopy frames masked with Micro-Mark Liquid Masking Film before being brush painted with Testors Semi-gloss Black enamel. After it dries I'll brush on Testors Aluminum:

48170088942_e08f31ccdb_o.jpg
Batmobile 1966 - WIP
by trekriffic, on Flickr

After gluing in the photo-etch grills and brush painting with de-canted Krylon:

48170018441_6e1fab5d2f_o.jpg
Batmobile 1966 - WIP
by trekriffic, on Flickr

Rear deck after gluing photo-etch in place with CA:

48170092802_bb993b1e0e_o.jpg
Batmobile 1966 - WIP
by trekriffic, on Flickr

Canopies after removal of dried liquid mask.
Sometimes a piece of tape helps to get the mask to start peeling off.
After some more cleanup I'll retouch the frames using a liner brush and some thinned enamel.
Then I have to wait about 3 days for the aluminum enamel to dry.
Uggggh!:

48170090967_885facf2d1_o.jpg
Batmobile 1966 - WIP
by trekriffic, on Flickr

Photo-etch signs for dashboard with orange decals applied.
These are incredibly tiny. Luckily I have a set of extremely fine pointy tweezers:

48170016196_d9c6273a09_o.jpg
Batmobile 1966 - WIP
by trekriffic, on Flickr

More pics to come Bat fans!
Just thought I'd keep it to ten at a time.
 
Cockpit seats. Flat black Krylon with aluminum enamel frames brushed on:

48170090797_f5fcc6c400_o.jpg
Batmobile 1966 - WIP
by trekriffic, on Flickr

Dash buttons painted flat red using thinned enamel and a round toothpick:

48170090707_2d065678fe_o.jpg
Batmobile 1966 - WIP
by trekriffic, on Flickr

Bat turn handle and Bat fire extinguisher painted and decaled:

48170088807_3f560e7950_o.jpg
Batmobile 1966 - WIP
by trekriffic, on Flickr

Rear Taillights painted with Tamiya Clear Red acrylic.
I backed them with pieces of reflective tape to shine when light hits them; although, you can't see much anyway behind the black grills to come:

48170090587_dd1c65b8f4_o.jpg
Batmobile 1966 - WIP
by trekriffic, on Flickr

Rear taillights Installed:

48170015851_5b6c1b541e_o.jpg
Batmobile 1966 - WIP
by trekriffic, on Flickr

rear taillight grills installed using CA. Touched up with Krlyon black satin brushed on from the can.
Parachutes installed with Testors tube glue:

48170090497_eb1becf92f_o.jpg
Batmobile 1966 - WIP
by trekriffic, on Flickr

Mobile Crime Computer decaled:

48170015726_f7dcbe2a41_o.jpg
Batmobile 1966 - WIP by trekriffic, on Flickr

I was looking for information on the Bat Computer when I found this tribute page.
Lots of neat stuff about the Batcomputer, Batmobile, Utility Belts, and more:


Anyway, moving right along...

Rear deck with Bat emergency brake handle and Bat fire extinguisher:

48170015661_4ee2f562f7_o.jpg
Batmobile 1966 - WIP
by trekriffic, on Flickr

Headlights and lower front grills installed:

48170088687_383eacedb7_o.jpg
Batmobile 1966 - WIP by trekriffic, on Flickr

Stand by for more!
 
Sorry for the long pause between posts guys. I've been a little tied up lately...

48171534601_a4f8bca325_o.png
Dynamic Duo Tied Up
by trekriffic, on Flickr

As you can imagine I've made some progress... after some minor hiccups.
Anyway, here are more pics taken with my Bat Camera...

Got this at Harbor Freight years ago. Inexpensive for my needs which is cutting tubing.
It's so old now the (rubber?) housing has gotten sticky:

48170018781_f507733ebd_o.jpg
Drillmaster Mini Cutt-Off Saw
by trekriffic, on Flickr

The kit instructions included a bracket and template for making your own rocket tubes using aluminum tubing. I masked the tubing with Tamiya tape to avoid scratches- hopefully:

48170093147_c8db6006c3_o.jpg
Batmobile 1966 - WIP
by trekriffic, on Flickr

The new rocket tubes glued to their bracket with CA.
The two outer tubes were a bit of a pain to get the same length but only took two tries and they were just right. I removed any burrs from the tube mouths using flat and round diamond files:

48170018581_8128ea5299_o.jpg
Batmobile 1966 - WIP
by trekriffic, on Flickr

The cockpit arch painted with Krylon Satin Black. This is after about three coats:

48170092977_dec916c039_o.jpg
Batmobile 1966 - WIP
by trekriffic, on Flickr

Canopy frames masked with Micro-Mark Liquid Masking Film before being brush painted with Testors Semi-gloss Black enamel. After it dries I'll brush on Testors Aluminum:

48170088942_e08f31ccdb_o.jpg
Batmobile 1966 - WIP
by trekriffic, on Flickr

After gluing in the photo-etch grills and brush painting with de-canted Krylon:

48170018441_6e1fab5d2f_o.jpg
Batmobile 1966 - WIP
by trekriffic, on Flickr

Rear deck after gluing photo-etch in place with CA:

48170092802_bb993b1e0e_o.jpg
Batmobile 1966 - WIP
by trekriffic, on Flickr

Canopies after removal of dried liquid mask.
Sometimes a piece of tape helps to get the mask to start peeling off.
After some more cleanup I'll retouch the frames using a liner brush and some thinned enamel.
Then I have to wait about 3 days for the aluminum enamel to dry.
Uggggh!:

48170090967_885facf2d1_o.jpg
Batmobile 1966 - WIP
by trekriffic, on Flickr

Photo-etch signs for dashboard with orange decals applied.
These are incredibly tiny. Luckily I have a set of extremely fine pointy tweezers:

48170016196_d9c6273a09_o.jpg
Batmobile 1966 - WIP
by trekriffic, on Flickr

More pics to come Bat fans!
Just thought I'd keep it to ten at a time.
 

Attachments

  • 48170089237_e4dc59a174_o.jpg
    48170089237_e4dc59a174_o.jpg
    135.1 KB · Views: 183
  • 48170089317_005203c57a_o.jpg
    48170089317_005203c57a_o.jpg
    119.8 KB · Views: 185
  • 48170089402_5ba2696b62_o.jpg
    48170089402_5ba2696b62_o.jpg
    80.8 KB · Views: 186
  • 48170014891_fcf40a6e1d_o.jpg
    48170014891_fcf40a6e1d_o.jpg
    88.6 KB · Views: 169
  • 48170015001_b14f544761_o.jpg
    48170015001_b14f544761_o.jpg
    120 KB · Views: 174
  • 48170089732_57b936c31d_o.jpg
    48170089732_57b936c31d_o.jpg
    98.5 KB · Views: 199
  • 48170088577_841f7a268f_o.jpg
    48170088577_841f7a268f_o.jpg
    88.4 KB · Views: 170
  • 48170089992_b9c91e6e81_o.jpg
    48170089992_b9c91e6e81_o.jpg
    128.6 KB · Views: 182
  • 48170015451_e986c9c47c_o.jpg
    48170015451_e986c9c47c_o.jpg
    92.2 KB · Views: 182
  • 48170090212_297161bce2_o.jpg
    48170090212_297161bce2_o.jpg
    140.2 KB · Views: 175
Last edited:
Cockpit seats. Flat black Krylon with aluminum enamel frames brushed on:

48170090797_f5fcc6c400_o.jpg
Batmobile 1966 - WIP
by trekriffic, on Flickr

Dash buttons painted flat red using thinned enamel and a round toothpick:

View attachment 1034539
Batmobile 1966 - WIP by trekriffic, on Flickr

Bat turn handle and Bat fire extinguisher painted and decaled:

48170088807_3f560e7950_o.jpg
Batmobile 1966 - WIP
by trekriffic, on Flickr

Rear Taillights painted with Tamiya Clear Red acrylic.
I backed them with pieces of reflective tape to shine when light hits them; although, you can't see much anyway behind the black grills to come:

48170090587_dd1c65b8f4_o.jpg
Batmobile 1966 - WIP
by trekriffic, on Flickr

Rear taillights Installed:

48170015851_5b6c1b541e_o.jpg
Batmobile 1966 - WIP
by trekriffic, on Flickr

rear taillight grills installed using CA. Touched up with Krlyon black satin brushed on from the can.
Parachutes installed with Testors tube glue:

48170090497_eb1becf92f_o.jpg
Batmobile 1966 - WIP
by trekriffic, on Flickr

Mobile Crime Computer decaled:

48170015726_f7dcbe2a41_o.jpg
Batmobile 1966 - WIP by trekriffic, on Flickr

I was looking for information on the Bat Computer when I found this tribute page.
Lots of neat stuff about the Batcomputer, Batmobile, Utility Belts, and more:


Anyway, moving right along...

Rear deck with Bat emergency brake handle and Bat fire extinguisher:

48170015661_4ee2f562f7_o.jpg
Batmobile 1966 - WIP
by trekriffic, on Flickr

Headlights and lower front grills installed:

48170088687_383eacedb7_o.jpg
Batmobile 1966 - WIP by trekriffic, on Flickr
 
Last edited:
Now for one of the hiccups...

I thought I'd lost the small sprue with the license plate brackets attached.
Couldn't find it anywhere on or under my work bench (thought I might have accidentally thrown out the sprue?) so... I made my own from scratch to work with the photo-etch steel license plate below the exhaust vent in the rear.
Then after three days I found the missing parts (I was also missing the tiny Bat Ram lever for the dashboard) clamped in the hobby vice at my right elbow!
Still don't know how I could have missed seeing that in plain sight like that:

48170090212_297161bce2_o.jpg
Batmobile 1966 - WIP
by trekriffic, on Flickr

The amber lenses were painted black, then silver, then Tamiya Orange Acrylic.
The PE screens over the headlights were touched up using a brush and some de-canted Krylon Satin Black:

48170015451_e986c9c47c_o.jpg
Batmobile 1966 - WIP
by trekriffic, on Flickr

A little cleanup left to do but the signs are all in.
The letters are decals which you apply first to the brass strips that are about 1/64 of an inch wide.
Then you glue the strips to the dashboard using CA. Delicate work:

48170089992_b9c91e6e81_o.jpg
Batmobile 1966 - WIP
by trekriffic, on Flickr

Chassis finished. The fit of the dash, doors, and rear deck was pretty bad.
I had to use a lot of CA and kickstarter to get the parts to mate and, even then, there were still gaps.
I may go back and apply some AVESD Apoxy Sculpt to the larger gaps (unless I feel they are not that conspicuous):

48170088577_841f7a268f_o.jpg
Batmobile 1966 - WIP
by trekriffic, on Flickr

"Holey Moley Batman somebody stole the Batmobile's body!!!"

"Well Robin, you know what they say?"

"What Batman?!"

"Every body... needs a body... sometime."

48170089732_57b936c31d_o.jpg
Batmobile 1966 - WIP
by trekriffic, on Flickr

Batphone and the shift handle next to it were glued in with CA.
If you have a jeweler's loupe you can actual read the tiny letters on the dash's orange signs.
I covered the floor with "carpet" using a sheet of adhesive-backed felt:

48170015001_b14f544761_o.jpg
Batmobile 1966 - WIP
by trekriffic, on Flickr

Turbine Engine was brushed with Creatfx acrylic black wash to bring out some more detail:

48170014891_fcf40a6e1d_o.jpg
Batmobile 1966 - WIP
by trekriffic, on Flickr

You also have to paint the canopy rims on the inside. Otherwise you will see the black enamel layer underneath:

48170089402_5ba2696b62_o.jpg
Batmobile 1966 - WIP
by trekriffic, on Flickr

Rear canopy glued in with canopy glue oddly enough. I glued the arch down using 5 minute epoxy:

48170089317_005203c57a_o.jpg
Batmobile 1966 - WIP
by trekriffic, on Flickr

Chassis ready for assembly with body:

48170089237_e4dc59a174_o.jpg
Batmobile 1966 - WIP
by trekriffic, on Flickr
 

Attachments

  • 48170018781_f507733ebd_o.jpg
    48170018781_f507733ebd_o.jpg
    73.2 KB · Views: 165
  • 48170093147_c8db6006c3_o.jpg
    48170093147_c8db6006c3_o.jpg
    129.8 KB · Views: 177
  • 48170018581_8128ea5299_o.jpg
    48170018581_8128ea5299_o.jpg
    66.7 KB · Views: 183
  • 48170088942_e08f31ccdb_o.jpg
    48170088942_e08f31ccdb_o.jpg
    123.8 KB · Views: 183
  • 48170018441_6e1fab5d2f_o.jpg
    48170018441_6e1fab5d2f_o.jpg
    76.7 KB · Views: 184
  • 48170092802_bb993b1e0e_o.jpg
    48170092802_bb993b1e0e_o.jpg
    103.7 KB · Views: 170
  • 48170090967_885facf2d1_o.jpg
    48170090967_885facf2d1_o.jpg
    95.9 KB · Views: 166
  • 48170092977_dec916c039_o.jpg
    48170092977_dec916c039_o.jpg
    62.8 KB · Views: 155
  • 48170016196_d9c6273a09_o.jpg
    48170016196_d9c6273a09_o.jpg
    135 KB · Views: 160
  • 48171534601_a4f8bca325_o.png
    48171534601_a4f8bca325_o.png
    584.3 KB · Views: 172
Mobile Crime Computer, Rear canopy and Arch, and rocket tubes installed in body:

48170013946_305c414c09_o.jpg
Batmobile 1966 - WIP
by trekriffic, on Flickr

Tamiya tape just to protect the Krylon from my dirty fingers temporarily:

48170014466_49ca6885b8_o.jpg
Batmobile 1966 - WIP
by trekriffic, on Flickr

Batmobile Emergency Turn Lever. Releases the bat chutes from the back and spins the Batmobile 180 degrees when pulled back.

48170088452_7205478a15_o.jpg
Batmobile 1966 - WIP
by trekriffic, on Flickr

That's all for now Bat citizens! More to come before the final unveiling!
 
Would the forum moderator please delete the duplicate postings above? It was doing funny things when I tried to post each reply and I see a lot of duplication.

Thank you!
 
Anyway, here's a small update...

I gave the tires a scuffing with a coarse sanding stick to make them look road worn.
I figure the Batmobile's tires stopped looking like new after about 5 minutes the way Batman drove:

48188571667_3494ba53d0_o.jpg

Batmobile 1966 - WIP
by trekriffic, on Flickr

Then I gave the undercarriage another brush and rub with the black acrylic wash. Really adds to the realism I think with the tires:


48188513551_076c52157f_o.jpg

Batmobile 1966 - WIP
by trekriffic, on Flickr


48188513421_24a4667a22_o.jpg

Batmobile 1966 - WIP
by trekriffic, on Flickr


48188571437_0180cd0cf7_o.jpg

Batmobile 1966 - WIP
by trekriffic, on Flickr


Cockpit done. Gave her another brush with water-based Liquitex Matte Varnish.
I also added the white buttons on top of the red circles I had dotted above the steering wheel yoke.
So basically a white dot inside the red dot I had painted a week or so ago.
Done with a pointy toothpick and thinned white paint ... Dot's all:


48188513201_eff85c63fe_o.jpg

Batmobile 1966 - WIP
by trekriffic, on Flickr


Next I think I'll paint and assemble the PE seatbelt buckles. Says to use black masking tape for the belts - hmmm.
Then I need to assemble and paint the vinyl Dynamic Duo figures.
Then I'll stick them into the seats before I glue the chassis to the body.

Thanks for reading! Keep your Bat Monitor tuned to this Bat Channel for my next update!
 
Greetings citizens! Time for your next Bat Update...

Bat Ray PE parts painted and ready for gluing together.
I drilled a tunnel into a piece of very thin styrene rod to insert the end of the PE shaft into:

48218088751_0b6e029d4c_o.jpg
Batmobile 1966 - WIP
by trekriffic, on Flickr

PE license plate glued to kit license plate bracket. A decal will be applied at the end of the build before final clear coats:

48218088671_f30eeffd37_o.jpg
Batmobile 1966 - WIP
by trekriffic, on Flickr

PE steel Bat Ray antenna glued into styrene rod. I'll paint the shaft silver. The grids should also be yellow not red so I'll repaint them to:

48218136837_1a2474f9ed_o.jpg
Batmobile 1966 - WIP
by trekriffic, on Flickr

Batman glued together and seams puttied:

48218137537_0a70742872_o.jpg
Batmobile 1966 - Dynamic Duo
by trekriffic, on Flickr

Neck presents a significant gap. Will putty and sand smooth:

48218088586_b26a187a9f_o.jpg
Batmobile 1966 - Dynamic Duo
by trekriffic, on Flickr

After first round of PPP:

48218088531_cea581f8b6_o.jpg
Batmobile 1966 - Dynamic Duo
by trekriffic, on Flickr

This makes for much less of a pain in the butt to work on... for me anyway:

48218088446_bc2bf9c613_o.jpg
Batmobile 1966 - Dynamic Duo
by trekriffic, on Flickr

The neck gap is filled and sanded:

48218087821_da755fb636_o.jpg
Batmobile 1966 - Dynamic Duo
by trekriffic, on Flickr

First primer coat brushed on. Tamiya white Surface Primer is lacquer based and goes on the vinyl real well.
No observable stickiness after it dried either. I tested it out on the back and buttocks of the figures before brushing it on all over:

48218088366_a93f26925d_o.jpg
Batmobile 1966 - Dynamic Duo
by trekriffic, on Flickr

After first primer coat before wet sanding with a narrow sanding stick:

48218088281_49e579ff90_o.jpg
Batmobile 1966 - Dynamic Duo
by trekriffic, on Flickr

After first primer coat and light sanding:

48218088201_37d0770553_o.jpg
Batmobile 1966 - Dynamic Duo
by trekriffic, on Flickr

After sanding before second wet primer coat:

48218137082_267327ba74_o.jpg
Batmobile 1966 - Dynamic Duo
by trekriffic, on Flickr

Dotting the eyes. With a toothpick:

48218087781_9e1743ec1c_o.jpg
Batmobile 1966 - Dynamic Duo
by trekriffic, on Flickr

48218136962_84fb455d20_o.jpg
Batmobile 1966 - Dynamic Duo
by trekriffic, on Flickr

Here I brushed white around the pupils to shrink them a tad.
Then I brushed a mix of light tan and white to make flesh and paint the eyelids and faces. I mixed a little red with the flesh to paint the lips.
Next I'll mix up some light blue grey to paint the body, arms, and legs:

48218136897_219ee4bc67_o.jpg
Batmobile 1966 - Dynamic Duo
by trekriffic, on Flickr

Robin:

48218136647_82a406343c_o.jpg
Batmobile 1966 - Dynamic Duo
by trekriffic, on Flickr

I applied liquid mask to face and head around the mask.
Then I painted flat black enamel around the eyes and the rest of the mask.
Here I am peeling the dried liquid mask away:

48226098241_1bab96cf8a_o.jpg
Batmobile 1966 WIP - Robin
by trekriffic, on Flickr

After applying a coat of light grey to torso, arms, and legs, I masked them with liquid mask. The parts that are meant to be dark blue will be painted Testors Sea Blue over a coat of black yet to come:

48226096756_75d8732b5a_o.jpg
Batmobile 1966 WIP - Batman
by trekriffic, on Flickr

Robin after liquid mask removal. I think this turned out really well myself.
Later, I realized the forehead was covered with too little mask based on the incised line in the photo. So I had to paint over the excess black with flesh tone.
Will need two coats:

48226098941_0498e32b94_o.jpg
Batmobile 1966 WIP - Robin
by trekriffic, on Flickr
 
WATCH AS BATMAN AND ROBIN GET THEIR COSTUMES!

Batman got a coat of liquid mask over his face and grey leotard.
I painted his cowl and cape black, gloves, shorts, and boots with flat black enamel. I will paint dark blue over the black once the black cures:

48244282102_8ed34023af_b.jpg
Batmobile 1966 WIP - Dynamic Duo
by trekriffic, on Flickr

48244273727_6ef32ca8ba_b.jpg
Batmobile 1966 WIP - Dynamic Duo
by trekriffic, on Flickr

Robin figure is masked with liquid mask. Then I painted the cape. Next I'll paint his shorts black. Then there's the red waistcoat followed by the dark green shorts, boots, and gloves painted over the black. I also need to add 6 more yellow straps to the upper waistcoat. The figure only has three now. I'll paint his hair dark brown with lighter brushed highlights. Don't know why they gave him a pompadour though rather than a part on the left side like Burt Ward had:

48244282052_eaa2615307_b.jpg
Batmobile 1966 WIP - Dynamic Duo
by trekriffic, on Flickr

I'll make 10 uniformly shaped tiny rectangles representing the straps (?) on the front of Robin's waistcoat then paint flat red acrylic around them. If that works after removing the tape I'll coat with Future and apply a coat of red enamel:

48318731411_5a51ec6284_b.jpg
Batmobile 1966 WIP - Robin in Canary Yellow
by trekriffic, on Flickr

And now for something completely different... seat belts...

The belts in the Batmobile movie I watched were red with a black stripe down the middle. I did a decent job recreating that using red masking tape and a black enamel paint pen. The width had to be about 3/32" wide or so to fit thru the slots in the PE parts:

48318731126_facf7c0154_b.jpg
Batmobile 1966 WIP - Seat Belts
by trekriffic, on Flickr

Backlit like this you can see how I threaded the belt (tape) thru the slot in the PE seat belt buckle then stuck it down to itself. It should drape nicely over the character's lap:

48318731361_0d6f452287_b.jpg
Batmobile 1966 WIP - Bat Safety Belts
by trekriffic, on Flickr

The tape used to make what we call "seatbelts" (I think the DD referred to them as "safety" belts in the Batman movie) is stuck down to the cutting mat, the end is raised up just a little. Then it has to be threaded thru slots in the stainless steel PE belt buckles using tweezers, Then it's folded over to stick to itself on the lap side. Done. Trim to about a half inch long and move on to the next buckle:

48318851532_3ce7bcf1b5_b.jpg
Batmobile 1966 WIP - Bat Safety Belts
by trekriffic, on Flickr

The Batman insignia is on the part you would pull up on to release the buckle. It is glued to the other two buckle pieces using Plastic Surgery glue, The red belts with black stripe down the middle match the ones I saw in a video showing the DD buckling up. The belts are made from red masking tape with a black enamel pen making the stripe. The tape had to fit thru slots in the two buckle halves then the end of the tape is folded about 1/4" and stuck to itself on the backside to secure the buckle. This is done four times.
We used to have seatbelt buckles that lifted up like these in the old blue '66 Chevy Impala my dad owned and let me drive for my first car:

48318851477_f105e443c5_b.jpg
Batmobile 1966 WIP - Bat Safety Belts
by trekriffic, on Flickr

Now back to the Dynamic Duo...

Robin got his straps. Or were they ties? Anyway, not exact, but pretty close-
BETTER THAN THE KIT MOLDED STRAPS/TIES OF WHICH THERE WERE ONLY THREE!?
Robin has between 9 and 10 straps on the front of his waistcoat:

48318731186_93ec88ffd7_b.jpg
Batmobile 1966 WIP - Robin Gets His Straps
by trekriffic, on Flickr

And Batman got his cowl brows...

Tiny bits of masking tape and thinned white enamel make the cowls "eyebrows". Then some work with thinner on a thin brush to clean up. Then retouching with more thinned flat black:

48318851292_5f6053768d_b.jpg
Batmobile 1966 WIP - Batman Gets his Eyebrows
by trekriffic, on Flickr

All done...
I'll give them another coat of Future once the decal dries. Then a brushing with Liquitex Matte Medium:

48322937211_9d29923f2f_b.jpg
Batmobile 1966 WIP - Robin Gets His R
by trekriffic, on Flickr

48322938091_cfac48373b_b.jpg
Batmobile 1966 WIP - Dynamic Duo
by trekriffic, on Flickr

Set aside to dry after Liquitex matte was brushed on:

The caped crusaders were only too happy to stay out of reach, stuck high up on their metal poles, when they saw who was parked next to them!

48318851392_704d60e3bd_b.jpg
Batmobile 1966 WIP - Dynamic Duo Meets Christine
by trekriffic, on Flickr


More to come as I experience the horrors of assembling the body to the chassis and what I had to do to make it work. Hint: Thin sections of black styrene sheet (I'd almost forgotten I had black in the Evergreen mulitcolor pack I bought years ago) and some AVES Apoxy Sculpt. Still working on touchups now.

"Holy ill fitting Batmobile Batman!"
 
Bat Update...

After soaking in purple Super Clean for an hour all chrome plating was removed from the police beacon. Then I sprayed with black Krylon before applying a coat of Tamiya Bare Metal Silver from a rattle can. Interesting note regarding the sprue attachment points on the lower rim for this part. Removal from the sprue left two flat spots where the rim was partially destroyed. This turned out to be by design I think because the two pins on the bottom are keyed to attach only one way to the mating holes in the arch. The flat spots lined up with the sides of the two horns that I am now about to attach. So the flat spots where the spruce attached allow clearance for a tight fit with the horns, the keyed pins tell me this was the intent of the model designers:

48390848742_9f5a7eea1c_b.jpg
Batmobile 1966 WIP - Beacon Dechromed
by trekriffic, on Flickr

The kit gives you two options for antenna bases - round or teardrop shaped. I painted them with Testors steel.
I may overpaint with Testors chrome... have to decide on that:

48390848717_5225e539f2_b.jpg
Batmobile 1966 WIP - Rear Antenna Bases
by trekriffic, on Flickr

The kit provides you with a short metal rod in its own bag for use with either of the antenna bases:

48390846187_15253f6708_b.jpg
Batmobile 1966 WIP - Antenna
by trekriffic, on Flickr

More modifications...

The center arch pillar was too tall and had to be cut down to allow the chassis to mate flush with the bottom of the car body:

48390709881_42aeeda6ab_b.jpg
Batmobile 1966 WIP - Mods to Rear Deck Pillar
by trekriffic, on Flickr

The rear canopy broke free from the "canopy" glue in the upper body frame after numerous failed attempts to get the chassis to slide flush into the body. It was then I decided to break the rear cockpit wall and deck free from the side door panels in the chassis and glue the deck inside the body instead using epoxy. You can also see the open slot meant to allow the "under the canopy" arch to pass thru and attach to the underside of the body. Since I am using the "over the canopy" arch I was left with an open gap:

48390709811_bb45474f0f_b.jpg
Batmobile 1966 WIP - Rear Deck from Underneath
by trekriffic, on Flickr

To cover the gap I made a cover of styrene and photo-etch brass screen. The idea is this is a subwoofer Robin installed somewhat to Batman’s chagrin:

48390848662_8fd4527fae_b.jpg
Batmobile 1966 - WIP - Rear Slot Cover
by trekriffic, on Flickr

The photo-etch "subwoofer" screen was painted with Testors semi-gloss black. After drying I glued it into the unused slot in the underside of the rear deck using epoxy. Later it would get a coat of Liquitex matte varnish:

48390709776_11998bdb0c_b.jpg
Batmobile 1966 WIP - PE Screen Painted
by trekriffic, on Flickr

Just to reiterate, with the rear deck and center console glued to the back of the chassis passenger compartment the deck would not slide flush into the grooves under the rear canopy which left visibly large gaps between the deck and the canopy. To solve this problem I broke the deck free from the chassis (I had used CA so it broke free fairly easily compared to styrene cement) and glued the deck into the grooves in the inside of the body using epoxy. This eliminated the gaps. The rear wall and console could then be slid behind and between the car seats during assembly of the body and chassis:

48390709726_a09a328871_b.jpg
Batmobile 1966 WIP - Rear Deck After Rework
by trekriffic, on Flickr

Check out the major center console gap. I knew this was coming when I had to alter my plan of attack for attaching the rear deck behind the seats. Will have to lay some sheet styrene over the frame at the base of the console to cover the gap:

48390848442_18d540c8bb_b.jpg
Batmobile 1966 WIP - Major Console Gap
by trekriffic, on Flickr

I had decided to protect the lower edges of the body with masking tape before gluing the edges of the chassis to the body. I'm glad I did considering how many times I had to pry the chassis and body apart trying to get them to fit properly:

48390848397_1d32315c99_b.jpg
Batmobile 1966 WIP - Masking
by trekriffic, on Flickr
 
With all the glue I had to use to join the chassis to the body I didn't want to risk any getting on my nice satin Krylon finish. I also needed to do a lot of clamping and didn't want the clamps scratching the paint. So I ended up masking most of the body:

48390709516_d487f68e2b_b.jpg
Batmobile 1966 WIP - Masked Crusader
by trekriffic, on Flickr

Have I said how confoundingly ill fitting this kit is? Prime example... the passenger compartment dashboard fits fine with very small gaps between it and the front canopy frame; conversely, in the engine compartment, there is this 1/8" gap at the top of the firewall. Will have to fill it in somehow:

48390709476_a2b120e597_b.jpg
Batmobile 1966 WIP - Major Gappage
by trekriffic, on Flickr

Hard to see in this image but there is a slight gap about 1/64” wide around the front edge of the dashboard after assembly. This was easily filled in with AVES putty before painting with semi-gloss black:

48390848187_90a95d5e6a_b.jpg
Batmobile 1966 WIP - Dashboard Gaps
by trekriffic, on Flickr

Shaving Batman's ass... I think I may be the first modeler to ever say that...

The kit makers didn't account for the amount Batman sinks into his seat when driving. So he sat too high in the seat for my taste. To reduce the height I used an xacto chisel blade and knife to carve away at Batman's ass and hamstrings. The final result is much better as you will see:

48390848142_126a930f39_b.jpg
Batmobile 1966 WIP - Shaving Batman's Butt
by trekriffic, on Flickr

To cover the console and firewall gaps I used this sheet of thin black styrene. It ended up being perfect for this use:

48390709306_44baf9354b_b.jpg
Thin Black Styrene Sheet
by trekriffic, on Flickr

After gluing the black styrene in place I filled any remaining gaps with white Perfect Plastic Putty:

48390707341_d43ce953bd_b.jpg
Batmobile 1966 WIP - Firewall Gap Covered and Puttied
by trekriffic, on Flickr

AVES worked well for filling this gap where the dash met the arch in the body:

48390709256_7907e34f24_b.jpg
Batmobile 1966 WIP - Gap Filled with AVES
by trekriffic, on Flickr

After separation of the rear wall and deck from the side door panels a slot remained which I covered with a piece of styrene sheet before painting it black:

48390848017_ac8934ce29_b.jpg
Batmobile 1966 WIP - Rear Wall Slot Covered
by trekriffic, on Flickr

Batman test fit after assembling the chassis to the body:

48390847957_f37624a5f7_b.jpg
Batmobile 1966 WIP - Batman Seated
by trekriffic, on Flickr

After covering and filling the gaps along the rear and side walls in the engine compartment the walls got a coat of semi-gloss black. Later I brushed them with Liquitex Matte Varnish:

48390847842_25b6b76c96_b.jpg
Batmobile 1966 WIP - After Touching Up
by trekriffic, on Flickr
 
More mods and retouches...

I noticed a small bit of stray AVES next to the red button on the square base of the Bat Scope. I cleaned it off later:

48390707261_7ef4a8f92d_b.jpg
Batmobile 1966 WIP - After Putty and Touchup
by trekriffic, on Flickr

Underside after finally gluing to the body. Need to retouch the weathering with some more of the black wash:

48390847657_2b0ccbe86f_b.jpg
Batmobile 1966 WIP - Underside After Gluing
by trekriffic, on Flickr

Console gaps fixed. Three sections of black styrene sheet were fitted around the base of the console’s front and sides to hide an unsightly gap:

48390708746_40fb83a5c4_b.jpg
Batmobile 1966 WIP - Console Gap Covered
by trekriffic, on Flickr

Looking better without all the gaps:

48390847492_66c9d415f5_b.jpg
Batmobile 1966 WIP - Test Fit with Forward Canopy
by trekriffic, on Flickr

Robin and Batman get their seat belts on...

I decided it was easier to epoxy the belt buckle to Robin’s lap before attaching the ends of the belts to the sides of the seat:

48390707226_896521f1ac_b.jpg
Batmobile 1966 WIP - Robin Gets His Belt On
by trekriffic, on Flickr

Of course, safety while driving a car as powerful as the Batmobile is always a primary concern for the Caped Crusader. Funny bit of serendipity but his hands just would not line up right with the steering wheel; that is, until I shaved Batman’s ass. Once I did that and the epoxy started to set I was able to tweak the angle of the wheel (I didn’t need to glue it in) just enough to get both of Batman’s hands to touch the wheel. Major advantage to the butt reduction:

48390847417_158ca44d72_b.jpg
Batmobile 1966 WIP - Batman Belted
by trekriffic, on Flickr


Figures gklued into seats...

A goodly dose of 5-minute epoxy was dripped onto the seat under Robin's butt and hamstrings. The forward canopy is placed temporarily to get Robin's hand positioned grabbing the frame. It'll stay in place until the epoxy sets. Then I'll finish the seatbelt attachments and glue the canopy in place with epoxy.

48390847327_f3ac1f2200_b.jpg
Batmobile 1966 WIP - Robin Glued In
by trekriffic, on Flickr

The police beacon gets some work...

The scalloped indents on the police beacon were painted Testors flat red then coated with MM fluorescent red then transparent red. I had to mask the slots at the top with Tamiya tape:

48390708591_069cb119f8_b.jpg
Batmobile 1966 WIP - Beacon
by trekriffic, on Flickr

The canopy won't be glued in until Robin's butt epoxy sets and I finish attaching the ends of the seat belt:

48415736011_ed4c7230de_b.jpg
Batmobile 1966 WIP - The Forward Canopy
by trekriffic, on Flickr

The hood...

Under closer inspection, the paint on the hood showed some minor imperfections in the finish when viewed at a certain angle so, after sanding with fine grit sandpaper and a repaint with more Krylon black Satin, it looks perfect and ready for install at the end of the build:

48390707166_b19b6a892e_b.jpg
Batmobile 1966 WIP - Hood
by trekriffic, on Flickr

More to come after the next photo upload.

Stay tuned Bat Fans!
 
This thread is more than 4 years old.

Your message may be considered spam for the following reasons:

  1. This thread hasn't been active in some time. A new post in this thread might not contribute constructively to this discussion after so long.
If you wish to reply despite these issues, check the box below before replying.
Be aware that malicious compliance may result in more severe penalties.
Back
Top