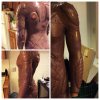
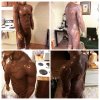
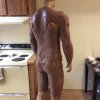
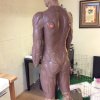
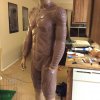
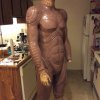
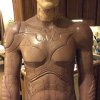
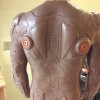
Batman Beyond-based on art by Mark Vick

You're doing a fine job! I'm curious though: if you had the 3d files why didn't you load then into pepakura and print out the pieces instead? I've only just discovered it myself so maybe there's a determining factor I'm not aware of. It just seems like carving it out of clay is a rather expensive and time consuming method?

Thanks in advance!
 
Very cool. I havent been able to read the thread fully, but is it mentioned how you plan on going from sculpt on the mannequin to a wearable suit? Im assuming some form of latex or rubber moulding? Is there a defined process for large wearable pieces like that? It looks excellent.
The sculpt will be separated into two main molds.. upper and lower. The sculpt will be in 4 parts (2 halves for each mold). After talking with the fine folks over at my local Smooth-On shop, I decided that the first layer is gonna be an apoxy gelcoat to capture the detail. After that, an apoxy shell will be made for each side of the mold. I could use plaster but with the size and weight of this thing, I would prefer to keep the weight down. Especially when it comes to moving this thing around. After the clay has been cleaned out of the mold, I'll be applying the rubber to the interior of both halves. After each side has a good coverage of rubber, the two halves are then mated together and the curing process continues. It's a lot of risk, and I hope this turns out well. If it doesn't I'll go cry in the corner for a while and decide what I'll do about it after that
 
You're doing a fine job! I'm curious though: if you had the 3d files why didn't you load then into pepakura and print out the pieces instead? I've only just discovered it myself so maybe there's a determining factor I'm not aware of. It just seems like carving it out of clay is a rather expensive and time consuming method?

Thanks in advance!
Hi BitterBits, and welcome. I only was given the 3D files for belt and components. The artist then sent over the super high resolution images that I could use for reference. in my sculpt. Pepakura is a great resource. I use it on a regular basis, but like any job, the right tool for the right job, The detail that went into the belt alone is staggering. The pictures I posted don't even do the 3D work that Mark Vick did any justice. It really is impressive. Also, organic and pepakura do not mix. The body armor would not work in Pep, and even if it was converted into a file, it would not look right. So this costume is a mix of mediums... 3D printing, sculpting, and traditional fabrication.
 
I want to see the video with you moving in that wicked costume...it'll make my year !!!!:cool

Somehow I don't see me doing hand stands in this ha! But I have photographers chomping at the bit for me to finish this costume. One has already found locations to shoot! The excitement that everyone has is very infectious.
 
Hi BitterBits, and welcome. I only was given the 3D files for belt and components. The artist then sent over the super high resolution images that I could use for reference. in my sculpt. Pepakura is a great resource. I use it on a regular basis, but like any job, the right tool for the right job, The detail that went into the belt alone is staggering. The pictures I posted don't even do the 3D work that Mark Vick did any justice. It really is impressive. Also, organic and pepakura do not mix. The body armor would not work in Pep, and even if it was converted into a file, it would not look right. So this costume is a mix of mediums... 3D printing, sculpting, and traditional fabrication.
Thanks so much for replying! I appreciate learning the details :)
 
The sculpt will be separated into two main molds.. upper and lower. The sculpt will be in 4 parts (2 halves for each mold). After talking with the fine folks over at my local Smooth-On shop, I decided that the first layer is gonna be an apoxy gelcoat to capture the detail. After that, an apoxy shell will be made for each side of the mold. I could use plaster but with the size and weight of this thing, I would prefer to keep the weight down. Especially when it comes to moving this thing around. After the clay has been cleaned out of the mold, I'll be applying the rubber to the interior of both halves. After each side has a good coverage of rubber, the two halves are then mated together and the curing process continues. It's a lot of risk, and I hope this turns out well. If it doesn't I'll go cry in the corner for a while and decide what I'll do about it after that

Thanks for the description - as I feared, its going to destroy your sculpt - I'd be terrified! haha. Im sure itll work out though
 
Main circuitry lines for the back are done.
ImageUploadedByTapatalk1417067606.050473.jpg


Sent from my iPad using Tapatalk
 
The time you are putting into this is really paying off. The details on the sculpt are coming out beautifully.
 
Hey Gang. I'm sorry I haven't updated in a few weeks. With all the holidays and then getting sick, I haven't been able to work on much of anything. But the good news I have the next two days off and I should be FINALLY wrapping up sculpting. At least I hope so.

I am worried about making the mold though. The weather has been chilly here in Arizona with a high of 50. I'm worried about my materials setting up properly. I need to read the fine print on the materials about temps or if I can use them inside. I'm looking at using Smooth-On red gelcoat to capture the detail and then lay fiberglass cloth in the layers after that. Any suggestions or words of advice for this large scale mold?
 
'Tis a thing of a beauty. Props to you for not rushing yourself, taking the time to get it exactly how you want it. VERY exciting!
 
Back
Top