AT-AT Driver 3D helmet greeblies

guabe

Sr Member
RPF PREMIUM MEMBER
I am making the greeblies for an AT-AT driver helmet that i will be making for my self soon. I will 3d print the greeblies but i want to make them as accurate as possible without having to source the original parts.

First i made the tusks base on the images from the star wars helmets website. I am not sure what the overall measurements are but i assumed the disk diameter is about 40mm. here are some renders. its going to be hollow but will attach via an 8-32 screw.

atattusk01.jpg

atattusk02.jpg

atattusk03.jpg

atattusk04.jpg


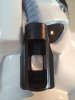
Next is the side hangers. I made them based on the same helmet and I am not sure of the overall dimensions. I made mine 2.75 inches long not counting the .400 inch tip so its little over 3 inches... the center core is 1 inch diameter. Anyone here knows what the overall dimensions are? I can scale it prety quick.

atathanger01.jpg

atathanger02.jpg

atathanger03.jpg

atathanger04.jpg


Thanks for watching and I would appreciate some feedback.
 
Nicely detailed stuff!

If it helps you with scaling, the 'tusk' (vintage Michell part) is 12.5mm wide. This is a separate part which sits inside the hollow tube of the disc.
 
Drop me a PM later on to remember me to take measurements of my tusks made from original Michel dart and also of original BOC holders. I'm at work now so no access to them.
 
ok so based on the Michael tip at 12.5mm diameter, i scaled the whole tusk a bit... and the BOC hanger accordingly... how does this look? (btw i had a reseaced surface and i also corrected that.

atattusk05.jpg

atattusk06.jpg
 
Looking great! Can't wait to see your helmet, there aren't enough of these around. :) have you given any consideration to the "tape buttons" next to the hanger hoses? I've found references on those to be severely lacking.

Do we know for sure that the original tusks had a flattened side like that? I wasn't aware that the original parts had been identified, and it's hard to tell from the pics on starwarshelmets.com. It certainly would make it easier to fit in my somewhat warped helmet!
 
Also, I'm thinking the 'wings' on your BOC parts are a bit large. Here's a pic of the real parts, as head on as I could manage.
 

Attachments

  • image.jpg
    image.jpg
    646.1 KB · Views: 206
Looking great! Can't wait to see your helmet, there aren't enough of these around. :) have you given any consideration to the "tape buttons" next to the hanger hoses? I've found references on those to be severely lacking.

Do we know for sure that the original tusks had a flattened side like that? I wasn't aware that the original parts had been identified, and it's hard to tell from the pics on starwarshelmets.com. It certainly would make it easier to fit in my somewhat warped helmet!

I will be making all the greeblies on the ATAT helm...

you have a good point on the flat surface... I have seen others making them like that but ill have to check further...

Thanks for the image btw... ill try to make them a bit smaller.
 
Happy to help, I did a fair bit of research on this helmet recently for my build. And I'm hoping you turn up some info I didn't find too! :)
 
I think I got it now.. i made the wings slightly smaller on the sides and increased the fillet between them and the center cylinder... fixed other stuff here and there.
Here is the render.

atathanger05.jpg


thanks again.
 
I got mine for $20 on ebay a few weeks ago, but it took me 2 months and some luck to find them! I'm tempted to pull them off and make a mold, except I don't need more! The new model looks better, I'll compare more closely when I can. :)
 
Looking again I think your BOC part is very very close. The back wall with the small opening is a bit thicker, I'd say about 4mm. The edge chamfer on the front opening should be a little sharper, almost as of there's no bevel. I didn't see the underside but there's a bit of a raised detail there, continuing from the wings. These are minor and what you have already would do nicely! Just posting in case you want to go the extra anal mile. ;) let me know if you need any more info or pictures or anything. I think it's really cool that you're modeling the bits you don't see, like the threading and bit on the bottom that gets sawed off! Keep up the awesome work!
 
Looking great! Can't wait to see your helmet, there aren't enough of these around. :) have you given any consideration to the "tape buttons" next to the hanger hoses? I've found references on those to be severely lacking.

Do we know for sure that the original tusks had a flattened side like that? I wasn't aware that the original parts had been identified, and it's hard to tell from the pics on starwarshelmets.com. It certainly would make it easier to fit in my somewhat warped helmet!

Jez from StarWarsHelmets confirmed the tusks are flattened on one side indeed.

IIRC Madrid Boba made some castings of his original BOC syphon holders
 
Pedro I made the whole syphon and then just simulated cutting the bottom piece so it does have the extra raised detail... regarding the back wall... does this mean that inside its not round? meaning that its somewhat a box insider instead of a cylinder ?

atathanger06.jpg
 
This thread is more than 9 years old.

Your message may be considered spam for the following reasons:

  1. This thread hasn't been active in some time. A new post in this thread might not contribute constructively to this discussion after so long.
If you wish to reply despite these issues, check the box below before replying.
Be aware that malicious compliance may result in more severe penalties.
Back
Top