Assassin's Creed Revelations Wedding Outfit

Zelkina

New Member
Hi all!

First time costumer here. I'm getting married in Oct 2016, and we've decided to have an Assassin's Creed themed wedding. The games played a big part in our relationship, so we figured it was perfect. My other half is buying his costume, so I'm not making this for him. He's decided on the Assassins Creed Revelations outfit. Not really wanting to wear white on my wedding day, and not liking the current girls outfits on offer (There's no WAY my inlaws need to see that much skin from me!) I've decided to use the Revelations outfit as a starting point, and make one of my own as my wedding "dress".

There were a few things I wanted to consider with this. If I were to make a full replica of the Assassin's Creed Revelations outfit...I was going to get warm. Really, really warm. It might be the end of October, it should, in theory, be pretty damn cold. But Wedding = nerves. Nerves = nervous sweats, hot flushes etc. Add to the fact this will also be the outfit I'll be wearing to the reception a few hours later, dancing etc. I wanted something that I wouldn't have to constantly take off when hot etc, and yet would still look like I wanted it to.


Here's a few first sketches, drawn a few months apart, of what sort of thing I'm aiming for.

DSC_0156.JPGearly dress concept 2.JPG DSC_0158.JPG Pins for the collar.

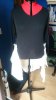
These are based off New Look dress pattern 6020, using the square neck option. I'm altering to split the skirt from the bottom to the waist, and the shape of the actual skirt will be altered to take the shape of one of the many layers on Ezio's coat. From the neck line, I'm planning to split down enough to fold back the corners like a shirt, and pin back the collars using some AC pin badges I just bought on Ebay. I've just noticed one is a little dirtier than the other, I might buy a second, if it won't clean up, but its probably just the way it's made. I'm not planning to use it as a dress, I don't like dresses, so I'm planning to make myself some comfortable trousers for wearing underneath, possibly in a Rennaisance style. Notice the belts on each outfit are different. I was initially going to use Connor's belt, but when I saw Aveline's belt, I figured that one was better suited. I'm not sure yet if I'll buy it outright, or arse about trying to make one from pewter. As for the hood, because this outfit will leave my neck and shoulders pretty bare, I'm planning to make it slightly longer to cover the shoulder blades, and the tops of the straps will be where the cloak is attached, so it will slightly cover them. This is just rough ideas at the moment, so I'm probably going to change it at some point.

Weapons etc haven't been determined yet, but I'm not exactly skilled to make a hidden blade, so I'll probably buy one. I've seen some good tutorials for making weapons using expanding foam etc, so I'll probably make a sword, or an axe, but that's about it.

DSC_0156[1].JPG These are the historical patterns I've bought. Butterick patterns B5733, B5580, B5371, B5936 and B5233. Good for some belts, bags, bracers and boots (Remember this is for a wedding outfit, I'm not going to be carrying a handbag etc, so I need bags for my costume). There's a nice pattern for a waist cincher/belt on the middle one, B5371. There's a few vambrace/gauntlet and greaves patterns too that I can use as a jumping off point. Esp. the ones on B5580 as they include shoulder pauldrons.

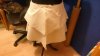
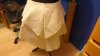
On the reccomendation of my local fabric shop, I'm using calico to make a practise run at the idea for the outfit. I've got 4m of it to arse about with, so I'm fairly sure i won't have to mess about going to the fabric store halfway through. I'll let you all know how I get on!

Zelkina xx
 
Last edited:
Question about pewter.Is it strong enough to make a large belt buckle like ezio's from the first assassins creed game he appeared in? Because I've been looking into making his costume for years using actual metal and leather for the costume itself.
 
Are you on reddit, because if so I may be totally waiting for your wedding to see how it turns out!

Yes, I totally am. bippity-bip-bip is my name, I'm subscribed to /r/cosplay so it will likely get posted there. Also want to do my 1st con next year/year after at some point, so this will be a good outfit to get a start on that!
 
Apologies for the silence. Found out in April i was pregnant, and was subsequently ill as all hell, in and out of hospital till recently. Pregnancy hates me. All is well now though, and I can begin looking towards the outfit again.

I've found a pattern that might help more with the layers on the Assassin coats. Simplicity 1138 has three skirts in decreasing lengths, and the shape of these skirts is perfect for the layers. That just arrived today. I've got a few weeks, and then I'm off on maternity leave. Which, between the school runs, means a lot of free time, as it's a good while till I'm due :)While my expanding belly means I can't try on the outfit, I have a tailors dummy in the size I'm aiming to reach for my wedding, so I can make the toile version on that.

I am a little stumped on fabric choices though. Given it's for a Halloween wedding, I need to make sure it's enough to keep me warm, but not to overheat. Embroidery designs from the AC Revelations outfit can be copied from my fiances outfit when he gets his ass in gear and gets it (I'm not making for two when I have this, a wedding dress for the morning, and two outfits for two small kids to make! Never mind the whole new baby thing!). So does anyone have a suggestion on a suitable fabric? Greatly appreciated if so!

- - - Updated - - -

Question about pewter.Is it strong enough to make a large belt buckle like ezio's from the first assassins creed game he appeared in? Because I've been looking into making his costume for years using actual metal and leather for the costume itself.


I should think so, it's pretty damn resilient. As long as the buckle isn't paper thin, it should be ok.
 
Things are now coming together! Wedding rings have arrived, wedding dress for part one of the day, and Fiance's outfit has been bought and is being made as I speak. I've lessened my workload by buying in a dress to alter instead of making my wedding dress from scratch. Now, on to the important stuff, the outfit!

I've bought these boots for my outfit, rather than going through making separate fur cuffs etc etc. The grey fur will match the fur on the AC revelations outfit. The added bonus is that they are actually really comfy, and I've worn them a few times to work. I've also got a pair of grey fur bracers eyed up in my watch list on ebay, unless i can make them myself. But we'll see how the actual outfit goes first, before accessories.
Vickys boots.JPG < The Boots!

As mentioned above, I've decided to use Simplicity pattern 1138 for the layers that are common in assassin outfits. If you look at the pictures below, you can see the shapes of the skirts, esp if used overlapping, will be perfect for it. Also, the top listed as B on the pattern may come in handy too, with some adjustments for sizeing etc.

simplicity 1138 cover.jpg1138outlines.jpg

I'm hopeing it will work well, we'll see how the toile comes out, which I'm hoping to try out this weekend. Keep your fingers crossed for me! I'm also hoping to try out making some belt bags etc for use too, using the historical patterns I spoke about in an earlier post.
 
So, here's an update on everything as it stands at the moment.

Firstly, we got our wedding licenses in November. So it's all systems go for October this year! Now baby is here, suitably named after an Assassin's Creed character (No, not Ezio), I've got a clear head and mind to focus on the costumes again. I never did get round to the toile like I wanted when I last posted, what with being heavily pregnant and stuff. But here's what we have got done.


Firstly, Fiance's costume arrived. and I'll be honest, I found it a bit disappointing. Granted, it's not like I forked out £1000 + for it, you get what you pay for, but being such hardcore fans, we were both annoyed by small bits that I'll have to correct before the wedding. The fur used on the costume is a very light brown, whereas in game and on the figurines we have it's grey. The shoulder pauldron is just literally a rectangle of fur. No shape or substance to it. The strap its attached to isn't leather, or even faux leather/pleather, its some horrible nasty plasticy stuff. The buckles and ornamentation on the strapping across his chest have been replaced by some nasty plastic shapes that are roughly correct, but have NO detail on them. The vambrace that would hold his hidden blade is again nasty plasticy material, and it's not even stiff, it's all floppy and nasty. I took one look at it and quickly realized I've got a lot of rectifying to do before we'd both be satisfied. The main outfit can be saved and used, but it was just the accessories etc that we found to be the more annoying bit. Also, the embroidery on it hasn't been trimmed properly, so all the loose end threads are showing, and will need to be trimmed down. I'm gonna be busy.


On the plus side, his hidden blade has arrived. He asked for Ezio's hidden blade, and i got it for him for Christmas. Those things may be plastic, but holy hell, they are SHARP and they WILL cut you if you don't move your fingers out the way! Yeah...he managed to stab himself in the finger within 10 minutes of opening it. Go figure. The plan is to take the silver vambrace off, and put the blade under the re-worked Revelations one I'm going to do, ensuring the fur etc is correct. Although I think Fiance wants the leather work re-done in black instead of brown. I've ordered my own hidden blade, but I've gone for Edward's blade instead of Ezio's. again, I'll be taking the plastic vambrace off, and changing the Velcro strapping for leather and buckles instead. The good thing about the Black Flag blade is there is less material surrounding the actual hidden blade. It means there will be a more snug fit against any material beneath it.


Fiance's present to me was some money to go fabric shopping. I bought everything I could think of to make my outfit. I'm going with black instead of grey, remember this is an interpretation of the outfit, it won't be 100% like the real thing. I took a section from his outfit to show the fabric shop staff what I was looking for, as i was uncertain about the fabrics. I bought 4m of black cotton drill, 4m of anti-static lining in black, 1m of grey fur, 2m of red cotton for the sash, 1m of black faux leather. I may need more leather in the future, as there's a lot to be done, but it's enough to get the main part of the outfit started. I've also kinda had some second thoughts about parts of the outfit. I'm going to put sleeves on it, as I can see myself getting bloody cold, even if I am nervous and sweating buckets before the ceremony, I'll be damn freezing during the pictures etc afterwards. I'm toying with the idea of making the sleeves detachable to help. A new sketch of what I'm now aiming for is to come.

I'm also setting myself a deadline of June to get the outfit as finished as possible. I wast to give it a trial run, so I'm going to go to either Brighton film and Comic Con, or London Film and Comic Con in July. Maybe even both. I need to know if it will stand up to a busy day, and this is the perfect way to try it out.


Hope that's everything. Any questions, or even suggestions, feel free to leave a comment! Zelks xx
 
Last edited by a moderator:
My own hidden blade has arrived! As mentioned previously, I’ve gone for Edward’s blade instead of Ezio’s. The less amount of material around the blade makes for a much better fit on my arm. The velcro strapping however, is pretty pants. I’ll definitely be replacing it with faux leather ones, and will make myself a new pair of bracers to cover it, basing them on the pattern from AC: Revelations. I’ve got to re-make several parts on Fiance’s outfit, after having another look at it last night, as it’s just not up to the standard we’re happy with. I’m also thinking of re-doing the skull buckle that comes with it out of polymer clay. I just…I’m not happy with it, I think it could be much cleaner.


And finally, I’ve finally sorted the concept art for my outfit. In the first two designs, i had myself planning to wear a corset. But, after a LOT of thought, I realised I HATE corsets. Last time I wore one, my back was killing me. and I was a much bigger waisted girl then too. I’ve no desire to end my wedding day with back ache. So the corset has gone, replaced with a top that is actually the top part of a jacket. Beneath that, there's a long sleeve top I have knocking around. It should keep me warm enough during the winter, but at the same time stop me from overheating in the summer when I trial it at a convention. Excuse the **** coloring, I had pencils to hand when I was done, and using the brush pens I had would have hidden the lines so you wouldn’t be able to tell what part of the outfit is what. I've left the borders white, as at the moment I'm not sure if I'm going to copy the embroidery from the Revelations outfit, or just ad a plain white border, or do my own design.

dsc_0163.jpg


The top of the jacket is from McCalls pattern M6819, jacket option B. The layers are actually from skirt patterns, belonging to Simplicity pattern 1138. I plan to use all three skirts to create the kind of layers that most assassin outfits have. The boots I already have, see previous posts, and I’ve got the material for the sash. Once I’ve got a toile of the outfit I’ll post again, so you can see the work in progress! thanks for reading! Zelks xx
 
It's been a long time since I updated you all! Ok, so, firstly, I finished my toile! Yay!

toile pinned side 1.JPGtoile pinned back 2.JPGtoile pinned 2.JPG

Looks pretty neat here, right? I'm pleased with the layering effect I have going on. Simplicity pattern 1138 has the skirts in three layers. Because of my height, I had to use the second shortest skirt, Skirt B, and shorten the final skirt, Skirt C, by about 5 inches, else it would have been dragging on the ground.The plan has been rather than use a button as in the plans, to fit the skirt with some strings to tie it on. The dummy in the pictures is a size 16. Now, with the best of intentions, I had planned to loose 2 dress sizes by October. However, here we are in August, and y'know, being a mum with a now 7 month old, I'm still way off size 16. Oh well, making it to my current size it is!

The top, however, I am NOT happy with. It looks like someone has one of those 80's super shoulder pad deals going on, and after trying it on, I still had the same effect. I've kinda fallen out with this for the top half, so something else is in order.

So now I finally got my adjustable tailors dummy, and set it to my size, or as wide as it would go, I put my toile on it for the skirt:

toile on new dummy1.jpg

And I clearly need to go a few sizes bigger! I'll be re-making a new toile, all pattern pieces have been cut out on parchment paper and are ready to be cut from calico. With luck, it's going to work better this time, although I have a sneaking suspicion I need to go get some more calico.
 

Attachments

  • toile front.jpg
    toile front.jpg
    38 KB · Views: 199
  • toile back.jpg
    toile back.jpg
    33.6 KB · Views: 197
  • toile on new dummy.JPG
    toile on new dummy.JPG
    860 KB · Views: 188
I am so sorry, it's been a hell of a time since we got married that i didn't get a chance to get back here and inform everyone what I've done! In the end, our wedding didn't go the way we planned, so we didn't have fancy dress after all. But we ended up attending a local comic con the following year, and I finished it in time for that. Plus hubs (anakin skywalker) and eldest kiddo's costume (Kubo and the two strings...so much gold paint...) (do NOT reccomend doing 3x costumes in the space of 3 weeks!) I ended up completely scrapping all my original plans, when i saw that it was in no way going to work how i wanted.

So. Here's my completed outfit! Materials used: Black cotton (undershirt) black cotton drill (about 90% of the outfit) red cotton (sash) faux black leather, faux grey fur, and a black and grey scarf that I spent an age hunting down the right one on ebay. all material bought from Fabricland (uk seller)

View attachment 794388View attachment 794389

Apologies for the fact they are sideways, i have no idea why this is happening and don't know how to correct it! So. Let's work from the bottom upwards!

The skirt - Prior to the wedding, Husband decided to order a costume from Aliexpress, as he didn't think we'd have enough time to make both. i say we, it would totaly have been just me, he can't sew lol. I used the skirt that came with it as a template, and traced outlines of all the appropriate parts. It's a bit different to the actual Assassins creed revelations outfit, as it's missing the larger patterned "pennant" or "ribbon" (depends what you call them, and the detail wasn't as great on his one. Once i had the patterns drawn, I then used them to cut out the material in the right size, making adjustments as and where needed. The white line detail was done with my sewing machine, adjusting the stitch size and length while using a zigzag stitch. For the larger detailed pennant/ribbon I first used a bit of calico to make a rough guide to the shape/size i needed. I also did this with another section that husbands outfit was missing completelly, before using it to cut the right size out of my black cotton drill.

Next, I drafted a pattern for the detailed artwork on the ribbon. I used a screen shot to get an accurate picture, printed it and cut it out, then enlarged it as best i could to get a clear picture again. Once I'd drawn out my outline, I sat and poked hundres of holes in the outline with pins. Then I used some talcum powder in a piece of velvet scrap i had, and used it like a dabber. the powder went through the holes, making a dotted outline. This was joined together with white talors chalk/pencil. I tried to stitch it using the small stitches on my machine, but it began to pucker, so i just finished it off with fabric paint. Running low on time, else I'd have unpicked it all and started again with just paint! The details on the front pennant/ribbons were etched out in pencil after the straigh line work was done, and then gone over with the sewing machine once again.

I attached it all to a singular piece of material which at the time I thought sat comfortably on my hips. On the day not so much it kept falling down! A definate re-draft of this is needed in future!
 
I didn't want to max out my post so here's the next bit.

The sash was simply a length of cotton folded in half and stitched in to a tube type shape. I tore the end of it with a knife making the fabric look ragged and worn.


The top layer!

View attachment 794396View attachment 794397View attachment 794398

Again sorry about the pics, no idea wtf is happening. So. the top was made from a pattern from an old hoody i had taken apart at the seams. I wasn't aiming to have it do up properly, as i fred this section would be hidden by the patch i was going to make that would hold the AC logo. For the sleeves, I made them out of cotton drill, again using the hoody pattern, and my sewing machine as before to stitch all the line detail. On the figures i have, and in game the sleeves look like they kinds come out from underneath the top jacket, so to avoid overheating i made a simple undershirt type top out of black cotton and attached the sleeves to this. The AC logo was done in fabric paint (again, low on time, if I had more I'd have stitched it) and attacked with some poppers.

The Hood.

This was, quite honestly, an absolute bitch to make. I don't have anything even remotely close to the right hood pattern apart from a hooded cloak, so I used that as my jumping off point. The hood that came with husbands outfit was quite honestly pants, and the point on it was all wrong, much too pointy for what it should be. Using rhe cloak hood, i drafted a paper pattern, then used that to cut out and assemble my hood. Again, sewing machine for the white line detail. I copied everything on the hood from screenshots and the figurine that came with AC Revelations. my first try was much too tight, so i had to make an extra piece for the front. Which was then too loose. Something to work on!

Belts, Buckles and Armor.

All made from faux leather, and faux fur for the detail where required and the pauldron on the right shoulder. A lot of drawing the patterns from observing the figures and screen shots, modifying as I went. silver paint for detail, and split pins for faux rivets on the belts etc. The bracers i will most definately re-do, as at the time I did them by using silver fabric puff paint, which then took an age to dry. I pinned two AC button pins, one to each bracer (And promptly lost one as i was getting in a lift and it decided to pop off and slip down the gap between the lift and the floor i was on). I was never happy with them, but again, time was not on my side. The buckles etc on Ezio's belt were again a rush job, as our plan to make them out of polymer clay failed spectacularly. so we stuck the pictures to cardboard and pinned them on.

Shoes

I wore the same shoes I had planned to earlier in the post, but merely an hour in they were killing me! I forgot how worn they were, the insides are SO flat, i need to buy insoles for them. I also hadn't had enough time to finish my boot armor either.


In conclusion...

I'm pretty pleased for my first ever cosplay. There's a lot I'd like to re-do, like the skirt, the bracers and pauldrons etc etc. But that will be my next project!
 
This thread is more than 6 years old.

Your message may be considered spam for the following reasons:

  1. This thread hasn't been active in some time. A new post in this thread might not contribute constructively to this discussion after so long.
If you wish to reply despite these issues, check the box below before replying.
Be aware that malicious compliance may result in more severe penalties.
Back
Top