"Arrow" Season One Build

Re: "Arrow" Season One Build *Pic heavy*

Web_Slinger have you tried Ebay? I'm looking for the seller I purchased from to see if they ship internationally.

Edit:

This is the seller I purchased the Brass strap hinges from. Aside from the shipping being a little slow, I have no complaints. And according to their seller info, they ship internationally. Hope this helps!

Boat Marine 6" Brass Hinges 1 Pair 2 Hinges Polished Brass Strap Hinges | eBay

Mine came from there also, today. Seems the new ones are welded on both sides so they might be a little harder to separate but it shouldn't be too much trouble.
 
Re: "Arrow" Season One Build *Pic heavy*

On a case-by-case basis and no more than two at a time, I certainly am.

I have far too much of my own costuming to get done to bury myself under a pile of bows.

Drop me a PM if you're interested and we'll talk.
PM Sent regarding your fiberglass limbs
 
Re: "Arrow" Season One Build *Pic heavy*

Christopher its time to admit that you have a serious case of 'Bow Hoarding Syndrome'. New sinew and tape look amazing, I am beginning to think the postal service have swallowed at least 3 bows worth of my bar tape...
 
Re: "Arrow" Season One Build *Pic heavy*

Thank you Tvayumat for letting post this here. I'm a new guy and can't make my own thread.

Okay, because I was in need of a quiver, and I like the TV show "Arrow", I decided to make the quiver " The Vigilante" uses in the TV show and document the process.

Now I cant say this is EXACTLY accurate, if people want to use this for the basics and change a bit to make it even more accurate, feel free, but I don't have access to a sewing machine so some parts are improvised or left out.

This may not be usual in the RPF, but I like a list.

- If you follow what I did you're going to need:
PVC pipe (schedule 40 with 3" interior diameter, 2 feet long - to be exact)
heat gun,
thick gloves or towel -to protect from the heat gun
dremel and bits,
good scissors,
X acto knives - or a box cutter,
black industrial Velcro,
1-1/2" black nylon webbing,
1"black nylon webbing
1-1/2" triglides
1" triglides
black cordura fabric of your choice (1000 denier, 400 denier, doesn't matter. the higher the number, the harder it is to cut)
black suede fabric (pennies compared to real stuff, but not necessary)
black vinyl ( I didn't have black vinyl so I decided to get black leather dye and dye the white vinyl I had)
*thick foam for the bottom of the quiver


Before I start, I apologize for not taking pictures of the first part of the build, it didn't occur to me until it was half done and this is my first how to, so it may not be the best.

So started the build by cutting down the 2' pipe to about 19" long - From what I've seen, that's an average size for a quiver- and save that extra piece of PVC pipe you just cut off for the bottom (more on it later)

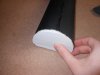
Now use the heat gun set it on 1000 degree setting, -be careful don't hold heat gun to pipe too long or risk burning the pipe (it only takes a second or two to burn it), releasing more gasses than necessary. Use a towel or gloves to handle it or you could seriously burn yourself.
-Your goal is to make it a half-moon shape the entire length of the pipe. Now I cant stress this enough. Don't rush this part! Just keep the heat gun moving.

quiverWIP01.JPG
(that's the bottom, going to cover the gap in fabric in part 2)

After it is the desired shape, using the dremel, cut a slit down the middle of the curved side of the pipe. After sanding it (I used a sanding bit for the dremel) to make it wider, round the edges on the top -not as wide as mine, and make sure it is a fairly decent line. After widening iit with a small sanding bit, use sand paper to smooth the lines so it doesn't get too wide.

For the bottom piece to stop arrows from falling out the bottom(this may be obvious but you never know), cut a slit with the dremel -doesn't have to be perfect. Use the heat gun on 1000 degrees to flatten it. Again, take your time! Cut out the half moon shape with a dremel (make sure it fits the bottom of the pipe with the outside edges)

quiverWIP04.JPG

After I shaped it, I spray painted the pipe black.

To cover the edges of the slit in the pipe, I used cotton 1-1/2" cotton webbing and glue down either side.

When gluing the webbing down, spread the shoe goo over the entire side of the THIN cotton webbing you're gluing down for an even surface. Make sure the webbing is secured on both sides with tape or something, because the shoe goo doesn't keep it down by itself.

After gluing one layer of cordura fabric over the pipe using spray adhesive, I realized that it didn't cover the bumps left by the webbing used as a trim,
I used another layer of cordura to cover the bumps and imperfections that shows trough the first layer of fabric.

(part 2 soon)
 

Attachments

  • DSCN0121.JPG
    DSCN0121.JPG
    3.4 MB · Views: 199
Last edited:
Re: "Arrow" Season One Build *Pic heavy*

I did almost the exact same. I used 3" pvc that was 2ft and cut it to 20". Heat gun to shape. Then coping saw to cut the taper all the way down. Painted the inside black. Used spray glue and cordura. Used a "leather" belt for the top. Made a removable bottom with pvc to hold the foam and easily change it. image.jpgimage.jpgimage.jpgimage.jpgimage.jpg
 
Re: "Arrow" Season One Build *Pic heavy*

I did almost the exact same. I used 3" pvc that was 2ft and cut it to 20". Heat gun to shape. Then coping saw to cut the taper all the way down. Painted the inside black. Used spray glue and cordura. Used a "leather" belt for the top. Made a removable bottom with pvc to hold the foam and easily change it.

Ha! nice job. Out of curiosity, What did you do to make a removable bottom? - I mean Velcro, glue etc... I was thinking about suggesting a drainage hole if you want to shoot in the rain (hunting) or if you're concerned about water getting inside - but not to make it too big. For the cut down the front, I just made sure that the a thicker arrow can make it through with a little comfort. In part two I will finish the quiver and straps.
 
Re: "Arrow" Season One Build *Pic heavy*

Part 2:

I spray painted the bottom cap and after it dried, I cut out foam into a half moon shape and made sure it fit the interior diameter.
Here is the part where you want to consider putting a drainage hole if you wish to hunt with it, because if it rains, the foam on the bottom will be wet for a day. If your like most people here and plan to use it for cosplay, then go ahead and glue it shut with no worries.


To cover the gap in the fabric on the lower half of the to-be quiver, I added a layer of cordura and glued the sides in the back, giving it a clean look.

Now one thing i didn't think of was that because vinyl is essentially plastic leather look a like, the leather dye didn't absorb into the vinyl, so I'd suggest using the vinyl paint Tvayumat suggested earlier in this thread. Of course, it should be black. Simply glue the 1" vinyl strip to the top of the quiver after cutting it so that the corner is rounded and will fit the rounded edges above the cut in the quiver. A space between the edge of the vinyl and the edge of the quiver makes it look clean.

For the straps, the main strap section (shoulder to waist) should be 1-1/2" wide. Now here is the part where the improvising takes place. The "Real-Deal" Vigilante quiver straps are sewn together, mine are glued with shoe goo. In addition, because I don't have a sewing machine, I can't add the green vinyl to the main strap because it will make the strap too hard.

You're going to need the triglides for an adjustable strap. The side strap should be 1" and black also with a triglide.

Here's what mine looks like, and is laid out as if you were looking at it from the front of the guy wearing it. The side strap should probably be sewn or glued a bit higher on the main strap.
DSCN0124.JPG

The straps should be glue on according to this picture.
Crucible-012.jpg

The main strap on the bottom should be glued on angled downwards, the side strap should be glued on 90 degrees from the bottom, and the top should be glued on straight up. At least, that's what I did. Everybody's body is different. Always test to make sure the straps fit well before you glue them on, you don't want one of those *facepalm* moments.

Let me know if there's anything I left out.
Good luck :)
 

Attachments

  • Crucible-012.jpg
    Crucible-012.jpg
    4 KB · Views: 1,072
Re: "Arrow" Season One Build *Pic heavy*

Thanks for the writeup on the quiver!

My own placeholder quiver is going to need replacing soon, what with all this new information we have on it!
 
Re: "Arrow" Season One Build *Pic heavy*

What size drill bit did you use on the hinges? My pair has both sides welded up so it's hard to tell the diameter of the pin. Thanks
 
Re: "Arrow" Season One Build *Pic heavy*

image.jpg
Ha! nice job. Out of curiosity, What did you do to make a removable bottom? - I mean Velcro, glue etc... I was thinking about suggesting a drainage hole if you want to shoot in the rain (hunting) or if you're concerned about water getting inside - but not to make it too big. For the cut down the front, I just made sure that the a thicker arrow can make it through with a little comfort. In part two I will finish the quiver and straps.
There is no glue or anything on the removable bottom. It fits tightly on. So it won't come off by itself but I can take it off. I don't really need a drainage hole. My foam is not a paper type foam that absorbs liquid. It's more of a thick dense plastic foam.
 
Re: "Arrow" Season One Build *Pic heavy*

For the limbs on the bow do they have to be sanded or can they just be painted black and gold tips ?


Sent from my iPad using Tapatalk
 
Re: "Arrow" Season One Build *Pic heavy*

I went ahead and gave the limbs a light sanding with 150 grit to help with adhesion.
 
Re: "Arrow" Season One Build *Pic heavy*

View attachment 303902
There is no glue or anything on the removable bottom. It fits tightly on. So it won't come off by itself but I can take it off. I don't really need a drainage hole. My foam is not a paper type foam that absorbs liquid. It's more of a thick dense plastic foam.

I was wondering why the bottom looked thick :p I didn't see how it could be the fabric.
 
Re: "Arrow" Season One Build *Pic heavy*

For the limbs on the bow do they have to be sanded or can they just be painted black and gold tips ?


Sent from my iPad using Tapatalk
I didn't sand my limbs at all. What I actually did was buy just 2 cans of spray paint. Krylon Fusion Flat or Satin Black and Rustoleum American Accents Bright Metallics Gold. Spray the whole limbs with the Fusion paint. Leave for 24hrs. Use some painters tape to cover about 6" of the limb right under the tips. Then spray the gold tips. Leave for another 24hrs. Now spray matte clear coat. I used Rustoleum Painters Touch Ultra Cover Matte Clear. This works very well! The fusion paint acts as a great primer. I have strung and unstrung my bow a dozen times and the gold paint is sticking great!

- - - Updated - - -

I was wondering why the bottom looked thick :p I didn't see how it could be the fabric.
Ya the bottom is made from pvc then covered in fabric. If anyone was wondering the spray glue I used is Loctite High Performance Spray Adhesive.
 
Re: "Arrow" Season One Build *Pic heavy*

I would definitely recommend lightly prepping the limbs with 240 wet and dry or something similar, it will give much better adhesion to the paint
 
Re: "Arrow" Season One Build *Pic heavy*

I agree.

I opted to sand off the name RAGIM though, as it still showed through my paint initially and ended up just sanding it clear.
 
This thread is more than 6 years old.

Your message may be considered spam for the following reasons:

  1. This thread hasn't been active in some time. A new post in this thread might not contribute constructively to this discussion after so long.
If you wish to reply despite these issues, check the box below before replying.
Be aware that malicious compliance may result in more severe penalties.
Back
Top