AP Trooper Kit Assembly

<div class='quotetop'>QUOTE(clutch @ Apr 19 2006, 06:40 AM) [snapback]1229041[/snapback]</div>
<div class='quotetop'>QUOTE(KevVader @ Apr 18 2006, 02:56 PM) [snapback]1228592[/snapback]
Looks good. You wear it well...
[/b]

Rod Stewart... :p
[/b][/quote]

Fantastic Work...
 
For us bigger guys, there is a bit of modding that goes on. The shins and thighs are left a little bigger, about and extra 1/2" on either side of the strip that runs down the middle. Other than that I shimed my thighs and then put and extention on the ab/back plate that is hardly noticable and velcros shut on the other side.
 
<div class='quotetop'>QUOTE(CMANavy @ Apr 28 2006, 04:41 PM) [snapback]1235030[/snapback]</div>
For us bigger guys, there is a bit of modding that goes on. The shins and thighs are left a little bigger, about and extra 1/2" on either side of the strip that runs down the middle. Other than that I shimed my thighs and then put and extention on the ab/back plate that is hardly noticable and velcros shut on the other side.
[/b]


Agreed....I currently figuring out how to assemble this so that I may wear from time to time. The thing is that it will be displayed on a mannequin 99% of the time so I want to add mods to fit my large frame but will still look "right" when displayed on a smaller mannequin....gotta figure it out.

In the meantime...I've been sanding and filing down the rough edges from trimming. Not something that can be easily discerned from photos so really not worth posting any of that...but I did repaint the frown...looks much better than the ROTJ job that I did last time....


Also painted the ears....just have to outline in black and paint the ridges....


I'm going to repaint the vocoder and assemble the helmet....finally!
 
Last edited:
<div class='quotetop'>QUOTE(KevVader @ Apr 29 2006, 05:21 PM) [snapback]1235613[/snapback]</div>
<div class='quotetop'>QUOTE(Boba Frett @ Apr 29 2006, 04:48 PM) [snapback]1235606[/snapback]
I'm going to repaint the vocoder and assemble the helmet....finally.
[/b]

Hurry up already :)
[/b]


:lol ...yeah, no kidding.
[/b][/quote]

LOL. :)

Better to take your time and be happy than rush and screw something up right? :p
 
Great Progress thread, AP is a little beyond me financially at present but when i eventually get an FX, and if it needs trimming this thread has a lot of tips
Nice one :thumbsup
 
Thanks guys....DD, having owned a few FX kits in the past, I highly suggest saving a few more $ and going for an AP Kit....worth it....
 
<div class='quotetop'>QUOTE(Darth Domain @ May 1 2006, 03:01 PM) [snapback]1236479[/snapback]</div>
I hear ya Kev
Do these kits always come untrimmed?
[/b]


As far as I know....he may trim them for ya, but I'm sure that there's a charge to do so as it is a lot of work...
 
Been working on the helmet a bit more tonight. Ever since someone mentioned the wonky left eye, it didn't bother me that much. However, the more I look at it, the more it started to bother me. So I borrowed a heat gun from work...


Yeah, it looks like a hair dryer, but don't try drying your hair with it, it'll burn a hole through your skull...not to mention it'll give you a bad acse of the frizzies! :p Very, very powerful! Only took a few seconds for the ABS to heat up enough to bend the bump in the rim of the eye socket back down...

...looks better, I think....

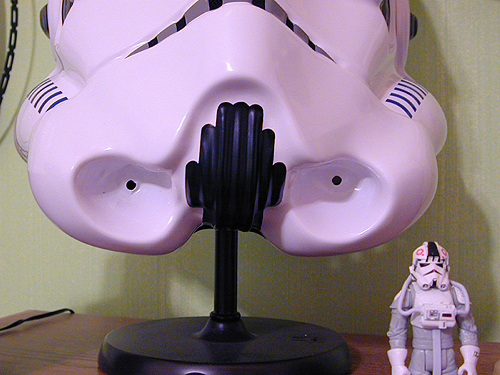
Then I painted the vocoder (again!)....still not 100% happy with it, but it'll do. Again, that's the one part of the lid detail that's a little soft...


Then I decided to test fit the mic tips that I got from Keith (love them BTW)...First thing is to drill out the divots in the helmet...


The tips are not predrilled, so you'll have to drill a pilot hole....there's a divot on the tips to guide you....Ya gotta drill a pilot hole as the resin tips are not flexible so they'll crack if you just try to drill a screw into them. I could've tapped the hole and used a small threaded rod and bolted them on, but these small machine screws and washers worked fine for me.


I don't envision ever having to remove them in the future, so to make sure they never fall off I dipped the tips of the screws in glue before screwing the mic tips in.

....Installed!

The helmet is starting to come together....
 
Last edited:
Kev, that wonky eye gives it character. Now you're just another mindless clone. ;)

One suggestion on the tips. I'd reposition those aerators so that they did not angle outward. I would aim for straight ahead to slightly angled inward. I didn't use the holes in the abs80 I recently acquired, I just punched two more further away from the inside of the helmet. Once the aerators are in, you can't see the original holes. Here's a pic of my GF that I used for reference when making the holes.
aeratorholes.jpg
 
Thanks Clutch....yeah, they do look a bit too bugeyed don't they? I'm going to give your tip a shot.... :thumbsup

BTW...is your vocoder painted or a decal? Did you use liquid mask?
 
Kev,
I lucked up on both helmets because the vocoders were already painted. They are immaculate. Better than anything I could ever do.

I was told by GF that he hand painted the whole thing. This is what he said: It was hand painted using enamel paint with a flat small paint brush, the trick is to put alot of paint on the brush and work fast before paint starts to dry which will leave marks and spread it out so paint doesn't run, I just got the hang of it. The round edges are naturally done, basically when you touch and twist the brush full of paint it will create a naturall round shape it's like making a drop of paint fall which creates almost a perfect circle, I always start by the top round edges and work going down. it's hard to explain I hope you understand what I'm trying to say.

My other helmet was painted by Darth Infamous and he gave me these tips for when I get ready to paint my TE: Well make sure you prepare yourself. Have some paint remover and napkins ready. You must use a med to small round brush. The trick is to NOT dap on the paint. You start at the round areas. Here you take your brush full of paint and go directly downwards until you have your circle. Then you drag the brush downwards towards the neck. Repeat until you have nice round edges. Dont stop. The paint will dry fast and cause seams. Dont hesitate and keep your hand steady. Easier said then done. I know. Oh the vital thing to do is to DRAW with a pencil the vocoder. Now you have something to follow.

I hope these two don't mind me posting this. If you do, let me know and I'll strike it.
 
Gotcha....Thanks for the tip. :thumbsup Easier said than done tho...the vocoder on the AP lid is not that sharp...hard to see where the ridges start and end...
 
When it comes to painting softly delineated shapes like that, sometimes you have to paint the shapes where you want them to be. Once the paint is on, your brain will matrix what your eyes tell your brain is there.


~ GM
 
Back
Top