Any suggestions for polishing metal items from Shapeways?

DerekH

New Member
Hey everyone, I have some stuff I am working on that I ordered in metal via Shapeways, and their stuff comes pretty pitted. I was hoping someone here might have suggestions on how to polish it to remove the pitting as I have little to no experience with such things. I have a dremel, but am unsure how many different steps and what grits I should use to get it to a mirror shine.

Any help or suggestions are much appreciated.


Thanks,

Derek
 
pitting in metal is difficult to fiz becasue you have to sand down so much, you might try melting in some solder and buffing with different grade of steel wool
 
What kind of metal? I have done a variety and could tell you what worked for me(I might even have some scrap around to test on) Some stuff you can use a buffing head on a bench grinder with the proper rouge(polishing compound) but some metals are pretty soft and you would need to hand polish them using Flitz, Simichrome, or a similar hand polish. If the parts are chromed you can use Quick Glo(Can be hard to find) It will clean up light pitting and can give amazing results(It sucks on anything but chrome.
Some metals you would need to wet sand to get it smooth enough to begin polishing
Like chucky says if the pitting is deep you will have a problem eliminating them. Using solder would be a limited solution. It will only work on some metals and it might show as much as the pitting.
If I Remember Correctly (and DerekH, correct me if my memory's faulty) Shapeways is using stainless steel. I've been fortunate enough to be one of the few people that he's allowed to see the pieces he wants to polish, and they're badly pitted, as are all the metal pieces produced by Shapeways. They say that they produce their pieces by PRINTING them. Not entirely sure how that works, especially with stainless steel, but that's their claim. And everything they make comes out a bit rough. Even the plastic pieces may need some sanding to be smooth enough to be satisfactory.

I'm not sure if DerekH is ready to reveal his project to the world, so I'll just show pics of a couple sample pieces seen on the Shapeways site:

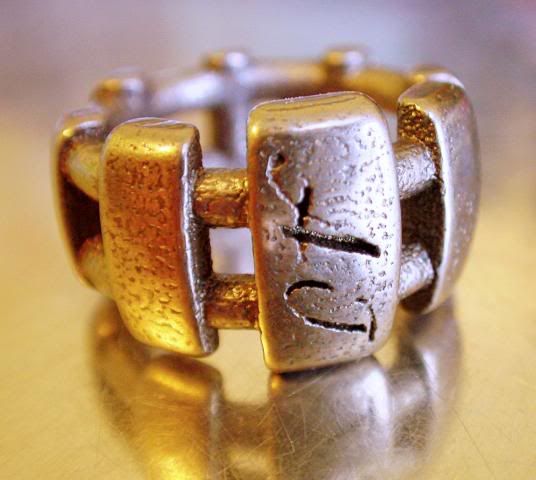
Shapeways stainless steel "bar ring":
ShapewaysBarRing.jpg


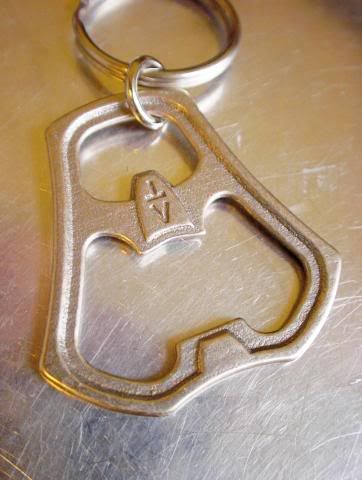
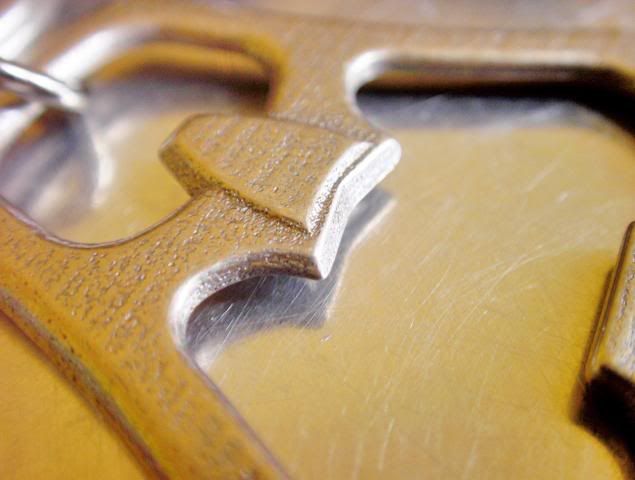
Shapeways stainless steel bottle opener:
ShapewaysBottleOpener1.jpg


ShapewaysBottleOpener2.jpg


ShapewaysBottleOpener3.jpg


So you can see there the problem he's talking about: Fairly uniform pitting all over the pieces they produce. But they're low cost, and they're stainless steel, so it's an affordable way to get metal props replicated inexpensively. If you can provide them with a 3D CAD render of the item, they can produce it for you in either plastic or metal at a very reasonable price. He just needs methods to polish down the stainless steel to get rid of the pitting and to achieve the finish that he's looking for. :cool

Derek, hope I haven't inadvertently said too much with this post. Just trying to assist you in obtaining the desired info as quickly as possible, so you can start perfecting the polishing techniques. :)
 
They say that they produce their pieces by PRINTING them. Not entirely sure how that works, especially with stainless steel, but that's their claim.

They print it with a 'bronze' powder and cover with in a fashion similar to sand casting, they then infuse this powder build up with stainless using capillary action...

The surface is reminiscent of a raw sand cast as they are similar processes...

And everything they make comes out a bit rough. Even the plastic pieces may need some sanding to be smooth enough to be satisfactory.

Well I wouldn't say 'rough' with a good source model and the higher cost materials the finish is honestly damn good nothing more then a slight buff down with some fine sand paper to remove the layer lines is needed to get a real nice finish, in fact a decent coat of primer will remove most of the surface issues in itself...

Back on the topic of the pitting it's simply the way it is for this method of production, short of sanding the crap out of it there isn't much you can do... For small pieces like this it's honestly best to create a master out of whatever and use that to make wax forms for investment casting...
 
They print it with a 'bronze' powder and cover with in a fashion similar to sand casting, they then infuse this powder build up with stainless using capillary action...

The surface is reminiscent of a raw sand cast as they are similar processes...
I see, thanks for the explanation. Interesting process. Now I know... and knowing's half the battle! :):thumbsup
Back on the topic of the pitting it's simply the way it is for this method of production, short of sanding the **** out of it there isn't much you can do... For small pieces like this it's honestly best to create a master out of whatever and use that to make wax forms for investment casting...
Unfortunately, those more conventional methods were looked into. Derek is trying to produce a small run of small metal props for a select group of just a few people. He's already talked to places that would make them with more conventional methods... wax sculpt prototype, make a mold, cast the pieces, yada yada yada. The cost was too high for what he wanted to do, and at least one of the people consulted for prototyping and costing purposes turned out to have NO scruples... he turned around and screwed over Derek and the others involved in this project. He took the molds produced during the prototyping phase and turned out a run that he sold himself, without permission, making the claim that he'd produced them on his own, giving NO credit to Derek and the others involved! (n)angry

I won't name names or say what the pieces were, or where they were sold. That's for Derek to reveal, if he so chooses. But this is a project that's been in the works for awhile and has already had some setbacks. At this point, Shapeways is looking like the only ETHICAL manufacturer that can produce these pieces in the desired price range. :unsure
 
You can drop me a line, I'm just about to get into small spin investment casting... No guarantee on prices or what not but I will guarantee I won't take the design and run...

I can already do sand casting if it's a larger piece, but then it would still have the rough surface...
 
If the pieces are the size of what is pictured, it is going to near impossible to bring on a mirror finish without losing most of the detail.
If you were really patient you could wetsand it pretty smooth. You would need to use a piece of wood to keep the paper flat and so you could work the edges, that would help keep the edge definition and not wash out the details to much. Once you got down thru the pits, you could hand or wheel polish the shine.

It is probably not the finish you are looking for, but they would look pretty good just polished up. The pitting gives a lot of "age" to the pieces.
 
Sorry, I completely forgot about this post in the excitement of getting the item in question.

To start, I spent a great deal of time redoing my original design to accommodate the loss in material that I had read was necessary to remove the pitting. So for each surface I was prepared to lose at least 1 mm from it. After receiving my item, I did some basic guesswork and a little bit of research on what was available to sand it and just basically winged it. Here is the finished piece, post polishing. (For the most part, I have since polished it even more and while it isn't a mirror polish, it is pretty darn close, and all the pitting has been removed everywhere except for the recessed areas behind the symbol.) For reference, I only lost about .5 mm from each surface, which was a nightmare for the inside of the band and required an extensive amount of extra sanding to fit.

RINGDONE.jpg


01.jpg


02.jpg


03.jpg


04.jpg


05.jpg
 
Jack, you have been nothing but a true friend in this. Thanks for that man.

No, no names shall come out, but I have learned a valuable lesson: while it may be longer and harder to do it on your own, you don't have to worry about someone screwing you.

So anyways, that is it. My proverbial white whale. It is done, and surprisingly came out pretty nice. I have each of the corps style models done, and can size them to any size, which is awesome.

Still would like to get some in silver, and can get resin duplicates made that would be usable in place of a wax model (they have low melting points and many have used them in place of wax for lost wax casting) and would love to get a low price for some. Heck, even if they weren't used in place of the wax model, they would be useful for making a mold to make the wax models from.

Honestly, if someone wanted to cast and sell extras for a profit, I wouldn't have a problem with that at all provided they hooked me up with a decent price for me and mine and didn't charge a ridiculous amount for the initial molds or whatever.
 
Great lookig ring Derek. I think the pitting insde the symbol actually makes it stand out more.

I am new to RPF and had never heard of shapeways. When I first started reading this thread I was thinking that would be a great way to make a GL ring, but I thought that they would probably not make it due to liscensing issues. Glad to see I was wrong.
 
Licensing issues does not seem to be much of a problem there, they make Master Sword NDS styluses. Basically they just print and mold objects that members design.
 
That looks really good. It is hard to get a mirror finish on stainless.
For the inside you could use an adjustable reamer rather than sanding. You would get a precise dia. and it would be quicker. You would have to be careful clamping the ring but copper jaw covers would grip Ok and finish the inside before the surface so any marring would be removed when you sanded them down.
 
That turned out fantastic. The contrast from the texture inside the symbol really makes the lantern "pop".

Are you going to be making the model available for others to print?
 
Could any modeler's have a go at creating a Return to OZ key that shapeways could print out? I would love a metal replica. PM me if you want some payment or anything. Key is 3"x1"

propskey4.jpg

propskey2.jpg

propskey4.jpg
 
Back
Top