Sendel
Active Member
Hello everyone,
We’re really close to being ready to mold our Stargate panels and chevrons and wings and glyphs and strips and bumpy rings and whatever you can see on a Stargate.
Now, we’ll have to order everything we need for the molds and the casts and it’ll be a HUUUUUUUGE order with many gallons and it’ll cost a lot of $$$$$$ or for us €€€€€€.
But before making any mistake, we’ve got a few questions, because maybe some of you already made really big molds for sets more than for props. I’m thinking of Daleks, or studio scaled models…
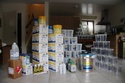
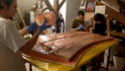
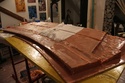
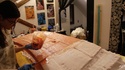
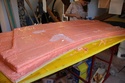
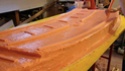
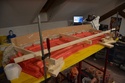
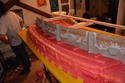
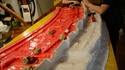
I’m searching for the best materials to mold and cast my parts, here is a picture with everything :

/*/ Some details /*/
-The idea is to order to Smooth-On.
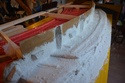
-The size of the biggest panel is 2m x 1m.
-We have to make 10 to 20 casts with each mold.
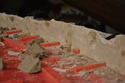
-There are tiny details of 1mm on each panel.
-You can see on the picture above the sizes of the molds : 3 big molds (2m) and 7 little ones (30cm).
-The parts 1 to 4 are hollow, the part 5 is solid and made with clear resin, the part 6 is hollow and made of clear resin and the part 7 to 9 are solid.
-The goal is to make light and durable casts, especially if we hit them because we’ll have transport them a lot.
-The casts will be painted and the clear casts (6) painted in part.
-It’s possible that the final product will be displayed outdoors under the sun and the rain.
-Our budget is not infinite, so we’re aiming for a medium-good quality, not especially the best.
/*/ What I think (and where I need advices) /*/
-For the molds 1 to 3 I would make a brush-on mold so I’m searching for a silicon, maybe a reinforcement cloth if you think it would be useful and a resin for the shell.
Maybe Rebound or Dragon Skin ? / Plasti-Paste or Shell-Shock ?
/The other molds (4 to 9) will be poured so there I just need a silicon.
Mold Star 16 ?
-For the casts, I would make the 1 to 4 with urethane plastic and fiberglass if needed.
Maybe Shell Shock ?
/ the 5 and 6 with the same clear (tinted) and durable resin without reinforcement (we’ve access to a vacuum chamber to avoid bubbles)
Crystal Clear with So-Strong ?
/ the 7 to 9 with a resin made for solid and durable casts.
Smooth-Cast 310 ?
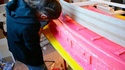
That’s for the materials. But for the process we already attempted to mold one of our panels and the main problem was that one side was not sticking to the jacket as in this drawing :

So I think the best way would be to fill the gap with silicon to avoid the silicon skin to fall, adding chopped old silicon will avoid spending a lot of money just for a bit of mass. One other option would be to make keys that stay in place once the mold is returned, but I really don’t know if it would work…
What do you think ?
I’ll obviously have more questions as we’re still thinking about how to do all these molds, so I hope it’ll be an interesting topic.
Here is the nice answer I received from Smooth-On :
Let me start out by saying your Stargate is very impressive and nicely sculpted.
Because of the size of your larger panels I agree that you want to go with a brush-on rubber. Rebound 25 would be a very good choice for this. You'd want to brush 3-4 layers on and do a thickened layer to smooth out and fill in any undercuts. You can thicken Rebound 25 with Thivex.
For the shell you can go with Plasti-Paste II or Free Form Air. Free Form Air is a bit labor intensive but will give you a lighter shell that you can sculpt smooth and shape better than you can Plasti-Paste II.
Crystal Clear is a good choice for your clear parts. It is UV resistant and very durable. EpoxaCast 690 is also a possibility but it is not as UV resistant as Crystal Clear.
Mold Star 16 is a very good choice for your straight cast parts. It is what we use here when we need to make basic molds for casting. Easy to work with and very durable and long lasting.
Shell Shock will work well and pick up all your detail for your larger panels. You would want to brush in 2-3 coats then back it with glass cloth and Epoxamite. If you want an even stronger piece I'd press in a layer of Free Form Air behind the shell shock and then back that with the glass and Epoxamite resin. That will give your pieces more thickness and added strength while not increasing the weight much. You'd want to press in a layer of Free Form Air that is between .25 and .5" depending on what you prefer.
Smooth-Cast 310 will work for your cast parts if you plan to paint them or you could go with Smooth-Cast 326 which is a clear amber and you could pigment the resin instead of painting. IF you use UVO tints your cast would be opaque and the colors are UV resistant.
We’re really close to being ready to mold our Stargate panels and chevrons and wings and glyphs and strips and bumpy rings and whatever you can see on a Stargate.
Now, we’ll have to order everything we need for the molds and the casts and it’ll be a HUUUUUUUGE order with many gallons and it’ll cost a lot of $$$$$$ or for us €€€€€€.
But before making any mistake, we’ve got a few questions, because maybe some of you already made really big molds for sets more than for props. I’m thinking of Daleks, or studio scaled models…
I’m searching for the best materials to mold and cast my parts, here is a picture with everything :
/*/ Some details /*/
-The idea is to order to Smooth-On.
-The size of the biggest panel is 2m x 1m.
-We have to make 10 to 20 casts with each mold.
-There are tiny details of 1mm on each panel.
-You can see on the picture above the sizes of the molds : 3 big molds (2m) and 7 little ones (30cm).
-The parts 1 to 4 are hollow, the part 5 is solid and made with clear resin, the part 6 is hollow and made of clear resin and the part 7 to 9 are solid.
-The goal is to make light and durable casts, especially if we hit them because we’ll have transport them a lot.
-The casts will be painted and the clear casts (6) painted in part.
-It’s possible that the final product will be displayed outdoors under the sun and the rain.
-Our budget is not infinite, so we’re aiming for a medium-good quality, not especially the best.
/*/ What I think (and where I need advices) /*/
-For the molds 1 to 3 I would make a brush-on mold so I’m searching for a silicon, maybe a reinforcement cloth if you think it would be useful and a resin for the shell.
Maybe Rebound or Dragon Skin ? / Plasti-Paste or Shell-Shock ?
/The other molds (4 to 9) will be poured so there I just need a silicon.
Mold Star 16 ?
-For the casts, I would make the 1 to 4 with urethane plastic and fiberglass if needed.
Maybe Shell Shock ?
/ the 5 and 6 with the same clear (tinted) and durable resin without reinforcement (we’ve access to a vacuum chamber to avoid bubbles)
Crystal Clear with So-Strong ?
/ the 7 to 9 with a resin made for solid and durable casts.
Smooth-Cast 310 ?
That’s for the materials. But for the process we already attempted to mold one of our panels and the main problem was that one side was not sticking to the jacket as in this drawing :
So I think the best way would be to fill the gap with silicon to avoid the silicon skin to fall, adding chopped old silicon will avoid spending a lot of money just for a bit of mass. One other option would be to make keys that stay in place once the mold is returned, but I really don’t know if it would work…
What do you think ?
I’ll obviously have more questions as we’re still thinking about how to do all these molds, so I hope it’ll be an interesting topic.
Here is the nice answer I received from Smooth-On :
Let me start out by saying your Stargate is very impressive and nicely sculpted.
Because of the size of your larger panels I agree that you want to go with a brush-on rubber. Rebound 25 would be a very good choice for this. You'd want to brush 3-4 layers on and do a thickened layer to smooth out and fill in any undercuts. You can thicken Rebound 25 with Thivex.
For the shell you can go with Plasti-Paste II or Free Form Air. Free Form Air is a bit labor intensive but will give you a lighter shell that you can sculpt smooth and shape better than you can Plasti-Paste II.
Crystal Clear is a good choice for your clear parts. It is UV resistant and very durable. EpoxaCast 690 is also a possibility but it is not as UV resistant as Crystal Clear.
Mold Star 16 is a very good choice for your straight cast parts. It is what we use here when we need to make basic molds for casting. Easy to work with and very durable and long lasting.
Shell Shock will work well and pick up all your detail for your larger panels. You would want to brush in 2-3 coats then back it with glass cloth and Epoxamite. If you want an even stronger piece I'd press in a layer of Free Form Air behind the shell shock and then back that with the glass and Epoxamite resin. That will give your pieces more thickness and added strength while not increasing the weight much. You'd want to press in a layer of Free Form Air that is between .25 and .5" depending on what you prefer.
Smooth-Cast 310 will work for your cast parts if you plan to paint them or you could go with Smooth-Cast 326 which is a clear amber and you could pigment the resin instead of painting. IF you use UVO tints your cast would be opaque and the colors are UV resistant.
Last edited: