Hi Gang!
Been away for a while as I've been all over with other projects, but I'm finally getting back to my prop stuff!
I recently had the opportunity to nab a MIller Meteor Cadillac, and have started to get her restored. I was drawn to this car as a haunted house project/prop, and a great way to test my skills on a car. When I saw her body online, I was disappointed that she probably would make a terrible Ecto, so I figured buy, fix, resell. Once I received her and saw her up close, my mind was blown. This car is more 59 than 61, and would easily make an Ecto. The guy who sold her to me confirmed that he was also going to build up one, but had too many projects on the table. So after much thinking, trolling pro car forums, and checking all available info I decided to start converting her into an Ecto-1A.


I've started on the interior, and while I improve and repair the exterior, the mechanics have been climbing in and out of her fixing and bringing much of her back to life. The car will be a great addition to our local haunted house for the next two years. Once that wraps, she'll go back to Maryland for her panel swap to a 59. The 61 panels will live again on another ratrod. My 59 is already there!!
A little history on this girl.
She's a Series 6890 Commercial Chassis. The Chassis was built the 4th. Week of March 1961 and is Chassis Number 1,862 out of a Total of 2,204 for the Year (Michigan born).
The chassis was then Shipped to Miller Meteor (Ohio bred) for the coachwork to be accomplished. Her id number is Z61746. One of my favorite moments since receiving her has been finding '746' scribbled everywhere. Most of the car is in such good shape that chalk and pencil have survived on these different surfaces.

She spent her life as a hearse in North Carolina, and after the death of her owner in 2012, it went to a Rat-Rodder in Maryland. He's got quite the collection of hearses and other cars. She is in running condition and still has her original brake pads, engine, and only has 42,000 miles on her. Her trip mileage oddly enough sits now at 666. OoooooOOOOOoooo!!! Her power plant is a beaut, big ole' 340 V8 in there. She really rumbles. Brakes have just been repaired, carb and engine getting tuned up. Needs a new gas tank and exhaust, but I'm in no hurry.
Body wise, her floor pans and rocker panels are gone, or just about to go, and there's ALOT of junk (bondo and latex paint) all over her. Chrome and stainless are solid though, and she'll get a new paintjob next summer. I'll be welding new panels and rockers in round about the end of May.
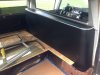
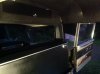
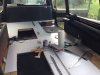
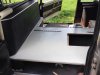
I've started pulling out the interior over the last two months. Everything was badly water damaged from leaks on the windows. Those have been repaired. She's sealed tight now, and has two rainstorms under her belt to prove it. Two pieces of glass are cracked, and one vent piece has to go too. The biggest hurdle I recently accomplished was getting the floor out, which had rotted away to the point of dust in some spots. At this point I had a choice to make. Keep it a hearse, convert to combo, or just go straight to ambulance. After asking around, I scored stainless trim and accurate jump seats to do a new floor and convert the interior to and Ecto-1A. I've alos made some interesting headway on all the odd panels on the interior, but more on that later.


So at this point, I've removed the entire interior of the rear, pulled all the door panels, repaired my headliner, id'd my vinyl (and subsequently the Ecto 1A's), and have started cleaning, restoring, rewiring, and on, and on and on. More to come, our next stop will be cleaning the chrome and stainless, then getting it painted and back into the car!
Stay tuned!
.
Been away for a while as I've been all over with other projects, but I'm finally getting back to my prop stuff!
I recently had the opportunity to nab a MIller Meteor Cadillac, and have started to get her restored. I was drawn to this car as a haunted house project/prop, and a great way to test my skills on a car. When I saw her body online, I was disappointed that she probably would make a terrible Ecto, so I figured buy, fix, resell. Once I received her and saw her up close, my mind was blown. This car is more 59 than 61, and would easily make an Ecto. The guy who sold her to me confirmed that he was also going to build up one, but had too many projects on the table. So after much thinking, trolling pro car forums, and checking all available info I decided to start converting her into an Ecto-1A.
I've started on the interior, and while I improve and repair the exterior, the mechanics have been climbing in and out of her fixing and bringing much of her back to life. The car will be a great addition to our local haunted house for the next two years. Once that wraps, she'll go back to Maryland for her panel swap to a 59. The 61 panels will live again on another ratrod. My 59 is already there!!
A little history on this girl.
She's a Series 6890 Commercial Chassis. The Chassis was built the 4th. Week of March 1961 and is Chassis Number 1,862 out of a Total of 2,204 for the Year (Michigan born).
The chassis was then Shipped to Miller Meteor (Ohio bred) for the coachwork to be accomplished. Her id number is Z61746. One of my favorite moments since receiving her has been finding '746' scribbled everywhere. Most of the car is in such good shape that chalk and pencil have survived on these different surfaces.
She spent her life as a hearse in North Carolina, and after the death of her owner in 2012, it went to a Rat-Rodder in Maryland. He's got quite the collection of hearses and other cars. She is in running condition and still has her original brake pads, engine, and only has 42,000 miles on her. Her trip mileage oddly enough sits now at 666. OoooooOOOOOoooo!!! Her power plant is a beaut, big ole' 340 V8 in there. She really rumbles. Brakes have just been repaired, carb and engine getting tuned up. Needs a new gas tank and exhaust, but I'm in no hurry.
Body wise, her floor pans and rocker panels are gone, or just about to go, and there's ALOT of junk (bondo and latex paint) all over her. Chrome and stainless are solid though, and she'll get a new paintjob next summer. I'll be welding new panels and rockers in round about the end of May.
I've started pulling out the interior over the last two months. Everything was badly water damaged from leaks on the windows. Those have been repaired. She's sealed tight now, and has two rainstorms under her belt to prove it. Two pieces of glass are cracked, and one vent piece has to go too. The biggest hurdle I recently accomplished was getting the floor out, which had rotted away to the point of dust in some spots. At this point I had a choice to make. Keep it a hearse, convert to combo, or just go straight to ambulance. After asking around, I scored stainless trim and accurate jump seats to do a new floor and convert the interior to and Ecto-1A. I've alos made some interesting headway on all the odd panels on the interior, but more on that later.
So at this point, I've removed the entire interior of the rear, pulled all the door panels, repaired my headliner, id'd my vinyl (and subsequently the Ecto 1A's), and have started cleaning, restoring, rewiring, and on, and on and on. More to come, our next stop will be cleaning the chrome and stainless, then getting it painted and back into the car!
Stay tuned!
.