Hey, I've been a fan of therpf.com for a while now, I mostly lurk, but I thought I'd share a project I did for a party I went to in Feb: A built-from-scratch Pipboy 3000:
The total build time from gathering artwork and making templates to finished piece was about three weeks, but it was only like 40-50 hours of that since I work full time and had other stuff going on.
The wife and I have been wanting some good Pipboys to play around with for a while now, and unfortunately the Official Limited Edition one offered with Fallout 3 was made with a flimsy plastic and not worth the $100-300 people are currently asking for it. Skruffy made some great copies of that one, but his run was over by the time I found about about it, and there were things I didn't like on the official one anyway. I made this one with parts and urethane mold rubber I had laying around the house. I have a list of about 15 things I want to change on the next one I build, which I'm working on now, but for a Saturday night costume party, this one was more than good enough. On to the build pics!
Hope I don't break any tables here, sorry if the pics are too big!
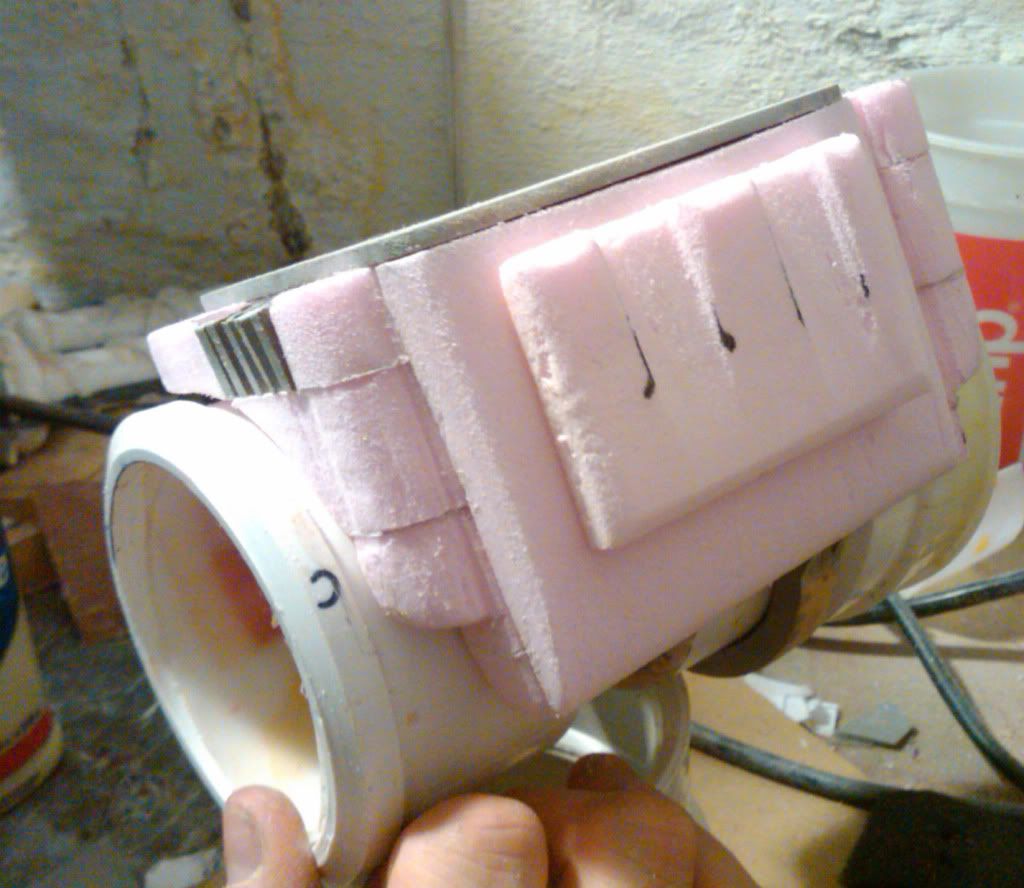
I started out with a PVC coupler and some good ol' polystyrene. I used a mix of PVC sheets and Sintra for the flat bits since it machines well with a Dremel. The nice thing about the Pipboy is that they're supposed to look old, beat up, worn, and damaged, so I really didn't have to worry about 500 grit sanded, high detail precision on this project.
More parts added! The PVC coupler/reducer was stretched to the length I needed by cutting it in half and using part of a QuikTrip cup as a spacer. The rest of it was used for the square "fins" on the left side of the Pipboy. Also added the clamp/strap, dial, and dial plate. The dial wheel is the plastic top from a Pepsi bottle. It's okay, but I've had problems with Smooth Cast and air bubbles in tiny little places like that, so I'm replacing it with a gear with wider teeth on the next one I do. Funny story, I used to live a couple blocks away from a QuikTrip when I lived in Des Moines, and every time I went to get a big gulp style drink, I'd get a new cup. I stockpiled about 75 of these things and like to use them in various projects. Hooray for cheap plastic containers!
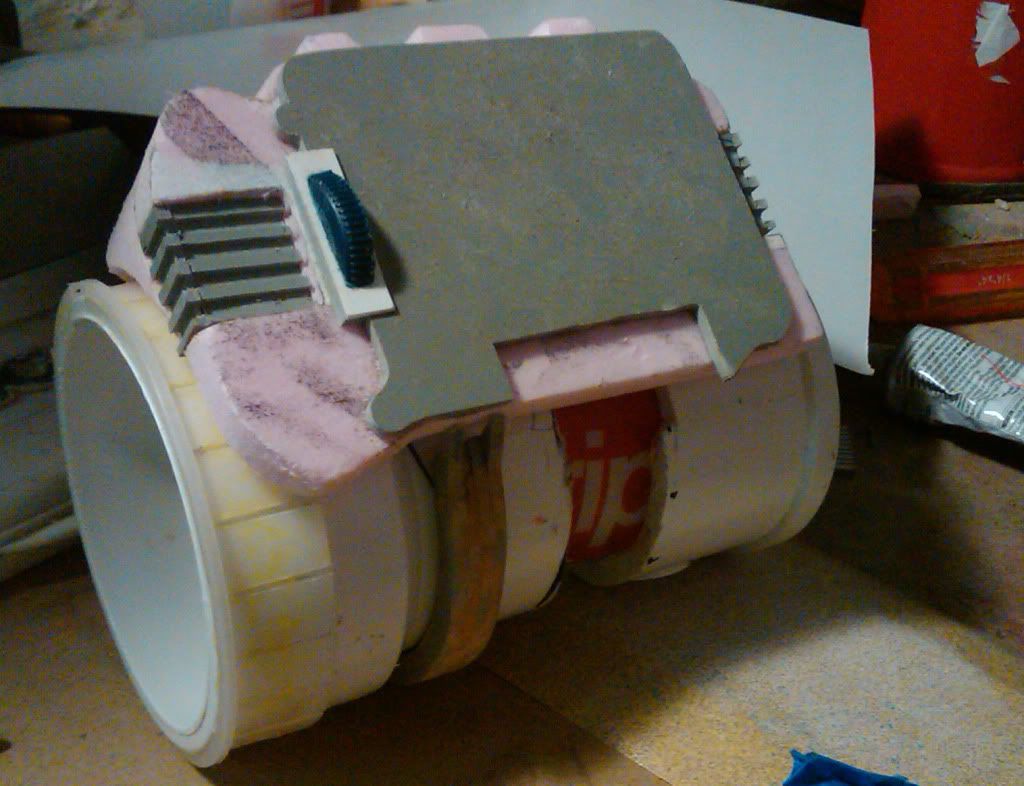
More details added! Polystyrene screen (it was easier and faster to shape than MDF but I ran into a huge problem later) and Sintra screen shroud added, and I put a coat of black acrylic on the polystyrene so show me where I needed more sanding. If you look closely, you'll notice two Stanley 99E Classics in this photo! My most used tool!
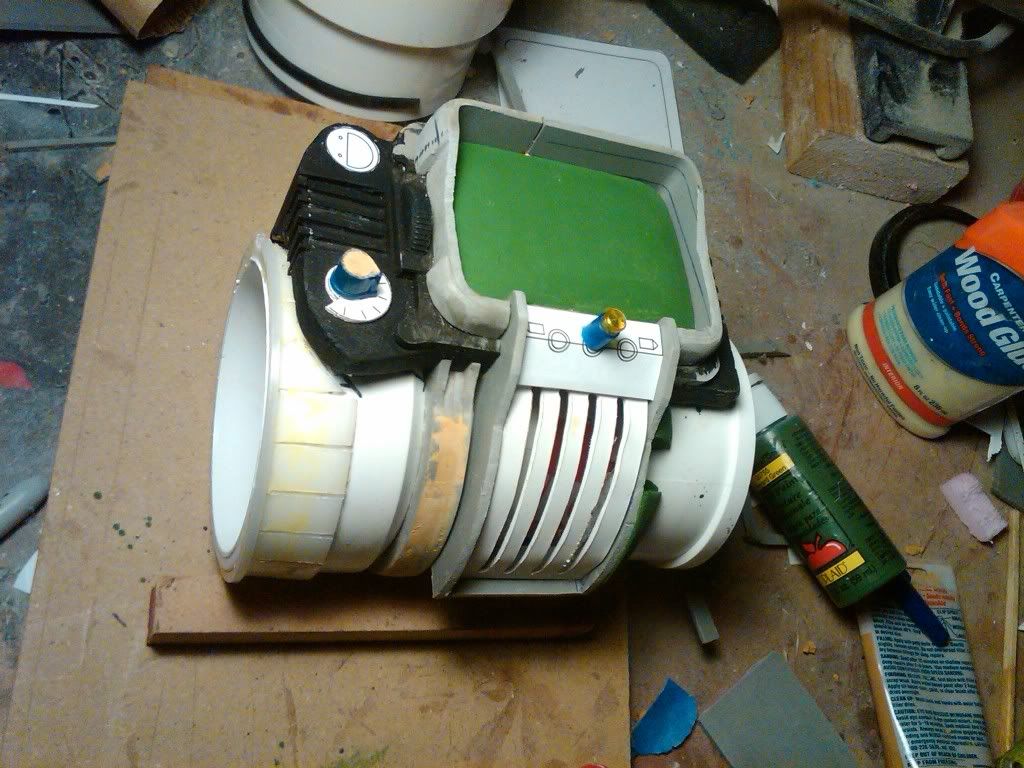
More PVC sheet, Sintra, and polystyrene details added, and a mockup of the ribbed center piece (the white part in the pic) was fitted. I was hoping to use the router to cut the slots in a piece of PVC sheet and then use a heat gun to bend it to the curve needed as in the picture, but it would heat unevenly and warp/shrink and after 4 attempts I couldn't get one to come out clean enough. The blue pieces are pen caps I altered. Also, the white/black parts are some the templates I used.
I really can't stress enough, if you're going to build something completely from scratch, learn Adobe Illustrator, use it to take all your measurements, and print out scaled templates to trace/cut/follow! This way you're essentially assembling a kit that you designed, and it takes 90% of the guesswork out of assembly and parts fabrication. The 10% of guesswork comes from doing dumb things, like gluing the main control panel of the Pipboy to the PVC cylinder at an off-kilter angle because it's not tapered like the original, which ended up throwing off a lot of my measurements.
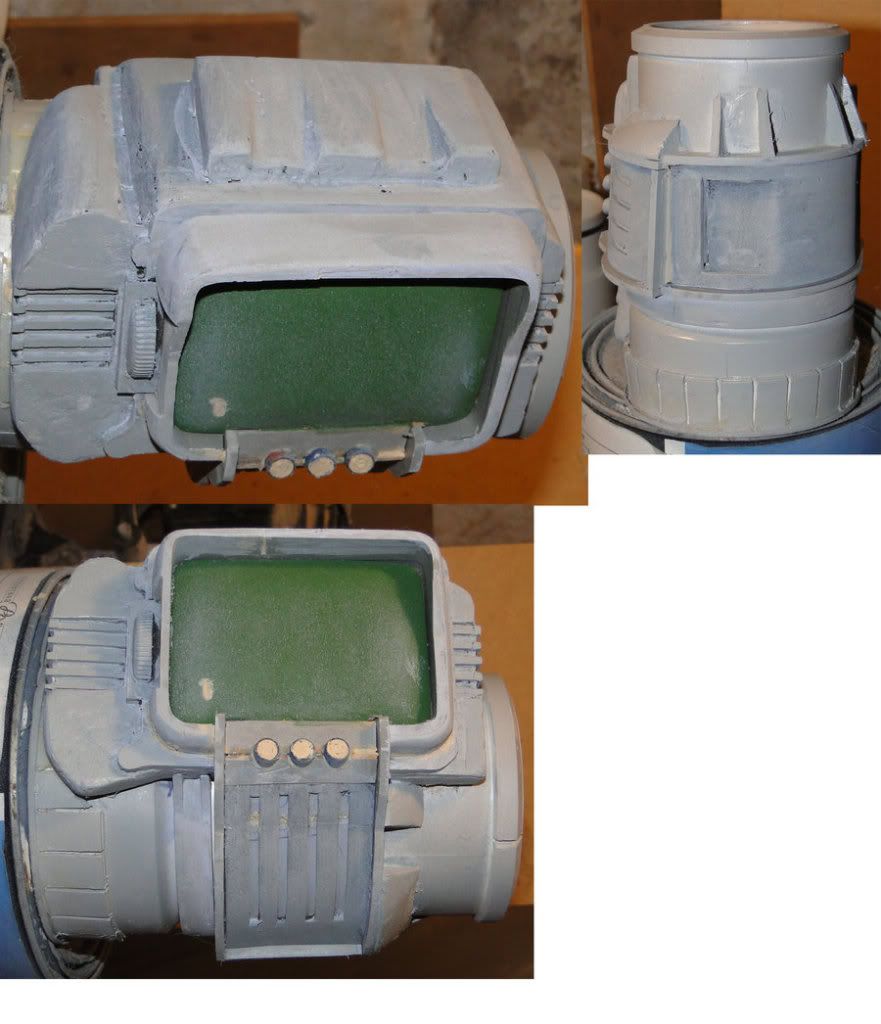
Soooooo I guess I didn't take any progress pictures of the back? The upper right photo is the detail on the back, and here I added polystyrene, Sintra, wood filler, and adhesive Foamies Craft Foam (polyethylene?) I coated the whole thing in a couple layers of auto primer so I could see where I needed to sand or fill more.
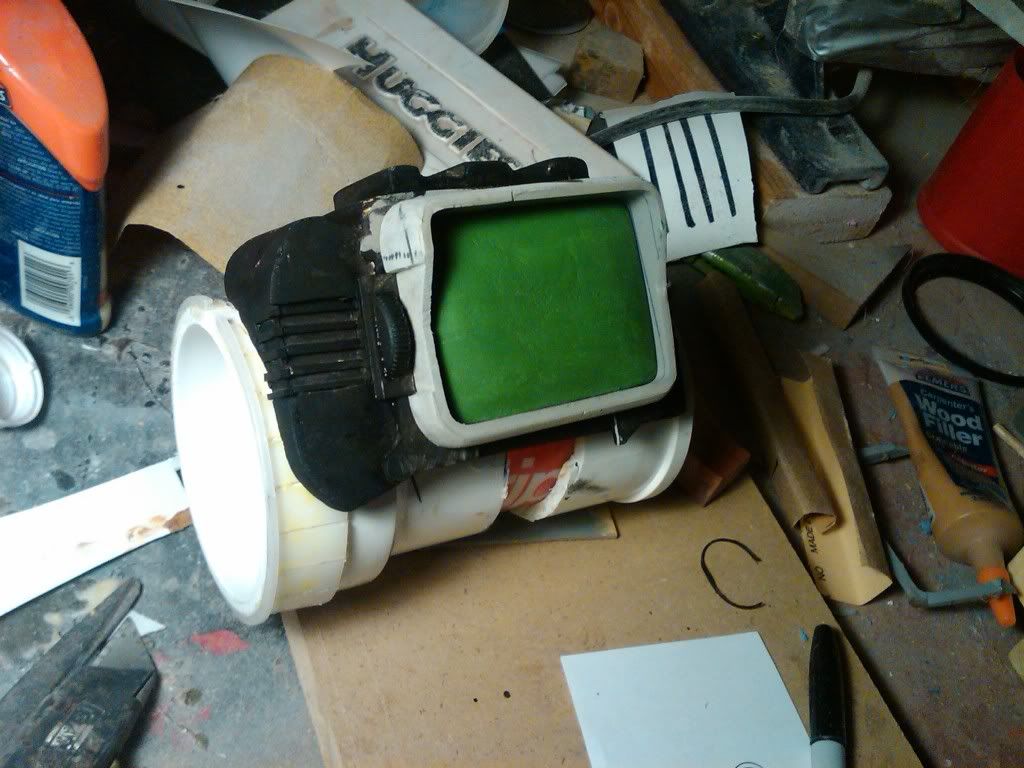
I also made a horrible mistake with the screen. When I was a Design student, I was taught you seal polystyrene with acrylic paint so you can apply rattle can spraypaints or clear coat or whatever overtop of it without having the acetone melt your polystyrene. Your paint still eats through the acrylic layer? Should have used more acrylic paint. I have NEVER gotten this to work and later found that latex paint is a much better one-coat sealant, but it doesn't sand as nicely as acrylic and for some reason I thought I'd be able to seal the polystyrene screen with acrylic paint well enough to put a few layers of clear coat on it to give the surface a REALLY smooth surface. Turns out the screen wasn't sealed enough and the clear coat got under the acrylic and started eating up the polystyrene. Frowny face.
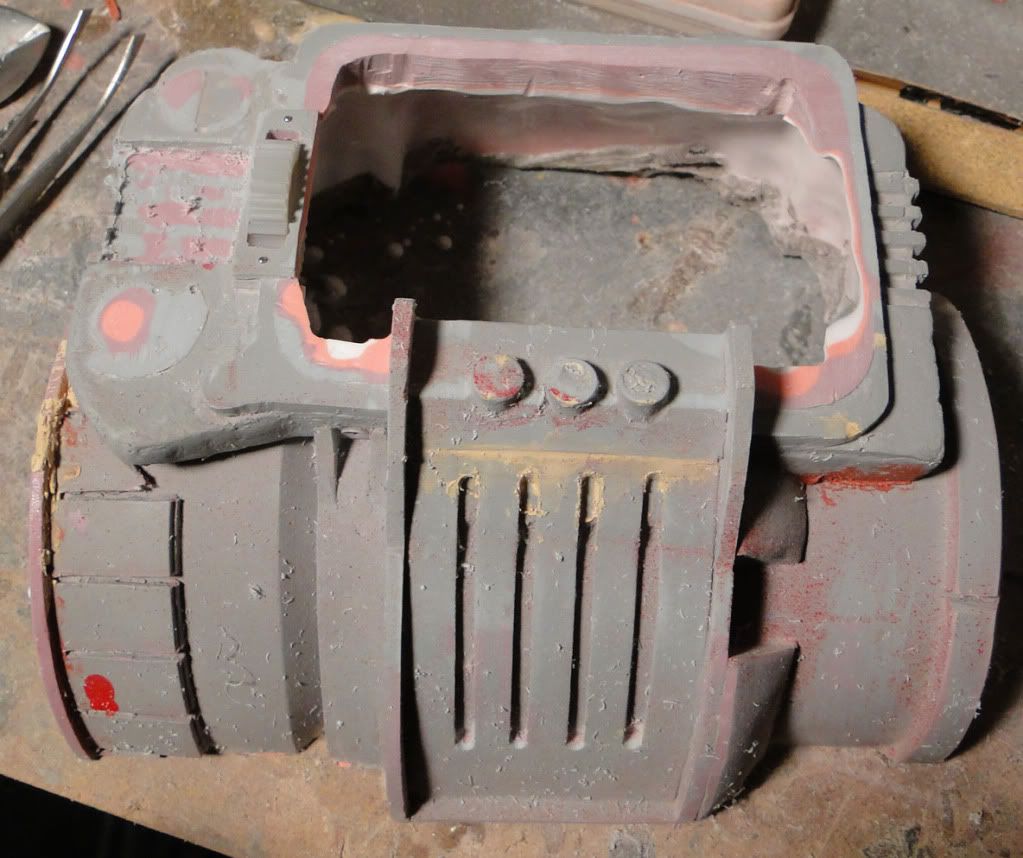
Started with the back half when making molds. The Smooth On urethanes I had were over a year and a half old, some were opened and were getting kind of skeezy. I wasn't sure if the urethane rubber would cure, or if there were going to be too many air bubbles, but I combined some old, opened Part A Brush On with some new Part B PMC 121/30 Dry (it's the exact same Part B for both) and made it work. Mother mold was Plaster O'Paris and burlap (still my favorite, it's very cheap and very quick).
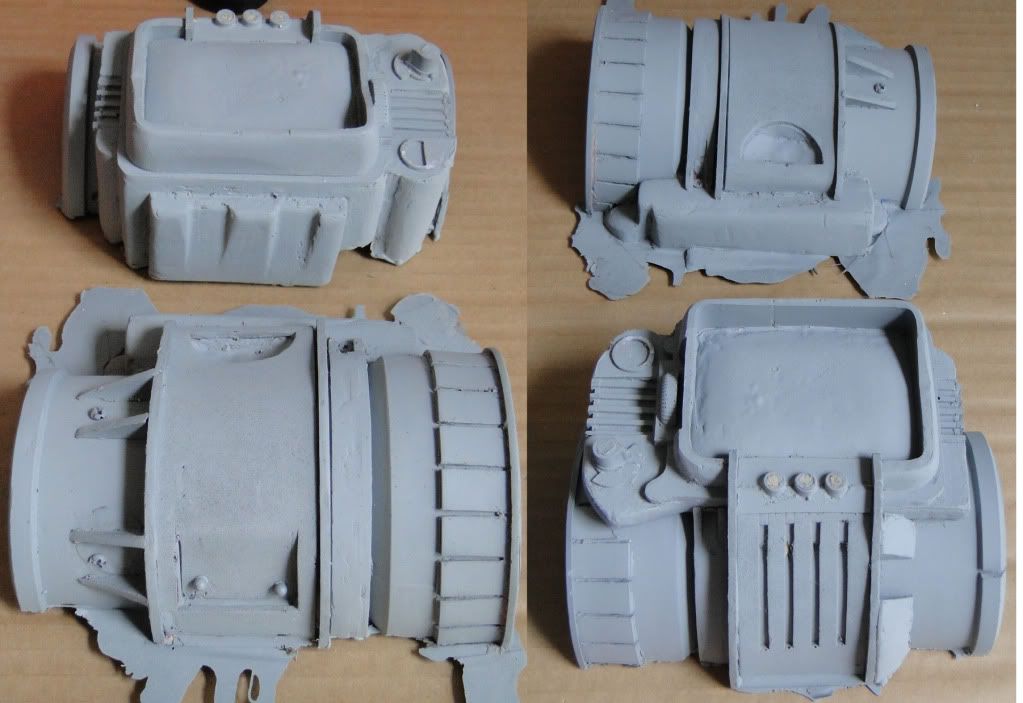
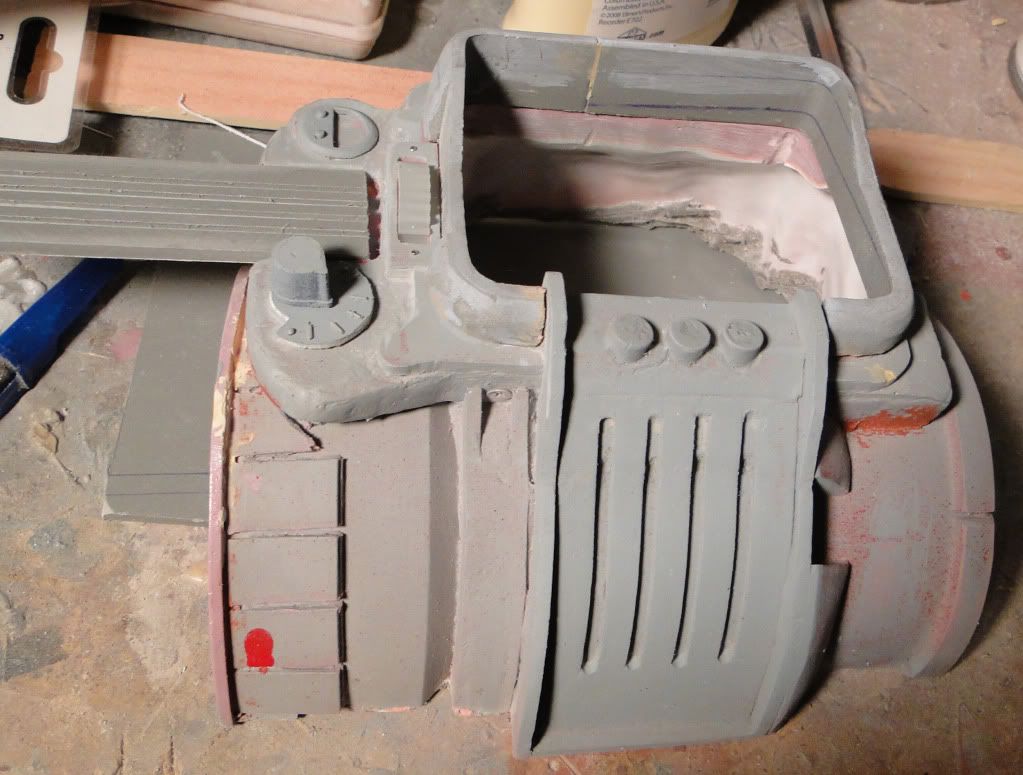
First pull from the molds. I put a couple layers of primer in the mold before pouring in the Smooth Cast 300 so I'd get a good protective surface. For the life of me, I've never been able to get paint to stick to Smooth On resins without either flaking off, orange peel-ing, or fisheye-ing. There was a tech bulletin on Smooth On's website a few years ago where they basically said "Yeah, we know. Paint don't stick. Use auto primer or Bulldog first". Anyway, the molds held up enough for this one pull (it's four pics of the same two halves, not two pulls from two molds) and it was time to get to painting and cleaning. Or cleaning and painting.
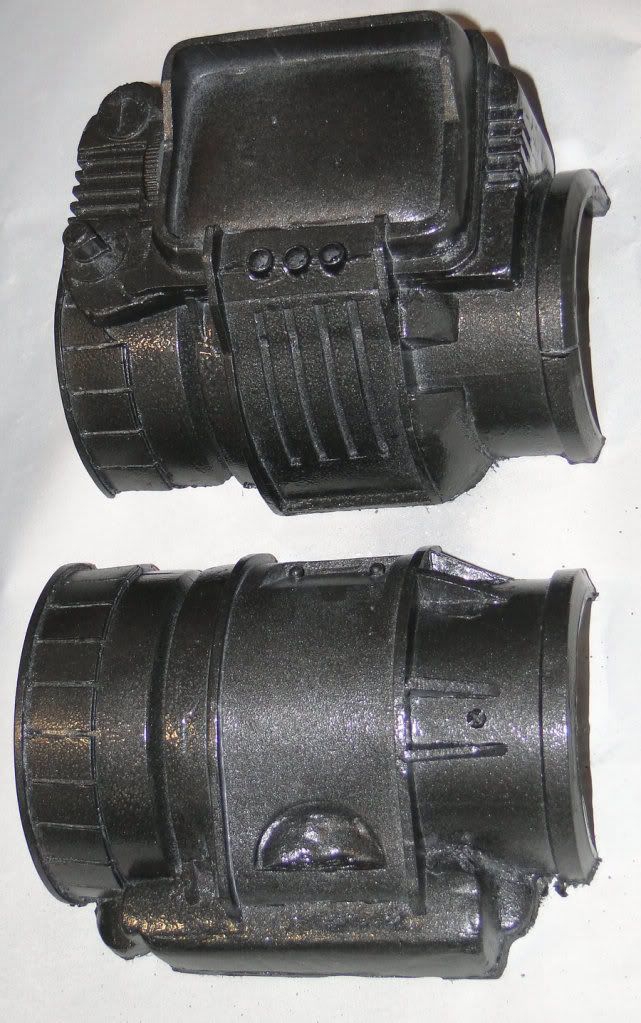
First layer of paint to be put down over the primer (and yes, I did try to scrub it down with degreasing soap first. Not a fan of washing parts with acetone because it has a tendency to also take the primer with it) was one of the colors I use on just about every prop I do: Rustoleum Metallic Charcoal AKA "cheap gunmetal in a rattle can". And hey, what a suprise! Multiple light passes from 10-14 inches still produces the orange peel effect that I didn't want. I'm starting to think it's not my lack of part cleaning, or Smooth On urethane resin's hatred of paints, but maybe that I'm not sanding enough? Maybe it's particulate on the surface that the paint is avoiding or globbing around? Anyway F YOU RUSTOLEUM, orange peel texture is EXACTLY WHAT I WANT HERE! I just didn't know it until I started putting the OD Green on.
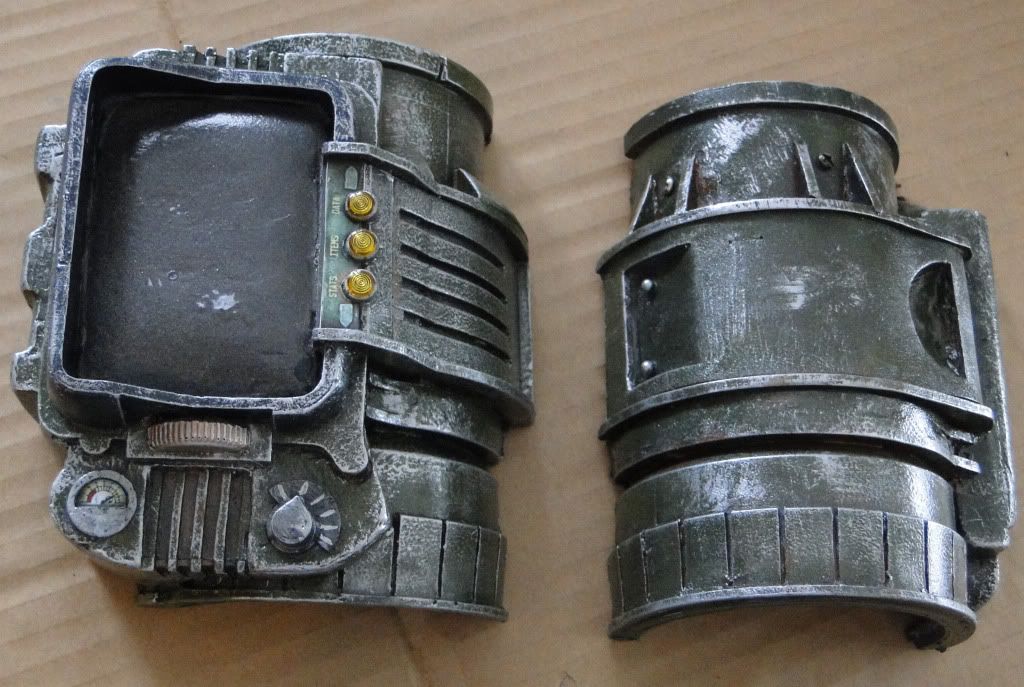
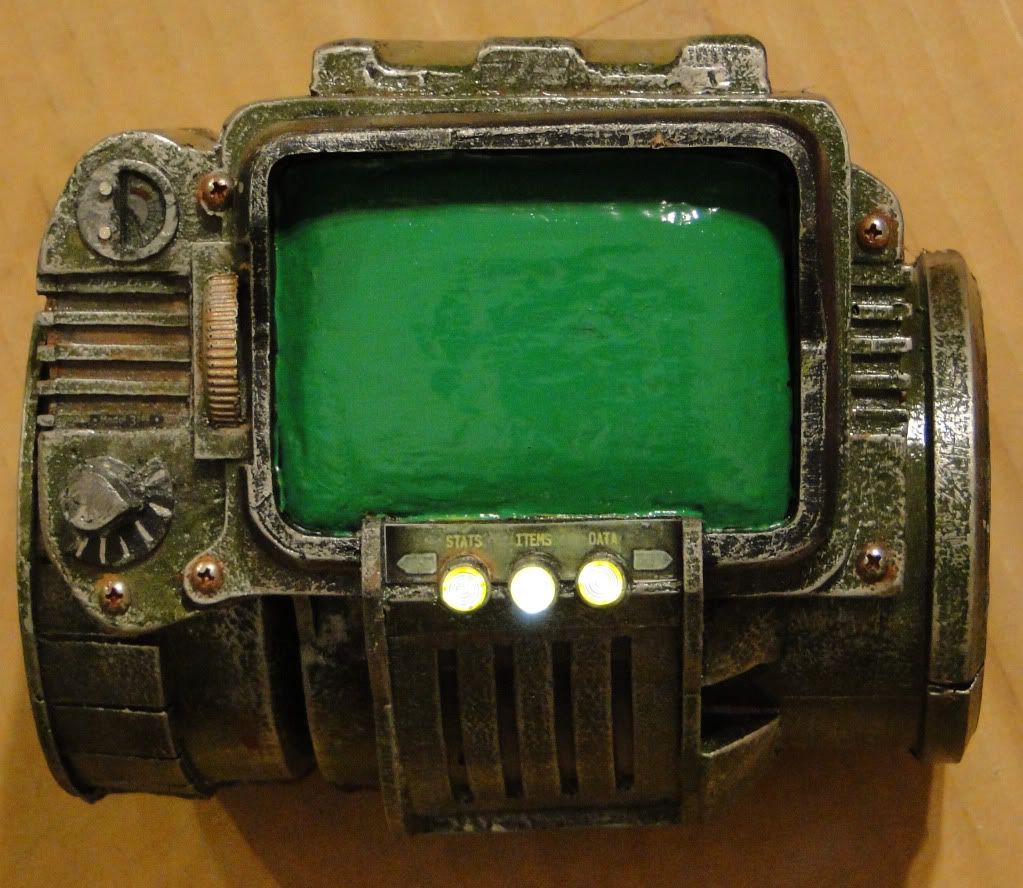
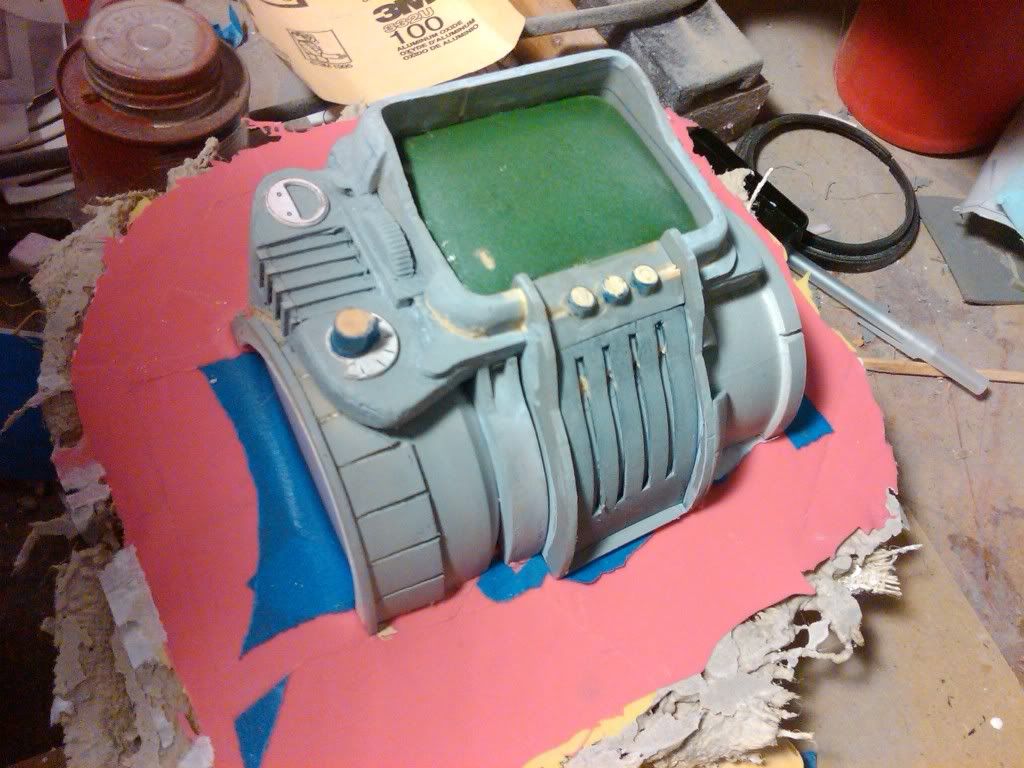
So the fun thing about that coat of Rustoleum I put on was that now I had a great "pitted" surface to work with. I don't think I could have gotten the silver drybrush detail without there being high and low points on the smooth surfaces. I put a light coat of OD Green on the whole thing (save for the darkest recesses and deepest cracks) and started drybrushing a LOT of silver on.
If you're familiar with the Fallout universe, you'd understand that 1) these things when brand new would have been military/govt issue, hence the OD Green (which is also visible in the game) and 2) Your character is wearing one that is what, 100 years old? if it didn't look beat up when he got it, it would have been weathered heavily wandering the dusty, sandy wastelands. There's not much paint left, there's probably some rust, and a lot of little scratches, dents, scars, etc.
Sorry for the photo's color shift here, I took some more pictures under different/better lighting.
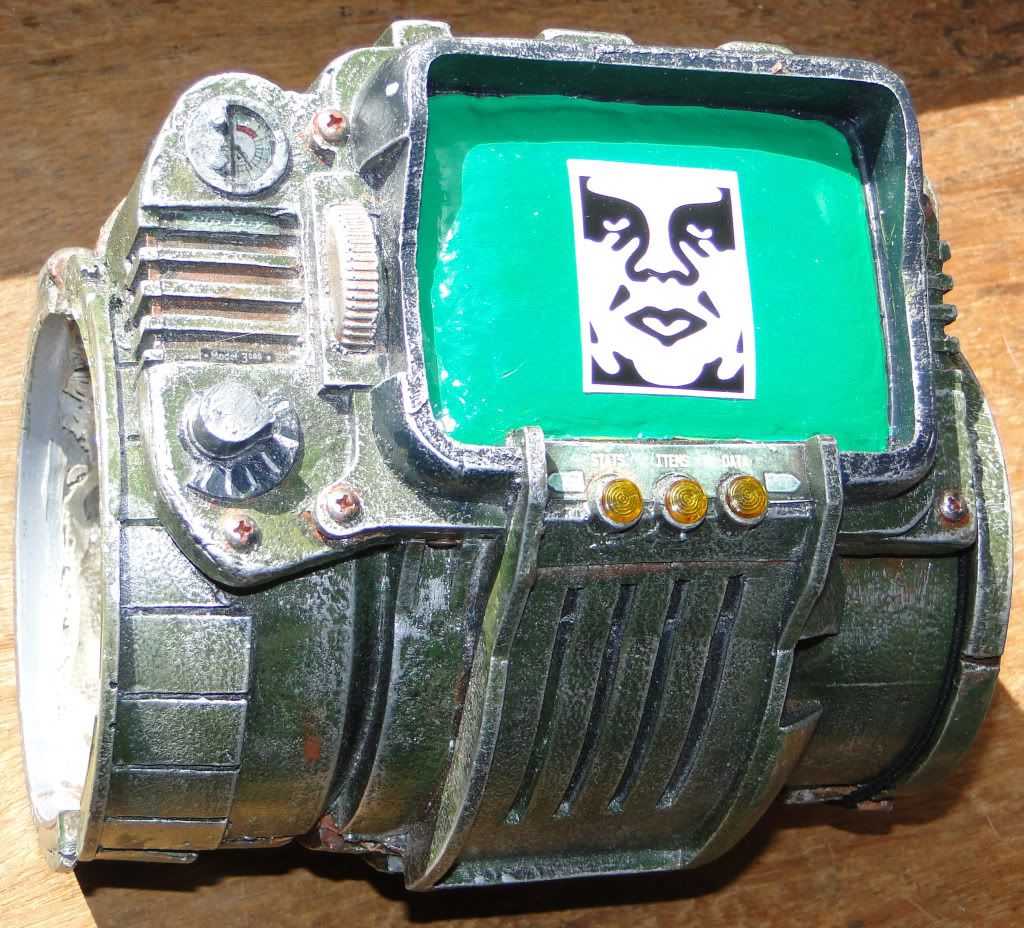
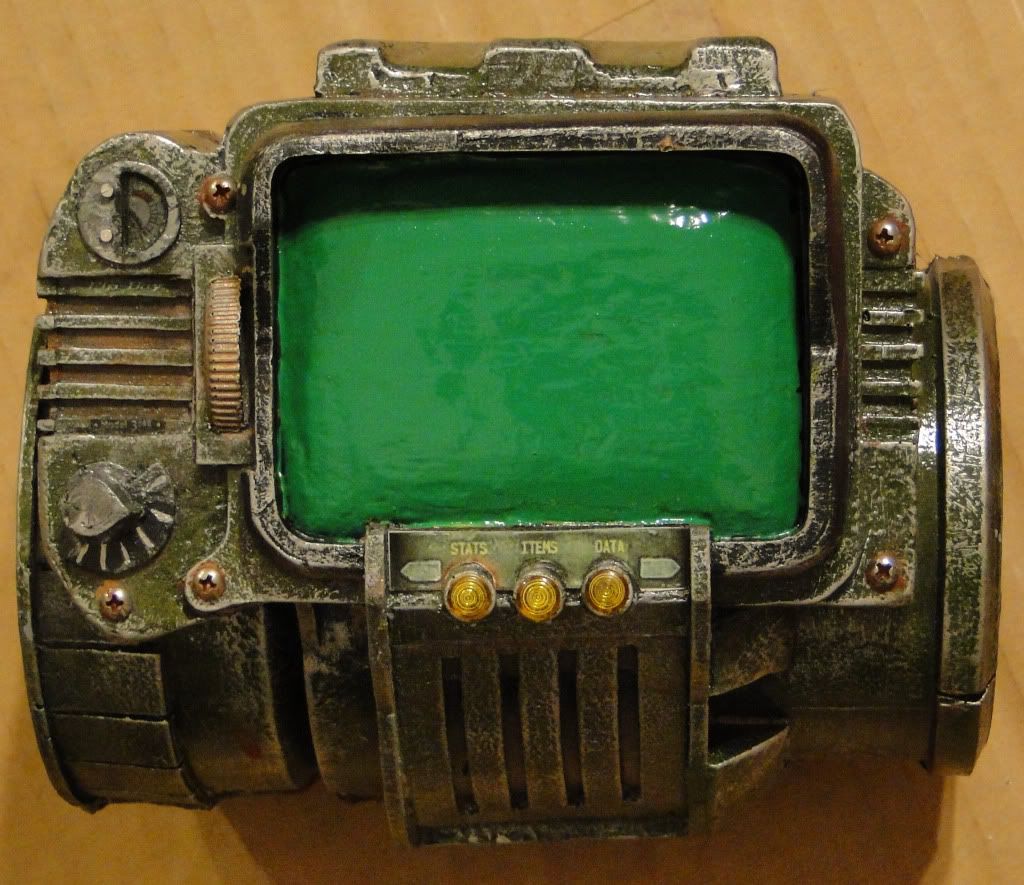
I added some rust color to a bunch of spots, and put some "decals" on. I printed out a screenshot from the game, and cut out the radiation meter, the barely visible "Pip-Boy", "Model 3000" and the "Stats Item Data" section above the lights/buttons. Illustator! It's good for making templates AND your own decals! I did these on regular printer paper and applied them with Super 77, but if you're going to make your own decals and don't want to pay for Testors Printable Decal Sheets, use a high gloss paper or photo paper, and seal it with a layer of clear coat. The ink soaks into regular printer paper, and sealing it just makes it fade more. However with a glossy paper, the ink stays on the surface, and a layer of clear coat really makes the colors pop. But whatever, by this time I was painting and repainting the Friday night and Saturday morning of the Saturday night party, so I couldn't be as precise as I would have liked. As far as the screen, well that was an acetone fueled nightmare, but it was my own fault for rushing. You'll notice the resin pulls from the mold have a bumpy, bubbled screen and I didnt' have time to go over it with filler, sand, re fill, re sand, etc. so I put a coat of a dark metallic black down to make it look like it was turned off, and also to hide the imperfections in the screen. My wife said "you went through all that trouble to make a Pipboy and you're not going to have the screen lit up?" So I decided to make a quick screenshot decal of a status screen to glue in the center of the screen. Unfortunately, the Super 77 has acetone in it which dissolved the paint layer that was already on the screen an made a goopy mess with a "screen shot decal" on it. It looked terrible, so I scraped most of that off and tried applying a bright green nail polish that was a similar color to the in-game model's screen. The theory was that 1)nail polish drys fast and I only have 3 hours left to finish this thing, 2) nail polish goes on thick and is kind of self leveling so it will fill in some of the blemishes on the resin screen's surface, 3) I really don't have any other colors of green in the house that I like. So I started putting on the nail polish and noticed that when I brushed it on green, it was leaving streaks of black in the brush strokes. Whoops, nail polish also has a solvent in it, and it was picking up whatever glue and paint was left on the screen, dissolving it, and mixing it into the nail polish. So I had to scrap that idea. Strangely enough, we had this lovely green latex house paint left over from something (that's one of the great things about living with an amateur theater producer) so I put a couple coats of that on and called it a day.
You can see more/larger/different pictures of the final piece and some additional build pics here if you're interested:
Pipboy 3000 Build by meowymeowmeow on deviantART
I'll update this thread with build progress from Version II which will be a mold of the two main halves and another mold of most of the little bits cast separately since I hate air bubbles in my resin as well as a larger screen shroud size to fit my brother's Zune.
The total build time from gathering artwork and making templates to finished piece was about three weeks, but it was only like 40-50 hours of that since I work full time and had other stuff going on.
The wife and I have been wanting some good Pipboys to play around with for a while now, and unfortunately the Official Limited Edition one offered with Fallout 3 was made with a flimsy plastic and not worth the $100-300 people are currently asking for it. Skruffy made some great copies of that one, but his run was over by the time I found about about it, and there were things I didn't like on the official one anyway. I made this one with parts and urethane mold rubber I had laying around the house. I have a list of about 15 things I want to change on the next one I build, which I'm working on now, but for a Saturday night costume party, this one was more than good enough. On to the build pics!
Hope I don't break any tables here, sorry if the pics are too big!
I started out with a PVC coupler and some good ol' polystyrene. I used a mix of PVC sheets and Sintra for the flat bits since it machines well with a Dremel. The nice thing about the Pipboy is that they're supposed to look old, beat up, worn, and damaged, so I really didn't have to worry about 500 grit sanded, high detail precision on this project.
More parts added! The PVC coupler/reducer was stretched to the length I needed by cutting it in half and using part of a QuikTrip cup as a spacer. The rest of it was used for the square "fins" on the left side of the Pipboy. Also added the clamp/strap, dial, and dial plate. The dial wheel is the plastic top from a Pepsi bottle. It's okay, but I've had problems with Smooth Cast and air bubbles in tiny little places like that, so I'm replacing it with a gear with wider teeth on the next one I do. Funny story, I used to live a couple blocks away from a QuikTrip when I lived in Des Moines, and every time I went to get a big gulp style drink, I'd get a new cup. I stockpiled about 75 of these things and like to use them in various projects. Hooray for cheap plastic containers!
More details added! Polystyrene screen (it was easier and faster to shape than MDF but I ran into a huge problem later) and Sintra screen shroud added, and I put a coat of black acrylic on the polystyrene so show me where I needed more sanding. If you look closely, you'll notice two Stanley 99E Classics in this photo! My most used tool!
More PVC sheet, Sintra, and polystyrene details added, and a mockup of the ribbed center piece (the white part in the pic) was fitted. I was hoping to use the router to cut the slots in a piece of PVC sheet and then use a heat gun to bend it to the curve needed as in the picture, but it would heat unevenly and warp/shrink and after 4 attempts I couldn't get one to come out clean enough. The blue pieces are pen caps I altered. Also, the white/black parts are some the templates I used.
I really can't stress enough, if you're going to build something completely from scratch, learn Adobe Illustrator, use it to take all your measurements, and print out scaled templates to trace/cut/follow! This way you're essentially assembling a kit that you designed, and it takes 90% of the guesswork out of assembly and parts fabrication. The 10% of guesswork comes from doing dumb things, like gluing the main control panel of the Pipboy to the PVC cylinder at an off-kilter angle because it's not tapered like the original, which ended up throwing off a lot of my measurements.
Soooooo I guess I didn't take any progress pictures of the back? The upper right photo is the detail on the back, and here I added polystyrene, Sintra, wood filler, and adhesive Foamies Craft Foam (polyethylene?) I coated the whole thing in a couple layers of auto primer so I could see where I needed to sand or fill more.
I also made a horrible mistake with the screen. When I was a Design student, I was taught you seal polystyrene with acrylic paint so you can apply rattle can spraypaints or clear coat or whatever overtop of it without having the acetone melt your polystyrene. Your paint still eats through the acrylic layer? Should have used more acrylic paint. I have NEVER gotten this to work and later found that latex paint is a much better one-coat sealant, but it doesn't sand as nicely as acrylic and for some reason I thought I'd be able to seal the polystyrene screen with acrylic paint well enough to put a few layers of clear coat on it to give the surface a REALLY smooth surface. Turns out the screen wasn't sealed enough and the clear coat got under the acrylic and started eating up the polystyrene. Frowny face.
Started with the back half when making molds. The Smooth On urethanes I had were over a year and a half old, some were opened and were getting kind of skeezy. I wasn't sure if the urethane rubber would cure, or if there were going to be too many air bubbles, but I combined some old, opened Part A Brush On with some new Part B PMC 121/30 Dry (it's the exact same Part B for both) and made it work. Mother mold was Plaster O'Paris and burlap (still my favorite, it's very cheap and very quick).
First pull from the molds. I put a couple layers of primer in the mold before pouring in the Smooth Cast 300 so I'd get a good protective surface. For the life of me, I've never been able to get paint to stick to Smooth On resins without either flaking off, orange peel-ing, or fisheye-ing. There was a tech bulletin on Smooth On's website a few years ago where they basically said "Yeah, we know. Paint don't stick. Use auto primer or Bulldog first". Anyway, the molds held up enough for this one pull (it's four pics of the same two halves, not two pulls from two molds) and it was time to get to painting and cleaning. Or cleaning and painting.
First layer of paint to be put down over the primer (and yes, I did try to scrub it down with degreasing soap first. Not a fan of washing parts with acetone because it has a tendency to also take the primer with it) was one of the colors I use on just about every prop I do: Rustoleum Metallic Charcoal AKA "cheap gunmetal in a rattle can". And hey, what a suprise! Multiple light passes from 10-14 inches still produces the orange peel effect that I didn't want. I'm starting to think it's not my lack of part cleaning, or Smooth On urethane resin's hatred of paints, but maybe that I'm not sanding enough? Maybe it's particulate on the surface that the paint is avoiding or globbing around? Anyway F YOU RUSTOLEUM, orange peel texture is EXACTLY WHAT I WANT HERE! I just didn't know it until I started putting the OD Green on.
So the fun thing about that coat of Rustoleum I put on was that now I had a great "pitted" surface to work with. I don't think I could have gotten the silver drybrush detail without there being high and low points on the smooth surfaces. I put a light coat of OD Green on the whole thing (save for the darkest recesses and deepest cracks) and started drybrushing a LOT of silver on.
If you're familiar with the Fallout universe, you'd understand that 1) these things when brand new would have been military/govt issue, hence the OD Green (which is also visible in the game) and 2) Your character is wearing one that is what, 100 years old? if it didn't look beat up when he got it, it would have been weathered heavily wandering the dusty, sandy wastelands. There's not much paint left, there's probably some rust, and a lot of little scratches, dents, scars, etc.
Sorry for the photo's color shift here, I took some more pictures under different/better lighting.
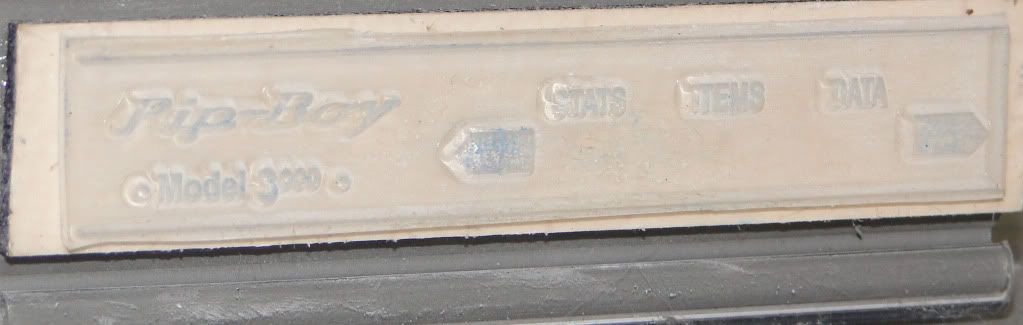
I added some rust color to a bunch of spots, and put some "decals" on. I printed out a screenshot from the game, and cut out the radiation meter, the barely visible "Pip-Boy", "Model 3000" and the "Stats Item Data" section above the lights/buttons. Illustator! It's good for making templates AND your own decals! I did these on regular printer paper and applied them with Super 77, but if you're going to make your own decals and don't want to pay for Testors Printable Decal Sheets, use a high gloss paper or photo paper, and seal it with a layer of clear coat. The ink soaks into regular printer paper, and sealing it just makes it fade more. However with a glossy paper, the ink stays on the surface, and a layer of clear coat really makes the colors pop. But whatever, by this time I was painting and repainting the Friday night and Saturday morning of the Saturday night party, so I couldn't be as precise as I would have liked. As far as the screen, well that was an acetone fueled nightmare, but it was my own fault for rushing. You'll notice the resin pulls from the mold have a bumpy, bubbled screen and I didnt' have time to go over it with filler, sand, re fill, re sand, etc. so I put a coat of a dark metallic black down to make it look like it was turned off, and also to hide the imperfections in the screen. My wife said "you went through all that trouble to make a Pipboy and you're not going to have the screen lit up?" So I decided to make a quick screenshot decal of a status screen to glue in the center of the screen. Unfortunately, the Super 77 has acetone in it which dissolved the paint layer that was already on the screen an made a goopy mess with a "screen shot decal" on it. It looked terrible, so I scraped most of that off and tried applying a bright green nail polish that was a similar color to the in-game model's screen. The theory was that 1)nail polish drys fast and I only have 3 hours left to finish this thing, 2) nail polish goes on thick and is kind of self leveling so it will fill in some of the blemishes on the resin screen's surface, 3) I really don't have any other colors of green in the house that I like. So I started putting on the nail polish and noticed that when I brushed it on green, it was leaving streaks of black in the brush strokes. Whoops, nail polish also has a solvent in it, and it was picking up whatever glue and paint was left on the screen, dissolving it, and mixing it into the nail polish. So I had to scrap that idea. Strangely enough, we had this lovely green latex house paint left over from something (that's one of the great things about living with an amateur theater producer) so I put a couple coats of that on and called it a day.
You can see more/larger/different pictures of the final piece and some additional build pics here if you're interested:
Pipboy 3000 Build by meowymeowmeow on deviantART
I'll update this thread with build progress from Version II which will be a mold of the two main halves and another mold of most of the little bits cast separately since I hate air bubbles in my resin as well as a larger screen shroud size to fit my brother's Zune.