Raven Morpheus
New Member
Hey all
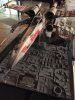
Just thought I'd share my completed 1/43 AMT X-Wing with you guys. I've read so much on these forums re. Star Wars models and some people did advise me on a couple of things a while back.
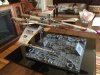
R2 D2 is the button to turn on the engine glow.
R2 is actually a resin R2 D2 in 1/43 made for the DeAgostini Falcon by a Shapeways 3d printed parts seller, it wasn't very good (there is detail on the body/dome but it's so faint it might as well not be there) but it served my purpose better than the kit part as the kit part has very badly raised details, especially on the dome.
The lighting kit was kindly made for me by britmodeller.com member madmonk of tirydiummodels.co.uk, although I didn't use all of it, just the engine LEDs, because the cockpit is poor and there wasn't a pilot in my kit (which might have been a blessing as the one for this kit is rubbish). I looked for a 1/43 or even 1/48 X-Wing pilot but gave up after many months of searching - I didn't want to convert a figure either.
I "smoke glassed" the canopy because in a scene in ESB (I think?), one of the scenes in the hangar just before the Hoth battle, you see an open canopy of an X-Wing (I think?) and it's glass looks opaque black. Plus it hides the poor cockpit and lack of pilot, although I think I went a bit too far with the "smoke glassed" effect as it is totally opaque!
Made an attempt at "weathering" but it's nothing great and I'm not all that happy with the "wear" on the stripes. I'm quite poor at weathering as I don't really understand how to do it, I tend to build "factory finish" models.
I have one slight issue now in that I used JB Weld to secure R2 D2 to the peg of the switch, but now it's all dried it doesn't quite press down properly, and of course I'll have no chance of removing it without destroying the kit. I can get it to work if I wiggle the R2 unit about and pull it up a bit but it has to be pressed down very hard.
I should have left the R2 unit loose! Doh!!
I can get the wires out the back though so I might be able to cut the switch off and install a new one, and perhaps have it sticking out the backplate...
Pictures -


Engine LEDs on -

Close up of R2 -

Just thought I'd share my completed 1/43 AMT X-Wing with you guys. I've read so much on these forums re. Star Wars models and some people did advise me on a couple of things a while back.
R2 D2 is the button to turn on the engine glow.
R2 is actually a resin R2 D2 in 1/43 made for the DeAgostini Falcon by a Shapeways 3d printed parts seller, it wasn't very good (there is detail on the body/dome but it's so faint it might as well not be there) but it served my purpose better than the kit part as the kit part has very badly raised details, especially on the dome.
The lighting kit was kindly made for me by britmodeller.com member madmonk of tirydiummodels.co.uk, although I didn't use all of it, just the engine LEDs, because the cockpit is poor and there wasn't a pilot in my kit (which might have been a blessing as the one for this kit is rubbish). I looked for a 1/43 or even 1/48 X-Wing pilot but gave up after many months of searching - I didn't want to convert a figure either.
I "smoke glassed" the canopy because in a scene in ESB (I think?), one of the scenes in the hangar just before the Hoth battle, you see an open canopy of an X-Wing (I think?) and it's glass looks opaque black. Plus it hides the poor cockpit and lack of pilot, although I think I went a bit too far with the "smoke glassed" effect as it is totally opaque!
Made an attempt at "weathering" but it's nothing great and I'm not all that happy with the "wear" on the stripes. I'm quite poor at weathering as I don't really understand how to do it, I tend to build "factory finish" models.
I have one slight issue now in that I used JB Weld to secure R2 D2 to the peg of the switch, but now it's all dried it doesn't quite press down properly, and of course I'll have no chance of removing it without destroying the kit. I can get it to work if I wiggle the R2 unit about and pull it up a bit but it has to be pressed down very hard.
I should have left the R2 unit loose! Doh!!
I can get the wires out the back though so I might be able to cut the switch off and install a new one, and perhaps have it sticking out the backplate...
Pictures -
Engine LEDs on -
Close up of R2 -