Wokky
New Member
Hi all, first post on here. I used to put together the odd model kit many years ago (very amateurishly might I add), but eventually grew tired of them getting summarily disassembled by a particularly exuberant younger brother. I still had Slave I and a Revell Starfury that weren't yet started, so I tucked them away with the intention of one day assembling them. Recently I felt the urge to finally put them together, so I bought a few bits and pieces and got underway. Things didn't get off to a great start; when I put the kits away I had the genius idea of separating the transparent parts from the rest to prevent them from getting scratched up, but it appears that at some point in the intervening decade they became more separated than I intended and are now nowhere to be found... so I shall have to get more creative than originally planned at some point in this project.
I've decided to try building the kit to look as close to the studio model as possible, scratchbuilding details where necessary. This is entirely beyond my abilities, but I shall stubbornly try regardless.
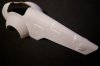
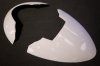
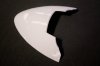
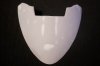
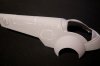
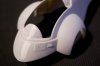
So far I've filed and sanded almost all raised details from the main hull and skirts, glued together the two halves of the main hull and gotten started with filling various gaps and dents with Milliput. The large raised panels on either side of the main hull seemed too large to file down so I sliced them out, and glued them back in a more recessed position. I also noticed that the positioning of the entrance hatch was totally off-centre, so that was also sliced out and repositioned.
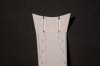
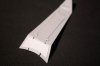
Next I'm aiming to fill and sand out some all remaining surface deformations, and get started on this new, fearsome beast known as panel line scribing.
I've decided to try building the kit to look as close to the studio model as possible, scratchbuilding details where necessary. This is entirely beyond my abilities, but I shall stubbornly try regardless.
So far I've filed and sanded almost all raised details from the main hull and skirts, glued together the two halves of the main hull and gotten started with filling various gaps and dents with Milliput. The large raised panels on either side of the main hull seemed too large to file down so I sliced them out, and glued them back in a more recessed position. I also noticed that the positioning of the entrance hatch was totally off-centre, so that was also sliced out and repositioned.
Next I'm aiming to fill and sand out some all remaining surface deformations, and get started on this new, fearsome beast known as panel line scribing.
Attachments
-
 P1020607.jpg675.6 KB · Views: 107
 -
 P1020629.jpg424.7 KB · Views: 85
 -
 P1020628.jpg466.2 KB · Views: 71
 -
 P1020627.jpg358.8 KB · Views: 79
 -
 P1020625.jpg457.2 KB · Views: 73
 -
 P1020622.jpg589.7 KB · Views: 74
 -
 P1020620.jpg531.3 KB · Views: 74
 -
 P1020619.jpg650.7 KB · Views: 88
 -
 P1020608.jpg379.1 KB · Views: 96


