Coshabogbrae
New Member
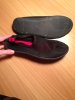
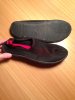
Hey everyone, sorry its been a while but i've been really busy with work and had little time to spend on the suit but more importantly I have pics of the finished shoes!
I used an adhesive called: "E6000" (pic below of the bottle) and attached the suit to a the soles of a pair of water/aqua shoes i cut the tops off of. The process was actually really simple, and if anyone wants me to explain it more thoroughly i'd be happy to do it, but it really was pretty much applying the glue all over the part of the shoes i'd be standing on, and then standing on it with my feet in the suit. I put a pair of shoes in the suit to help give it a more structured look and it ensured that the glue wouldn't stick to my feet through the fabric!
The only difficult part was waiting, as the glue takes up to 72 hours to fully dry, but i let it dry for the full 72 because i wasn't in a rush. I stood in the shoes for about 3-4 hours to help apply more intense pressure for the beginning of the drying process, and then placed the shoes under a mattress with weight on it, this way it helped keep the pressure being applied equal, and obviously so I wouldn't have to stand in them for 3 days!")
I have to give a big shoutout to the member on here by the name of Lunaman for the help with this process, as well as his thread, because without it i'd probably be still trying to sew them together. But this glue is incredibly solid, and i've given it a good, solid test, and i can confidently say i could probably run a marathon in these and they won't come apart, so to anyone glueing shoes to their suits i highly recommend you consider this option!
Anyways, pics below! Enjoy!


I used an adhesive called: "E6000" (pic below of the bottle) and attached the suit to a the soles of a pair of water/aqua shoes i cut the tops off of. The process was actually really simple, and if anyone wants me to explain it more thoroughly i'd be happy to do it, but it really was pretty much applying the glue all over the part of the shoes i'd be standing on, and then standing on it with my feet in the suit. I put a pair of shoes in the suit to help give it a more structured look and it ensured that the glue wouldn't stick to my feet through the fabric!
The only difficult part was waiting, as the glue takes up to 72 hours to fully dry, but i let it dry for the full 72 because i wasn't in a rush. I stood in the shoes for about 3-4 hours to help apply more intense pressure for the beginning of the drying process, and then placed the shoes under a mattress with weight on it, this way it helped keep the pressure being applied equal, and obviously so I wouldn't have to stand in them for 3 days!
I have to give a big shoutout to the member on here by the name of Lunaman for the help with this process, as well as his thread, because without it i'd probably be still trying to sew them together. But this glue is incredibly solid, and i've given it a good, solid test, and i can confidently say i could probably run a marathon in these and they won't come apart, so to anyone glueing shoes to their suits i highly recommend you consider this option!
Anyways, pics below! Enjoy!