Aliens Stasis Tube - WIP

Fabio Testini

New Member
Hello guys,
I started a new prop, after watching Aliens again.
I would like to create a stasis tube, containing a facehugger. Very similar to this:

aliens-colonial-marines-screenshot-face-hugger-640x325.jpg

I started with the creation of the facehugger ... I created separately the legs, body and tail ... here is the first photo:

IMG_20130701_221551.jpg

Now I'm waiting for the dough becomes stiff. After i join all the pieces.
For the stasis tube, I thought of a flower pot cylindrical, with a fake bottom, where to place the leds and an oxygenator for aquariums ...


the work progresses ... add photos later ...
if anyone can give me some advice, it is welcome!
 
hello guys ...
I update my post with new pictures and details.
After drying the pieces for 48 hours, I started sanding all the pieces so as to have the most smooth and molded parts.

IMG_20130706_162542.jpg

I applied the cuts in the individual paws, so as to fit together with the rest of the body.

IMG_20130706_162607.jpg IMG_20130706_162657.jpg IMG_20130706_163219.jpg
I glued the legs with hot glue, which is fine with this material

here is the final result:

IMG_20130706_215253.jpg

I bought a flower pot transparent, unfortunately does not have a cylindrical shape, but at the moment I'm happy.

IMG_20130706_215347.jpg

will update with more details in the coming days
 
ok friends, my puppy grows facehugger .... :lol

now that I glued all the pieces, I have enriched the body with the details:

IMG_20130707_130427.jpg

to cover the legs, I rebuilt the joints, and also creating effects in the skin.
Then I realized the spine

IMG_20130707_142429.jpg IMG_20130707_142442.jpg IMG_20130707_142501.jpg

Now I miss the inside, the mouth and a few more details
 
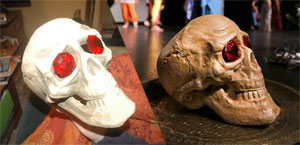
Here's what I managed to get from a white polystyren skull :


On the left, as it was from the shop : quite white with poor grey shades.
I first applyed some coats of liquid white rubber. So it was all white, just like your alien is. Then a rough coat of light brown, that I rubbed with a piece of fabric before it's dry. Then an even rougher coat of dark brown, but only in valleys and shade areas, that I also rubbed before it's dry. At the end, it's not like I've painted dark on the dark areas, but it's more like I've scrubbed dark paint to emphasise light areas. The more I scrubbed, the neerest I was from the first white coat.

It's the same principle when quickly cleaning a dirty thing : it turns out darker in valleys, and lighter on protruding surfaces.

I suggest you could use this same method, for a realistic biologic effect. But using much more colors ;)
 
thank you very much JFcustom, your advice is very important.

as soon as it dries completely, I will give a final coat of sandpaper, and then try with your method.

Right now I'm focusing my ideas on how to make a base for the flower vase, a base that contains LEDs and a top cover that is similar to that of the film.

I will invent something ... in the next few days the complete picture of the facehugger
 
Hi,
Not sure if you are still on this project but here is a magazine article that I kept from years ago...scan0001.jpgscan0002.jpgscan0003.jpgscan0004.jpg
 
Back
Top