Aliens Motion tracker build

propmainiac

Sr Member
RPF PREMIUM MEMBER
Hi All
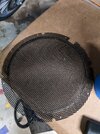
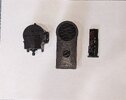
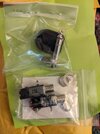
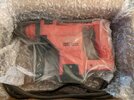
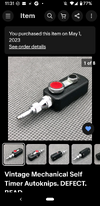
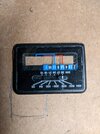
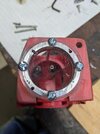
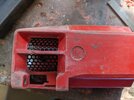
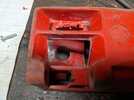
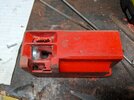
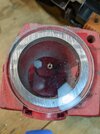
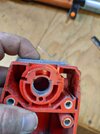
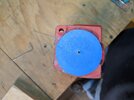
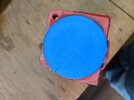
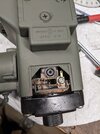
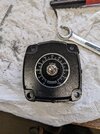
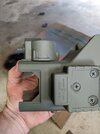
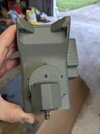
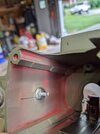
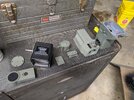
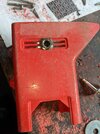
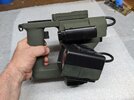
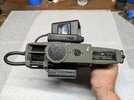
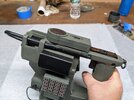
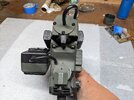
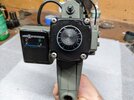
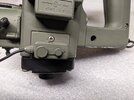
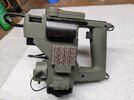
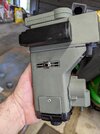
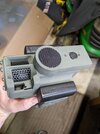
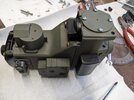
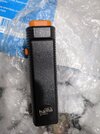
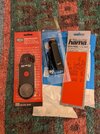
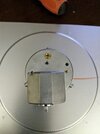
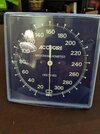
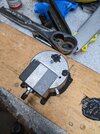
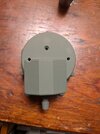
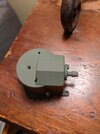
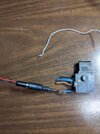
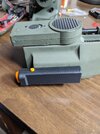
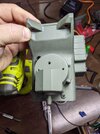
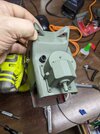
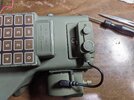
Thought id start documenting my motion tracker build. No build yet but parts have been arriving. Still waiting on a couple more. I managed to snag a Kango 426! Might not be a big deal to our members across the pond but i was happy to get it! I have a combination of real 3 d printed and resin parts. Ive got the right angled 1/4 jack and female connector, the peices from the Vivitar flash, the shutter timer is on the way, resin jobo light and pump widget both from Spatcave, matchbox power unit resin from Spat. 3d printed Hama shutter remote and timer case. Knurled knob is on the way from Amazon for the bottom knob. Casio sl80 calculator arrived the other day. The little calculator panel that mounts behind the jobo light, was told this is the same one that was used on the master replicas version. Hoping to start building after all the parts are here.
 

Attachments

  • PXL_20230424_232857218.jpg
    PXL_20230424_232857218.jpg
    3.4 MB · Views: 118
  • PXL_20230507_140158371.jpg
    PXL_20230507_140158371.jpg
    706.8 KB · Views: 98
  • PXL_20230505_221626762.jpg
    PXL_20230505_221626762.jpg
    2.2 MB · Views: 112
  • PXL_20230505_213907754.jpg
    PXL_20230505_213907754.jpg
    2.6 MB · Views: 106
  • Screenshot_20230501-113153.png
    Screenshot_20230501-113153.png
    1.6 MB · Views: 123
  • PXL_20230430_191114474.jpg
    PXL_20230430_191114474.jpg
    2.4 MB · Views: 110
More pics here..
I re moved the very greasy guts on the drill. The only hard part was getting the second snap ring out of the front. I had to resort to cutting the front down to the ring then removing it. It all got a bath in hot water and dawn soap overnight. The next day i began the very tedious cutting out of the top area. Several different files and dremel bits were used here. I cut a peice of speaker grill material that i saved from an old computer case. I then made the disc to cover the hole in the front of the drill. This was made from plexi and i used my disc sander to make the circle. After i drilled and tapped 4 holes. I also received my Hama viewer. Incorrect model but using it anyway.
 

Attachments

  • PXL_20230602_000138513.jpg
    PXL_20230602_000138513.jpg
    2.1 MB · Views: 72
  • PXL_20230530_202647352.jpg
    PXL_20230530_202647352.jpg
    2.3 MB · Views: 50
  • PXL_20230529_025901050.jpg
    PXL_20230529_025901050.jpg
    2 MB · Views: 69
  • PXL_20230529_025857621.jpg
    PXL_20230529_025857621.jpg
    2.3 MB · Views: 56
  • PXL_20230528_215945693.jpg
    PXL_20230528_215945693.jpg
    2.2 MB · Views: 47
  • PXL_20230528_215443263.jpg
    PXL_20230528_215443263.jpg
    2 MB · Views: 49
  • PXL_20230528_215435794.jpg
    PXL_20230528_215435794.jpg
    2.1 MB · Views: 58
  • PXL_20230528_214116756.jpg
    PXL_20230528_214116756.jpg
    2.1 MB · Views: 57
  • PXL_20230517_194742470.mp4
    15.9 MB
  • PXL_20230517_194621617.mp4
    102.8 MB
More updates
Added the phono jack. Had to cut more out inside. Made a backing plate to help strengthen the area. Added a potentiometer and knob to the bottom. I went with a knurled knob that resembled the knob on the propstore motion tracker. Also added a dial that came with the knob. Thought it looked good on it.not accurate I know. The plastic on the drill body. Was pretty rough in some spots so i used some bondo red putty to smooth things out . Everything got a good coat of primer with a wet sand after. I went with olive green camo. Not correct but i like it. I then began assembly. I kept the plastic ring from inside. This allowed me to screw the sideplates back on. The black plastic bottom got a sanding and a repaint as well. My pump widget is resin and required some cleanup. I drilled and tapped a screw in the back. Cut the screw head off and bolted it to the drill body.
 

Attachments

  • PXL_20230620_003815504.jpg
    PXL_20230620_003815504.jpg
    2.3 MB · Views: 63
  • PXL_20230619_224118743.jpg
    PXL_20230619_224118743.jpg
    3 MB · Views: 60
  • PXL_20230619_223248519.jpg
    PXL_20230619_223248519.jpg
    1.9 MB · Views: 57
  • PXL_20230619_223236493.jpg
    PXL_20230619_223236493.jpg
    1.8 MB · Views: 55
  • PXL_20230619_223220091.jpg
    PXL_20230619_223220091.jpg
    2.3 MB · Views: 66
  • PXL_20230618_235009214.jpg
    PXL_20230618_235009214.jpg
    3.4 MB · Views: 64
  • PXL_20230604_232327979.jpg
    PXL_20230604_232327979.jpg
    1.3 MB · Views: 58
  • PXL_20230604_232303314.jpg
    PXL_20230604_232303314.jpg
    2.5 MB · Views: 55
The next day I worked on the Hama viewer. Not the correct one but it will do for now. I previously cut and trimmed down the Vivitar flash parts and installed them. The phono jack was installed as well. It got a coat of paint and drilled the hole for the cable wire. I used part of the grommet that was leftover from the drill to pass the cable through. Then the final assembly of all the parts took place.
I didnt have any black tubing so i took the outer insulation off of an extension cord. Also the small rod thats on the side is actually the depth guage that came with the drill. The small black cord is not correct but it came wth the vivitar flash so i used it.

The Casio keypad is not the correct one but its close. All in all im very happy with how this turned out.
 

Attachments

  • PXL_20230625_024357775.jpg
    PXL_20230625_024357775.jpg
    2 MB · Views: 107
  • PXL_20230625_024327316.jpg
    PXL_20230625_024327316.jpg
    2.4 MB · Views: 78
  • PXL_20230625_024322435.jpg
    PXL_20230625_024322435.jpg
    2.2 MB · Views: 78
  • PXL_20230625_024316765.jpg
    PXL_20230625_024316765.jpg
    2.3 MB · Views: 86
  • PXL_20230625_024305065.jpg
    PXL_20230625_024305065.jpg
    2.1 MB · Views: 60
  • PXL_20230625_024255534.jpg
    PXL_20230625_024255534.jpg
    2.2 MB · Views: 68
  • PXL_20230625_024251294.jpg
    PXL_20230625_024251294.jpg
    2.5 MB · Views: 83
  • PXL_20230620_232313108.jpg
    PXL_20230620_232313108.jpg
    2.2 MB · Views: 70
  • PXL_20230620_232230760.jpg
    PXL_20230620_232230760.jpg
    2 MB · Views: 90
  • PXL_20230620_232214481.jpg
    PXL_20230620_232214481.jpg
    2.4 MB · Views: 68
  • PXL_20230620_232203968.jpg
    PXL_20230620_232203968.jpg
    2.1 MB · Views: 68
  • PXL_20230625_024327316.jpg
    PXL_20230625_024327316.jpg
    2.4 MB · Views: 104
Last edited:
The next day I worked on the Hama viewer. Not the correct one but it will do for now. I previously cut and trimmed down the Vivitar flash parts and installed them. The phono jack was installed as well. It got a coat of paint and drilled the hole for the cable wire. I used part of the grommet that was leftover from the drill to pass the cable through. Then the final assembly of all the parts took place.
I didnt have any black tubing so i took the outer insulation off of an extension cord. Also the small rod thats on the side is actually the depth guage that came with the drill. The small black cord is not correct but it came wth the vivitar flash so i used it.

The Casio keypad is not the correct one but its close. All in all im very happy with how this turned out.
Looks good. I love seeing things come together
 
Hi awesome updates on the motion tracker I've managed to install a Bluetooth speaker which actually sounds pretty loud I've also just got today a homa 394/02 remote shutter release! A member of the motion tracker builders Facebook group was able to help me locate one from Sweden. Best part was I picked it up for a really low price. Also managed to pick up two jobo mini lights for decent money and hopefully I'll have a pump widget in a week or two
 

Attachments

  • PXL_20231024_220806455.jpg
    PXL_20231024_220806455.jpg
    2.5 MB · Views: 33
Finally had a little time today filled the extra holes with jb quick weld. Sanded then shot a little camo green. Also bought nobles gasket from shape ways and epoxied it to to pump widget. . Still need the correct Hama viewer and the Olympus calculator panel but we will get there!
 

Attachments

  • PXL_20231112_214228920.jpg
    PXL_20231112_214228920.jpg
    2.8 MB · Views: 38
  • PXL_20231115_231444003.jpg
    PXL_20231115_231444003.jpg
    1.9 MB · Views: 39
  • PXL_20231115_231453672.jpg
    PXL_20231115_231453672.jpg
    2.1 MB · Views: 31
More progress. Attached the pump widget , Jobo Minilight and the Hama shutter release.
 

Attachments

  • PXL_20231120_171048600.jpg
    PXL_20231120_171048600.jpg
    2.7 MB · Views: 44
  • PXL_20231120_181539068.jpg
    PXL_20231120_181539068.jpg
    2.2 MB · Views: 41
  • PXL_20231120_221021105.jpg
    PXL_20231120_221021105.jpg
    2.3 MB · Views: 39
  • PXL_20231120_221025833.jpg
    PXL_20231120_221025833.jpg
    2.4 MB · Views: 46
  • PXL_20231120_230345060.jpg
    PXL_20231120_230345060.jpg
    2.4 MB · Views: 46

Your message may be considered spam for the following reasons:

If you wish to reply despite these issues, check the box below before replying.
Be aware that malicious compliance may result in more severe penalties.
Back
Top