While waiting for some pieces to arrive over the holiday season to let me continue working on my ANH Vader belt run I took a little time to work on another project. I've succumbed to the temptation to also work on some ROTJ pieces, drawn in by the desire to see a fully accurate hero ROTJ belt replica created using the fantastic reference seen in Brandon Alinger's Star Wars Costumes book. It would also be a good opportunity to nail down the details to be able to produce runs of ESB and ROTJ Vader belts after I'm done with the ANH run. Through my research into all this, I believe I can confirm that the belt pictured in the Costumes book is indeed the screen used hero ROTJ Vader belt, but I will leave those findings for a future post. My work on this new replica has also led me to some additional information that I will eventually add to my ESB belt box analysis write up.
I did some 3D modeling work to reverse engineer the accurate layout of all the components on the hero ROTJ belt boxes seen in the reference photo, nailing down as many of the asymmetries as I could. I then translated this into an accurate drilling template (I will post this for download at a later date) that I printed out at the correct scale so I could transfer the positions onto the aluminum enclosures I am using with a centre punch and a scribe.


I then mounted the box onto the mill table at the shop so I could drill the holes for the knobs and red light.


I used a step drill bit to make the holes for the green lights.


I then drilled out the thick of the material in the hose slot, just to make the final shaping a little easier to do.

I used an end mill to cut out the remaining material.


I then used a small flat file to square up the corners of the hose slot. I cleaned off the layout fluid and the front face of the box was done!


I then flipped the box over and milled out the slots for the belt to pass through, which completed all the needed cuts.


After masking the insides of the boxes and lids (not totally necessary, but leaves things cleaner for attaching the various components and doing the wiring etc.) I sprayed them with some flat black paint.


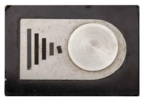
I then screwed in the silver knobs that I had machined a while back, installed the red and green lights, and stuck in the section of braided hose.


I did some 3D modeling work to reverse engineer the accurate layout of all the components on the hero ROTJ belt boxes seen in the reference photo, nailing down as many of the asymmetries as I could. I then translated this into an accurate drilling template (I will post this for download at a later date) that I printed out at the correct scale so I could transfer the positions onto the aluminum enclosures I am using with a centre punch and a scribe.
I then mounted the box onto the mill table at the shop so I could drill the holes for the knobs and red light.
I used a step drill bit to make the holes for the green lights.
I then drilled out the thick of the material in the hose slot, just to make the final shaping a little easier to do.
I used an end mill to cut out the remaining material.
I then used a small flat file to square up the corners of the hose slot. I cleaned off the layout fluid and the front face of the box was done!
I then flipped the box over and milled out the slots for the belt to pass through, which completed all the needed cuts.
After masking the insides of the boxes and lids (not totally necessary, but leaves things cleaner for attaching the various components and doing the wiring etc.) I sprayed them with some flat black paint.
I then screwed in the silver knobs that I had machined a while back, installed the red and green lights, and stuck in the section of braided hose.