2nd Mandalorian Style Helmet and Armour. 3d Print

patrickivan

Sr Member
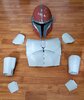
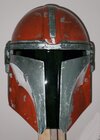
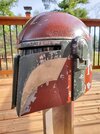
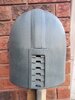
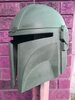
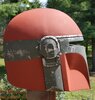
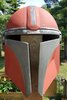
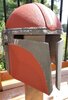
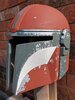
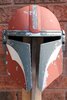
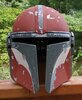
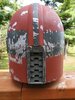
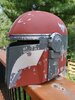
This is my 2nd 3d printed helmet on my ender 3
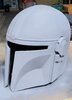
Done in 8 sections. I'll come back and post the 3d model creator credits in a few mins.

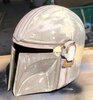
This one is coming out far better than the 1st. The inside is lined with resin and a little fiberglass, then rocker guard lined.

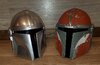
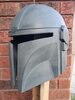
The exterior is primed with auto filler primer and wood filler. And then primed with auto etching primer because I accidentally grabbed the wrong can. Oh well. I actually like the green in it.

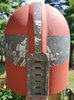
Next coat will be another layer of primer, then chrome metal, base coat, then top coat. Then lightly worn down to the metal base.

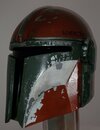
I'm planning to paint it colours representing my own Mando style bounty hunter. I'm really having a hard time trying to lock in a colour style. The plan is white and rusty red.

The chest armour file was made by Maurice Sizzlac Thingiverse - Digital Designs for Physical Objects
The forearm armour files (not shown yet) was made by Mr_Corn The Mandalorian Beskar Armor - FULL ARM - Pauldron Vambrace Gauntlet by Mr_Corn
The helmet file was made by hmmm. Can't find it. It's credited on my prior thread on the 1st one I made. I'll update.
 

Attachments

  • 20200805_152549.jpg
    20200805_152549.jpg
    615.5 KB · Views: 379
  • 20200805_152644.jpg
    20200805_152644.jpg
    447.1 KB · Views: 189
  • 20200818_091641.jpg
    20200818_091641.jpg
    1.5 MB · Views: 211
  • 20200818_091707.jpg
    20200818_091707.jpg
    1.5 MB · Views: 199
  • 20200818_092931.jpg
    20200818_092931.jpg
    2.8 MB · Views: 237
  • 20200817_081957.jpg
    20200817_081957.jpg
    1.6 MB · Views: 225
Last edited:
Some more paint and sanding and paint and sanding. It's heading towards the effect I'm planning.

A bit of a set back due to my impatient, is a little crazing of the etching primer over the chrome.

And now I may change my colours from red and white (for the True North Strong and Free Canada), to white and green.

20200819_121258.jpg

20200820_122936.jpg
20200820_122953.jpg


I'm thinking of something like this crude quick sketch.

20200820_124851.jpg
 
Last edited:
And I changed my mind again. Did an iron oxide. Encouraged the masking to tear out the paint to reveal the base metal paint.

More work on the paint. Will also be weathering it with soot.
 

Attachments

  • 20200822_123629.jpg
    20200822_123629.jpg
    2.6 MB · Views: 160
  • 20200822_123613.jpg
    20200822_123613.jpg
    1.3 MB · Views: 171
  • 20200822_123600.jpg
    20200822_123600.jpg
    2 MB · Views: 118
  • 20200822_123542.jpg
    20200822_123542.jpg
    2.3 MB · Views: 141
I'm liking where this is going. And this will help map out my armour and suit colour patterns.
 

Attachments

  • 20200822_162652.jpg
    20200822_162652.jpg
    1.7 MB · Views: 103
  • 20200822_162633.jpg
    20200822_162633.jpg
    744 KB · Views: 127
Most of the armour is printed.

Just doing knee armour for the legs.

I have a blaster to work on as well.

Looking up surplus flight suits / overalls.

And the belts and pouches that used to be so much more readily accessible 20 years ago. I blame people like us. ;)
 

Attachments

  • 20200830_112149.jpg
    20200830_112149.jpg
    2.1 MB · Views: 177
Got the shield cut and started on the armour. Going to try truck bed/ rocker protection coating on it. It sands well (though not shown here yet).
 

Attachments

  • 20200906_094152.jpg
    20200906_094152.jpg
    1.5 MB · Views: 230
  • 20200907_152036.jpg
    20200907_152036.jpg
    4.2 MB · Views: 130
Just a little update. Started to grime up the helmet. A little paint weathering, with some handling to replicate real dirt from touching.

The flash really highlighted some water marks and paint I didn't wipe off properly. Ugh.

1603811626125.png


And a few couple of armour pieces.

1603811784978.png
 
I'm done with the helmet. Cleared it and on to the armour.

I think what I'm particularly happy with, is the paint chipping. Having primed, then metallic steel, then primer and paint on top of that, followed by chipping. It really gave it that realistic look of paint peeling from age and damage.

There will probably be one more thing done to it. I'm just getting my hands dirty when I'm working on stuff, and will handle the helmet in a natural way. Dirt accumulates on top of things, and I won't clear that to seal it up.
 

Attachments

  • 20201105_090321.jpg
    20201105_090321.jpg
    841.3 KB · Views: 111
  • 20201105_090218.jpg
    20201105_090218.jpg
    842.6 KB · Views: 145
Last edited:
A few shots in natural light.
 

Attachments

  • 20201106_111733.jpg
    20201106_111733.jpg
    1.7 MB · Views: 101
  • 20201106_111205.jpg
    20201106_111205.jpg
    1.5 MB · Views: 99
  • 20201106_111157.jpg
    20201106_111157.jpg
    1.5 MB · Views: 122
  • 20201106_111147.jpg
    20201106_111147.jpg
    1.6 MB · Views: 125
Currently printing the same helmet file. Looks kinda daunting still in pieces but man does watching yours come together give me hope! Great work!!!
 
This thread is more than 3 years old.

Your message may be considered spam for the following reasons:

  1. This thread hasn't been active in some time. A new post in this thread might not contribute constructively to this discussion after so long.
If you wish to reply despite these issues, check the box below before replying.
Be aware that malicious compliance may result in more severe penalties.
Back
Top