Dave Vader
Active Member
HI
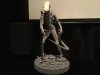
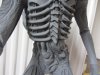
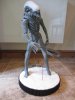
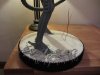
I have decided to add a good size Alien statue to my cinema room and therefore purchased a second hand NECA 1/4 scale figure off ebay.
The figure was in decent shape, very dirty with some slight damage but overall fine for my purposes. The mods will be some new sculpting, getting rid of any ratchet type joints, removal of seem lines, metal coated teeth/nails, complete repaint and bespoke base.
I started by removing the dome, splitting it in to pieces to make the sculpting and painting easier. I have stripped off the paint from the dome, spent some time cleaning and shaping the teeth and generally tidying up the head. I have covered with a coat of primer which highlights a few other defects which will be sorted in due course.
I have now reshaped the hands to give a more sinister appearance in the pose, these will be concluded by sculpting to the arm and then covered with primer.
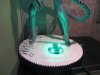
The dome removed but very dirty!

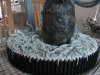
First Job was to split it up in to manageable parts


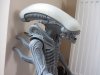
The first area to attack was the head, so I decided to smooth and define the teeth


Once done I gave it a coat of primer, joined to the main body of the head after sculpting the gaps


I am not entirely sure which Xeno I am going to do but I removed the dirt and paint on the dome so I have a blank canvas!


My current job is the hands. I wanted them to have a different feel and pose to the standard NECA ones so I have split them open and closed one hand whilst opening the other. The nails will be smoothed and coated (like the teeth) in metal adhesive.


I will be sculpting the wrists and cleaning up the joints today so will update once I have something more to add.
Thanks for your interest
I have decided to add a good size Alien statue to my cinema room and therefore purchased a second hand NECA 1/4 scale figure off ebay.
The figure was in decent shape, very dirty with some slight damage but overall fine for my purposes. The mods will be some new sculpting, getting rid of any ratchet type joints, removal of seem lines, metal coated teeth/nails, complete repaint and bespoke base.
I started by removing the dome, splitting it in to pieces to make the sculpting and painting easier. I have stripped off the paint from the dome, spent some time cleaning and shaping the teeth and generally tidying up the head. I have covered with a coat of primer which highlights a few other defects which will be sorted in due course.
I have now reshaped the hands to give a more sinister appearance in the pose, these will be concluded by sculpting to the arm and then covered with primer.
The dome removed but very dirty!
First Job was to split it up in to manageable parts
The first area to attack was the head, so I decided to smooth and define the teeth
Once done I gave it a coat of primer, joined to the main body of the head after sculpting the gaps
I am not entirely sure which Xeno I am going to do but I removed the dirt and paint on the dome so I have a blank canvas!
My current job is the hands. I wanted them to have a different feel and pose to the standard NECA ones so I have split them open and closed one hand whilst opening the other. The nails will be smoothed and coated (like the teeth) in metal adhesive.
I will be sculpting the wrists and cleaning up the joints today so will update once I have something more to add.
Thanks for your interest
Last edited:


")