You are using an out of date browser. It may not display this or other websites correctly.
You should upgrade or use an alternative browser.
You should upgrade or use an alternative browser.
1/24 X-Wing near 100% from scratch
- Thread starter Moska
- Start date
johnfields
Active Member

Rick Deckard
Sr Member
Amazing castings Mr. Rafa! So inspiring! :love
Adolfo
Adolfo
Moska
Sr Member
Hey Stu, Ray22, KNIGHT, Talkierg, johnfields and Rick Deckard.
As always, your kind words give me strength to continue working on my model. Thank you all. love
love
----------
No, I've not yet started working my fuselage in styrene. I'm sorry but I needed to make some final adjustments.
The top half of my first prototype was almost perfect (I think) but needed some small but important correction. And the bottom half yes has needed a more important renovation, particularly in the sloping area.
I built a second prototype with a thinner cardboard printed to define all paneling lines and also I took advantage of its flexibility to simulate the curves on all surfaces.
I'm not entirely sure, but I think it's better if the upper side walls aren't absolutely flat. A little curve makes them seem more ... uhmmm ... advanced?… sophisticated?
Your opinions or accurate information are welcome.
Another area to which I had not paid enough attention is the front of the belly. I always thought it was completely flat but the Red-5 image attached clearly shows that the long front zone of the belly is divided in two surfaces with different angles. I captured this feature in my second prototype but again I would like to have your opinion.:confused
Thanks for looking.
Rafa
As always, your kind words give me strength to continue working on my model. Thank you all.
love----------
No, I've not yet started working my fuselage in styrene. I'm sorry but I needed to make some final adjustments.
The top half of my first prototype was almost perfect (I think) but needed some small but important correction. And the bottom half yes has needed a more important renovation, particularly in the sloping area.
I built a second prototype with a thinner cardboard printed to define all paneling lines and also I took advantage of its flexibility to simulate the curves on all surfaces.
I'm not entirely sure, but I think it's better if the upper side walls aren't absolutely flat. A little curve makes them seem more ... uhmmm ... advanced?… sophisticated?
Your opinions or accurate information are welcome.
Another area to which I had not paid enough attention is the front of the belly. I always thought it was completely flat but the Red-5 image attached clearly shows that the long front zone of the belly is divided in two surfaces with different angles. I captured this feature in my second prototype but again I would like to have your opinion.:confused
Thanks for looking.
Rafa
Attachments


Moska
Sr Member
Hi guys.
After much thought and much doubt in what could be the best way to build the fuselage, I decided to do the opposite of what common sense dictates (not sure what to think of myself and my sanity). :wacko
My explanation: since, thanks to my prototypes, I already had the accurate measurements and profiles of the outer surfaces, why complicate my life and start working from a lower level that would force me to make new calculations for a sum of layers that give me a result that I already had?
Maybe not everyone understand my logic, but I decided to build my fuselage from the outside inwards. :unsure
The first problem was that is not the same folding a thin cardboard sheet that a 2 mm. thick sheet styrene. The edges of the styrene pieces need to be profiled in a particular angle so that the adjustment angle between them is correct.
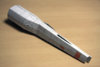
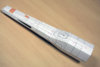
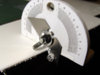
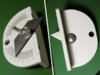
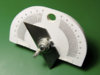
To facilitate this, I designed and built a simple tool with a blade that I can set at any angle. Repeatedly sliding the tool along the edge of the pieces I can easily get the profile I need for a perfect fit.
The tool is built with 5 mm. thick foamed PVC, a screw, a wing nut, and of course, a resistant blade.
Can it be made easier and cheaper?
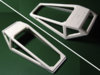
Using this tool and a small external rib structure, I've built the top rear of the fuselage and the window frames of the cockpit.
The pics:
01 - The angles I've calculated to fit the pieces.
02-03 - My profiling tool.
04 - Profiling tool in action.
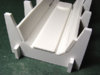
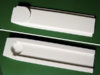
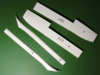
05 - Profiled parts ready to be joined together.
06 - The droidstrip socket .
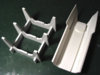
07-08 - Building with the aid of external ribs.
09 - Building inwards: profiled internal reinforcements.
10 - Upper rear fuselage almost complete.
11 - Cockpit frames.
Thanks for looking.
Rafa
After much thought and much doubt in what could be the best way to build the fuselage, I decided to do the opposite of what common sense dictates (not sure what to think of myself and my sanity). :wacko
My explanation: since, thanks to my prototypes, I already had the accurate measurements and profiles of the outer surfaces, why complicate my life and start working from a lower level that would force me to make new calculations for a sum of layers that give me a result that I already had?
Maybe not everyone understand my logic, but I decided to build my fuselage from the outside inwards. :unsure
The first problem was that is not the same folding a thin cardboard sheet that a 2 mm. thick sheet styrene. The edges of the styrene pieces need to be profiled in a particular angle so that the adjustment angle between them is correct.
To facilitate this, I designed and built a simple tool with a blade that I can set at any angle. Repeatedly sliding the tool along the edge of the pieces I can easily get the profile I need for a perfect fit.
The tool is built with 5 mm. thick foamed PVC, a screw, a wing nut, and of course, a resistant blade.
Can it be made easier and cheaper?
Using this tool and a small external rib structure, I've built the top rear of the fuselage and the window frames of the cockpit.
The pics:
01 - The angles I've calculated to fit the pieces.
02-03 - My profiling tool.
04 - Profiling tool in action.
05 - Profiled parts ready to be joined together.
06 - The droidstrip socket .
07-08 - Building with the aid of external ribs.
09 - Building inwards: profiled internal reinforcements.
10 - Upper rear fuselage almost complete.
11 - Cockpit frames.
Thanks for looking.
Rafa
Attachments
-
 Upper rear fuselage.jpg93.5 KB · Views: 654
 -
 External ribs-03.jpg103.3 KB · Views: 467
 -
 External ribs-01.jpg113.3 KB · Views: 447
 -
 Droidstrip socket.jpg80.7 KB · Views: 421
 -
 Profiled parts.jpg97.7 KB · Views: 439
 -
 Profiling Tool-3.jpg94.4 KB · Views: 535
 -
 Profiling Tool-2.jpg96.5 KB · Views: 449
 -
 Profiling Tool-1.jpg104.8 KB · Views: 525
 -
 Cockpit frame.jpg106.4 KB · Views: 586
crackerjazz
Sr Member
Rafa that is a marvelous tool!
ProfKSergeev
Sr Member
The precision on display here is breathtaking.
Man you are the Davinnci of modeling, this is going to be Legendary!!!
Oh come on Ray, surely you mean EPIC
Lee
Okay Epically Legendary!!! LOL.:lolOh come on Ray, surely you mean EPIC
Lee
Very nice work as always Rafa, And that tool is marketable! I'll take two:lol
Its just what i wish i had to throw together my styrene speeder upper hull, must make one Rob!
Lee
Moska
Sr Member
Wow! no idea that my simple tool would be so successful.
Please give me time to patent it and initiate mass production. I'm taking your orders. :lol
EPIC is the current buzzword in this forum?
Please, be rational, is only a few pieces of styrene … but my love for her is ... EPIC! :lol
Thank you very much for your support, guys.
And now I leave, I have to cut and sand a few hundred pieces.opcorn
Thank you again.
Rafa
PS- Here is my profiling tool template in case you find it useful.
Please give me time to patent it and initiate mass production. I'm taking your orders. :lol
EPIC is the current buzzword in this forum?
Please, be rational, is only a few pieces of styrene … but my love for her is ... EPIC! :lol
Thank you very much for your support, guys.
And now I leave, I have to cut and sand a few hundred pieces.
opcornThank you again.
Rafa
PS- Here is my profiling tool template in case you find it useful.
I know what's going on here now!. All Rafa's pics are CGI, it's all fake, it's too good to be real!.:lol
Rafa, if only that were the case!.
Just stunning is all I can summon up mate, or just WOW!.
You keep us all in awe with every update, it's true craftsmanship happening before our very eye's.
That tool is genius, patent it quick before the Chinese toolmakers get a whiff of it mate:lol
Stu
Rafa, if only that were the case!.
Just stunning is all I can summon up mate, or just WOW!.
You keep us all in awe with every update, it's true craftsmanship happening before our very eye's.
That tool is genius, patent it quick before the Chinese toolmakers get a whiff of it mate:lol
Stu
Yeah the canopy pic was my favorite, so clean, amazing just what Rafa is achieving in styrene.
This X-Wing has just got to be given the award for sheer skill & love that's going in to it.
It's like the Bugatti of X-Wing models compared to the usual Honda's or similar:lol
This X-Wing has just got to be given the award for sheer skill & love that's going in to it.
It's like the Bugatti of X-Wing models compared to the usual Honda's or similar:lol
3d-builder
Sr Member
:thumbsup For craftsmanship!!!!!!!!!!!!!!!!!!!!!!!!!!!!!!
Moska
Sr Member
Hello friends.
Ralphee, Stu, 3d-builder ...
I greatly appreciate your kind comments. Especially when they come from guys that I have much to learn. Thank you very much.
Stu, cgi is not bad at all but… I NEED TO TOUCH IT :angel
-------------
Working on the fuselage.
The top front of the fuselage is finished. In this second chance to use my profiling tool I've been familiarizing myself more with their use, and I got an even better result than I expected. The pieces have fit so well that I didn't need the help of any putty. I've been working on the piece as if it were a solid piece of styrene. Without any hint of bondline when I sanded it to round the front. I'm very happy to have the help of my new and useful tool.
In the first picture you can see how this piece was built.
The following images show part of the paneling and detailing process . I've decided to detail this piece because I think it is easier to do it now, when it's still small and manageable piece, better than to do it when it's already attached the entire upper fuselage.
To do the paneling correctly, I put a printed template on the piece that I glued using repositionable adhesive spray. First I make a slight shallow cut with a cutter along all lines. Then I review those lines with the tip of a sharp punch to open the cut and highlight it. And finally, using my old scribing tool to achieve the final depth and width of each line. After that there is only sanding and polish the surface to remove burrs and to smooth the edges of the paneling lines.
In the third picture you can see the small punctures I did on the surface that help me to correctly position the small reliefs to be pasted to complete the detailing.
The last picture shows the three main parts of the upper fuselage close together, but not yet attached with glue.
It's great to have good blueprints and the experience that I learned through two previous prototypes: Each fuselage part fits perfectly with the others.
Thanks for looking. :love
Rafa
Similar threads
- Replies
- 15
- Views
- 2,411