1/24 Star Wars AAT Assault Tank

Tanolucas

Active Member
Well, this project came to me through a person who contacted me a few weeks ago and asked me if I wanted to design a model of this vehicle for 3d printing.
At first we thought of a 1/18 scale, but the final size of the model would be about 50 cm long (20 inches), so we decided to go on a smaller scale of 1/24. Even in this way, the final model will measure about 40 cm long (16 inches approx)
Likewise, once the STL files are created, they can be scaled to the size you want.

I started by designing the side cannons.

Improved side gun 1.jpg


Improved side gun 2.jpg


Then The main cannon.
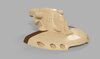
main gun 2.jpg
main gun 5.jpg
main gun 3.jpg


Main turret design.
turret 1.jpg

turret 2.jpg


These are the basic forms of the back hull
Back body 1.jpg


Design and test print on the secondary barrel fastening system, it had to be hidden inside the "wing" and it had to enable its elevation.
side gun fixation system 3.jpg
side gun fixation system 2.jpg
side gun fixation system 1.jpg


Test Print of the parts. ( it works like a charm)
A5176F3A-D2C7-4A27-8D8F-D48E454AC4E5.jpeg
762E9151-224A-461C-9138-8BFEF13D118B.jpeg


Then I moved to the main barrel clamping system with the turret, it had to allow the barrel to go up and down, but in turn, it had to maintain the position, so I opted for a screw system. Obviously i did a print test. (also worked well)

main gun fixation system 1.jpg
Main gin fixation system test 1.jpeg
Main gin fixation system test 2.jpeg
Main gin fixation system test 5.jpeg


Complete layout of main turret and gun, compared to reference photo.
turret 3.jpg
turret 4.jpg
turret 5.jpg
turret 6.jpg


Then we continue with the hull
hull 2.jpg
hull 5.jpg
hull 6.jpg


The time has come to design the fastening system of the main turret with the hull, I chose one that I saw in a 1/35 scale tank that was lying around.
It allows you to remove the turret when you want and also allows you to rotate 360 degrees.
Later i do a test print.
Turret System A.jpg
back body and turret 1.jpg


using the reference photos, I designed the interior of the upper hatches
and the components in the lower back
IMG_0859.jpeg
hatch interior 1.jpg
aat tank 4.jpeg
Bottom 2.jpg


These are the cuts in the hull, so it can be 3d printed.
Body cut 1.jpg
Body cut 2.jpg


After the 3d design stage, these are the renderings of the final model, with a small color adjustment

(Reference)
reference.jpeg


(My model)
Final 2.jpg
Final 3.jpg
Final 5.jpg
Final 6.jpg
Final 7.jpg


Finally, I leave you the results of the 3d print of the back of the hull, the turret, the main gun and the side guns.
The rest, I will be printing these days.
4699868E-BF06-49D8-B99D-8333A535B68E.jpeg
7DE0A001-0C02-4D7C-881E-01E49C71BE21.jpeg
C1438FA3-B158-481E-99AE-AF55FFCF547D.jpeg
BD3C0AAB-D634-4BDB-A1D7-543699B39255.jpeg
E88D35CD-50D2-45D1-81CA-5F3C6558C205.jpeg


Cheers!!
 

Attachments

  • hull 2.jpg
    hull 2.jpg
    40.8 KB · Views: 138
You do certainly have some modelling skills. Thanks for sharing.
I noticed that some of the curved surfaces were noticeably faceted. On a FDM printer it wouldn't be noticed because you would have to sand the surface, but they would be more noticeable on a resin printer.
I look forward to see what else you design.

TazMan2000
 
Thanks Guys to all of you for your comments , yes, it is so Tazman, in a resin printer, it will be necessary to sand the faceted faces. This happens because I used two different design programs, to make it faster and due to compatibility, I had to keep the number of faces low. It also serves to not lose the habit of sanding a model .... haha
 
Wow. That's gonna be epic! Caused me to dig out my AMT build of that model from 2000. It was the last kit I built before I got back into the hobby, and the only prequel model I have. Will be very interested to watch your progress on this scratch build.

LAAT.jpg
 
Aaaaarggg! Why so low poly? You did such a great job with proportions, planning and everything. This is gonna take a ton of work on any type of printer to get a smooth non-faceted look. I've completely given up printing models like this no matter how cool the subject matter is. No plans on finessing it further? Adding some subdivisions and stuff? I know it's more work but you're off to such a good start. What software caused comparability issues if I may ask?
 
Invar, good model men, on what scale is it?.


Base, the compatibility problem is between Blender and Fusion, triangular meshes vs quad meshes.

”This is gonna take a ton of work on any type of printer to get a smooth non-faceted look”

I partially agree with what you say, I understand that if the purpose of the model is to do some animation or make a print with an SLS machine, low polygons would be a pain in the ass, but this model will be printed in an FDM and those of us who use them, know that a good result cannot be achieved if we do not perform a good post-process, with putty and sandpaper or some self-leveling resin. Also, at this time, we have one of the best tools ever created for the hobby .... THE DREMMEL.
I have already been doing the task of smoothing the surface and I must say that the additional work was not significant in terms of time, first a good pass with the dremmel, then putty and then sand ... goodbye to the faceted faces.
 
Last edited:
Base, the compatibility problem is between Blender and Fusion, triangular meshes vs quad meshes.
There is a free open source program/plugin for that exact type of problem. Instant Meshes. Take a look. You can then do your usual subdivisions and have a perfect model without the facets. Also you can up the resolution/fidelity when you export a model from Fusion360.
”This is gonna take a ton of work on any type of printer to get a smooth non-faceted look”
I partially agree with what you say, I understand that if the purpose of the model is to do some animation or make an impression with an SLS machine, low polygons would be a pain in the ass, but this model will be printed in an FDM and those of us who use them, know that a good result cannot be achieved if we do not perform a good post-process, with putty and sandpaper or some self-leveling resin. Also, at this time, we have one of the best tools ever created for the hobby .... THE DREMMEL.

Yes Yes, but no:) I fully disagree with adding more work for later and wholeheartedly disagree that FDM is only good with a ton of post ;). The problem with facets are that there can be high spots and low spots as it's an approximation of a curve. Adding and removing a lot of material is tedious work if you print a lot. It's cool if you are creating a 1 time thing or a master for casting, but not if it's a digital file meant as an end product for 3D printing. Obviously you can fix everything in post like you say and it's easier and more forgiving with a LARGE model, but that is almost impossible with high detail small scale models without obliterating the details and totally impossible with figures unless you have really nice high poly models.

Like I said "It will take a ton of work on any printer" because I have printed and do print and design stuff too. It's completely down to what level of detail you print your model at, your printer calibration and how much post process you are comfortable with. Here is an example that should be familiar and the 1:72 scale fence of my own design that is pure slicer and printer manipulation. No Postprocessing done on any of these. FDM.
BWmqiRgO5lsPW?width=4624&height=2600&cropmode=none.jpg

FDM is fully capable of producing excellent results that need very little post processing. I never use self levelling resin as it's a waste and covers details. I use spray filler though and I use Pledge floor polish and milliput as needed as I would with any resin kits. Here is one more I use for the non-believers
B48G7RHx2I0eg?width=1223&height=1630&cropmode=none.jpg

Head was printed seperately at a higher resolution (50 micron layer height) while the torso has adaptive layer height (higher res where needed) for quicker printing.

I have already been doing the task of smoothing the surface and I must say that the additional work was not significant in terms of time, first a good pass with the dremmel, then putty and then sand ... goodbye to the faceted faces.

I have no doubt you will have an amazing looking model and that you do excellent work. Please understand I think what you are doing is really cool and the results will speak for themselves. You are putting in the work to make it as accurate as possible. I just have this hang-up with low poly models because I keep seeing them finished up as low poly models with smooth surface only and facets still there. I've seen more than a few painted up like that and it makes me a little sad ;) I can't help it. In reality it's my problem because I believe the hobby is about making the maker happy and not others in the end.
Thank you for sharing your process and thoughts and I hope you don't mind me sharing mine.
 
Ok Basement, thanks for sharing this information. This is a step I took some time ago, but I found that during the passage from triangles to squares many of the details of the original piece were lost, so I ended up discarding the use of this program.
I might give him another chance now that I have more time to investigate.
 
Some small advances in the print of the model. I must say that really the "extra" work involved in smoothing the faceting was not a big deal, 5 or 6 minutes with the dremmel at low speed was enough to eliminate the edges and leave the pieces rounded.

I leave an example of the two pieces on the back after the pass with the Dremmel
113D1D7E-ACB9-4B9F-9C04-D9D469256B64.jpeg


The turret, after the Dremmel and a few layers of putty.
A6E6FBDE-7678-47A0-B992-B90922D27754.jpeg


Obviously it is necessary to sand and give gray Pimer.


These are the photos of the hull parts, as they came out of the printer
22F191C9-E8B8-483E-80F9-A9D294264A65.jpeg

AE658D43-D49F-4FEE-88BD-A12FBF9A14F8.jpeg

DCDFE805-5A55-4824-B693-B7F356E7D8CE.jpeg

15085FDE-A547-4173-9FDB-D8FB1A6534D7.jpeg

266426E9-1946-4F9F-A3F1-44046BCD5AA8.jpeg


Cheers!
 
Well, it has been a long time since I published progress on this project, the reality is that I had to prioritize my job.
Beyond this small setback, I was able to make small advances.
As I imagined, smoothing the surfaces was not something laborious, in fact, there were no differences regarding the previous treatment that must be done to a 3d printing made with an fdm printer.
Putty and sand ..... I am very happy with the result, you can see that the surfaces were, in my opinion, very smooth.
The model was ready to begin the painting stage. In these days I will begin the process.
Cheers

4ECD41AE-E009-4E93-8A46-28DEAF52AC0E.jpeg

1B927B75-2917-4E29-8C7B-29E4B0AEE032.jpeg
06FE2C6D-5223-4C29-BB30-392357CE6B87.jpeg
E5333B67-B496-4159-9893-598BAFA425DE.jpeg
D9BA82E5-8D60-4B0C-807B-44CCA618BB27.jpeg
4ECD41AE-E009-4E93-8A46-28DEAF52AC0E.jpeg
1B927B75-2917-4E29-8C7B-29E4B0AEE032.jpeg
06FE2C6D-5223-4C29-BB30-392357CE6B87.jpeg
E5333B67-B496-4159-9893-598BAFA425DE.jpeg
D9BA82E5-8D60-4B0C-807B-44CCA618BB27.jpeg

7FB4DF1C-F580-4F75-B58A-216295AF4AD7.jpeg
5FDE6114-9200-4F29-B2B8-5BB754BFC4A5.jpeg
 
This thread is more than 3 years old.

Your message may be considered spam for the following reasons:

  1. This thread hasn't been active in some time. A new post in this thread might not contribute constructively to this discussion after so long.
If you wish to reply despite these issues, check the box below before replying.
Be aware that malicious compliance may result in more severe penalties.
Back
Top