Re: Pcoz's Hasbro Hero Star Wars X-Wing Conversion
Hello people....
Finally found some time to sit down and post some progress pic's.
I have to say before I get started, I think I've come a long way and learned a lot in just this project alone. In the beginning, I was using balsa, foam, etc and it made things extremely difficult. Now that I'm learning techniques with styrene and greeblies that I've learned from you fine folks, things are going a lot smoother. Unfortunately for me, I wasted a LOT of time figuring things out and rebuilding things.
Lastly, in hindsight, I now definitely believe working around the existing Hasbro structure and crappy plastic is probably way more difficult than scratch building this thing.....
Anyhow, let's move on, shall we ?
I finished casting the internal engines


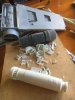
Then turned my attention to the lasers. Styrene sheets cut to install the paneling on each laser body.


For the top of the heat sink, I was looking at different reference photos and decided to use a good old foam sheet.


I'm going to show you another one of my screw ups. So I started building out the internal engine compartments from the left over balsa wood from my original wings so they wouldn't go to waste....BIG mistake....lol. You'll notice that the tops of each bay have a wide section of the toy that needs to be cut out. I also noticed that when I put the panels on, it covered up a lot of the bay and needed to be trimmed.....start over


I cut back the panel to reveal the tip of the wing that needed to be removed to line up with the engine compartment. I then cut even more of the toy frame off at the top.


Since I was worn out on that part, I needed something new to rejuvenate me.... probably the most exiting part of my build right here. I will rebuild the cockpit hatch later.


As I moved forward, I thought I'd better decide on how I'm going to display this x-wing when it's done. I settled on a table top presentation so you could actually see the details that I've been working on. If it was hanging from the ceiling, why hide all the work I've done ?
I cut a 2X4 and notched to fit inside the fuselage. I then drilled a hole in the bottom for maximum support.


Oops, hit my pic limit...
I'll be back.
Thanks for looking
Pcoz


") ...please keep going, no one has finished this bird in a way that will be frigging awesome like you are doing.
...please keep going, no one has finished this bird in a way that will be frigging awesome like you are doing.