2-1B Surgical Droid

again, open in new tab/window for full res

21bfrigate.jpg


21bsculpting.jpg


hoth21btauntaun.jpg
 
Last edited:
well i dunno where you got these from but thanks for sharing, they look like they were taken yesterday!

-z
 
Rinzler Books. ^_^ But yeah they came out nice for sure!

Looks like the aluminum strip is the right way to go on the alice band. I will have to upgrade.
 
Great to see all the new photos! Here is what I have been working on for what seems like the last decade.
Hope to have it at Star Wars Celebration.

Wireless Arduino Control and fully programmable.

DSCF0873.JPG

 
Last edited by a moderator:
Finally got around to dremelling down my Shure to the correct shape - geez, that is a long and nerve racking process! I thought about how to mount the Shure to the head and considered hot glue, 2-part epoxy resin, Milliput and others, but in the end I found that the screws and pre-made screw holes in the Shure half fitted perfectly into the mouth hole to hold it steady, so it only needed one pasticard strip with holes drilled in it to hold it really secure.

10551004_10154968518635319_4615637323641094431_n.jpg


The paint colour really is hard to capture on this guy and looks different in different lighting conditions (this is a combination of Ford Glacier Blue and Citroen Mediterranean Blue sray paints, with Humbrol aluminium dry brushed lightly over the top):

1798640_10154968518645319_5206697161487975204_n.jpg
10389345_10154968518610319_8216728196761704381_n.jpg


Anyone any further ahead with identifying what to use for the metal hose connector, or inside the hollow Shure?

10868114_10154968518580319_8706492930325856589_n.jpg
 
Finally got around to dremelling down my Shure to the correct shape - geez, that is a long and nerve racking process! I thought about how to mount the Shure to the head and considered hot glue, 2-part epoxy resin, Milliput and others, but in the end I found that the screws and pre-made screw holes in the Shure half fitted perfectly into the mouth hole to hold it steady, so it only needed one pasticard strip with holes drilled in it to hold it really secure.

10551004_10154968518635319_4615637323641094431_n.jpg

That's exactly how I mounted my mic shell as well :D
 
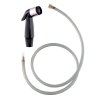
image.jpgI'm using the guts of the Shure mic + some other free lies for the interior of the mouth. As for the hose - it changed over the course of the shoot (as did the eye greeblies, the studs on the side of his head, his chest clock, and the lighting pattern). The hose that I'm using is attached. It is a very simple, cheap hose from a hardware store used to replace the kitchen faucet sprayer. It's the right diameter, braiding style, and the metal piece is crimped he same way. The plastic nipple fits just right into the hole in the bottom of the mic. $10 - easy peasy........ Gene
 
This thread is fantastic! I might have to see about draining my wallet for a head... Would any of you "magical" people have any decent photographs of One-Two Bee's legs, and back? I'd like to study some for a "maybe one of these days".
 
I hope someone someday makes the clear neck piece......hint hint ;)

I should be able to do a few after Celebration Anaheim is over. I am plugging away at molding and casting the other parts which has been a hassle for me.

I'll post more once I get some time and more pictures of my progress.
 
Are they still orderable from Shure as a replacement housing?

Here is how I mounted mine. Of course I have a few things in there too including a speaker. I'll also have a range finder eventually.5 Inside the head.jpg
 
This thread is more than 8 years old.

Your message may be considered spam for the following reasons:

  1. This thread hasn't been active in some time. A new post in this thread might not contribute constructively to this discussion after so long.
If you wish to reply despite these issues, check the box below before replying.
Be aware that malicious compliance may result in more severe penalties.
Back
Top