You are using an out of date browser. It may not display this or other websites correctly.
You should upgrade or use an alternative browser.
You should upgrade or use an alternative browser.
Warhammer 40000 Space Marines
- Thread starter Rotwang
- Start date
jackdoud
Sr Member
<div class='quotetop'>QUOTE(thorssoli @ Dec 7 2006, 12:38 PM) [snapback]1373376[/snapback]</div>
SWEET. What kind of paint did you use for the metal coat?
Next step, shiny metallic coat...
[/b]
SWEET. What kind of paint did you use for the metal coat?
<div class='quotetop'>QUOTE(jackdoud @ Dec 7 2006, 10:02 AM) [snapback]1373393[/snapback]</div>
SWEET. What kind of paint did you use for the metal coat?
[/b][/quote]
I haven't done it yet, I've used Mirrachrome in the past, but today I'm thinking about experimenting with Model Masters Metallizer. I've got a can of their "aluminum plate" color that seems like it might be worth trying.
<div class='quotetop'>QUOTE(thorssoli @ Dec 7 2006, 12:38 PM) [snapback]1373376[/snapback]
Next step, shiny metallic coat...
[/b]
SWEET. What kind of paint did you use for the metal coat?
[/b][/quote]
I haven't done it yet, I've used Mirrachrome in the past, but today I'm thinking about experimenting with Model Masters Metallizer. I've got a can of their "aluminum plate" color that seems like it might be worth trying.
<div class='quotetop'>QUOTE(jackdoud @ Dec 7 2006, 10:16 AM) [snapback]1373402[/snapback]</div>
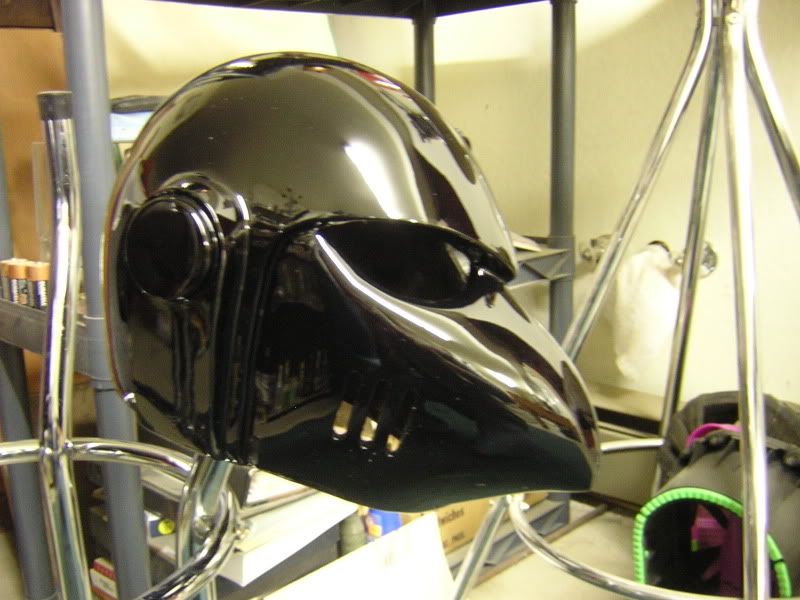
Yes, I'm quite proud of it. It's going to look awesome in chrome or polished aluminum. It's really going to be a heartbreaker to put the finish colors on top of all that...
LOL. I thought the second pic was of the metal coat. :lol That's some serious gloss you've got going there.
[/b]
Yes, I'm quite proud of it. It's going to look awesome in chrome or polished aluminum. It's really going to be a heartbreaker to put the finish colors on top of all that...
That looks fantastic..
When you have the time, could you give more details on how you made the lens?
Thanks
When you have the time, could you give more details on how you made the lens?
Thanks
<div class='quotetop'>QUOTE(RacerMachX @ Dec 8 2006, 06:02 AM) [snapback]1373807[/snapback]</div>
The lenses are made by vacuum-forming a piece of 1/8th inch thick acrylic. The vac-forming rig looks like this:
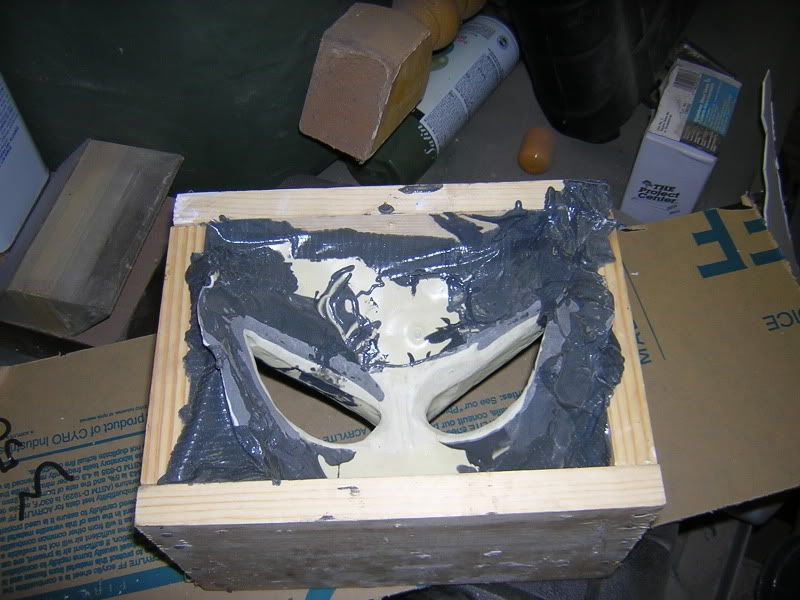
It's essentially just a casting of the eye area of the helmet cut out and built into a fitted box. The box is airtight and has a fitting to connect the shop vac to it (not visible in the picture, it's on the opposite side of the box).
To make a pull from this mold I heat the piece of acrylic in a toaster oven until it becomes flexible enough to form. I still haven't perfected the time and temperature needed to make this work, so I end up wasting a lot of acrylic when it starts to bubble and melt.
Just before the acrylic starts to bubble, I remove it from the oven and drape it over the eye holes in the mold. Then I turn the on the shop vac which pulls the air out from under the lenses and draws the acrylic into the eye holes. This way I have a pair of convex bubble lenses that fit perfectly into the eye holes of the helmet.
Everything about this is dangerous. The acrylic lets off all sorts of nasty chemical gasses when it heats up, it's very hot when it comes out of the oven, and it leaves a smell that guarantees that the oven will be useless for anything else you could want to use it for. In short, don't try this at home.
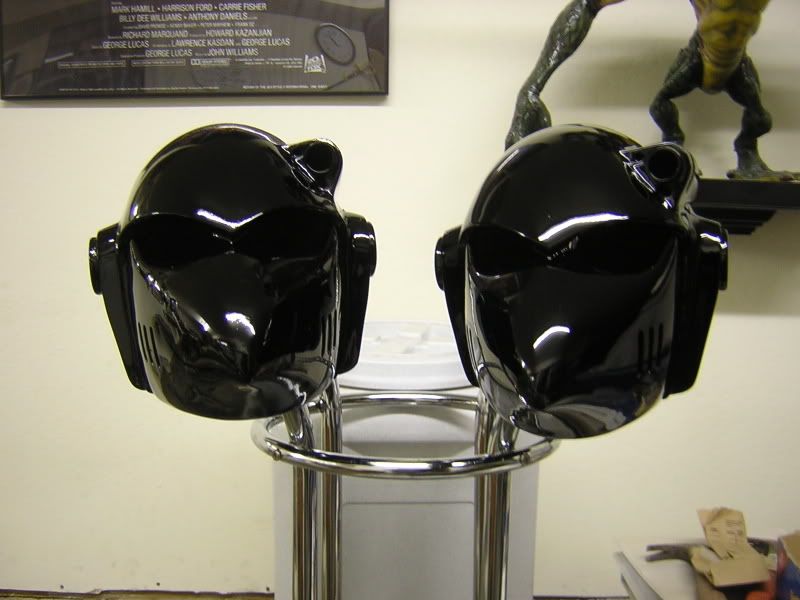
In other news, I've added the chrome coat using Mirrachrome and it looks pretty okay:
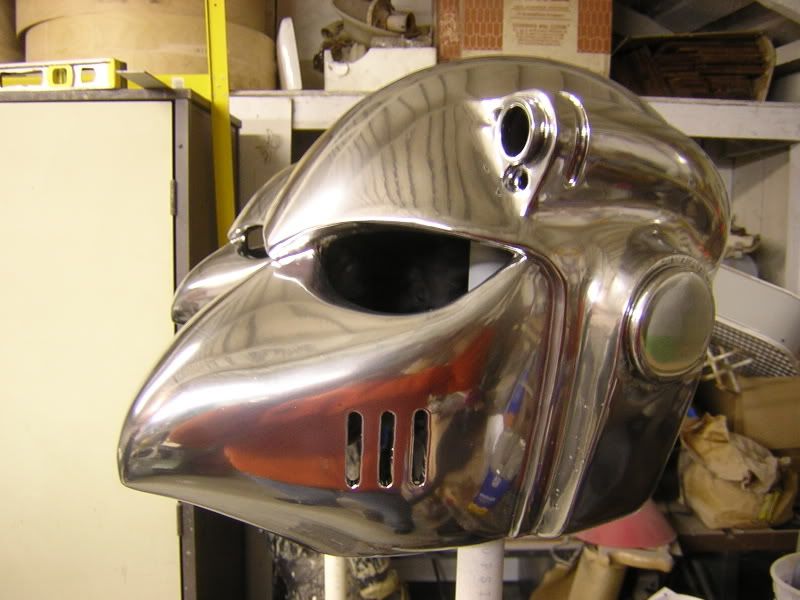
I'm definitely having second thoughts about painting over this. Oh well.
When you have the time, could you give more details on how you made the lens?
[/b]
The lenses are made by vacuum-forming a piece of 1/8th inch thick acrylic. The vac-forming rig looks like this:
It's essentially just a casting of the eye area of the helmet cut out and built into a fitted box. The box is airtight and has a fitting to connect the shop vac to it (not visible in the picture, it's on the opposite side of the box).
To make a pull from this mold I heat the piece of acrylic in a toaster oven until it becomes flexible enough to form. I still haven't perfected the time and temperature needed to make this work, so I end up wasting a lot of acrylic when it starts to bubble and melt.
Just before the acrylic starts to bubble, I remove it from the oven and drape it over the eye holes in the mold. Then I turn the on the shop vac which pulls the air out from under the lenses and draws the acrylic into the eye holes. This way I have a pair of convex bubble lenses that fit perfectly into the eye holes of the helmet.
Everything about this is dangerous. The acrylic lets off all sorts of nasty chemical gasses when it heats up, it's very hot when it comes out of the oven, and it leaves a smell that guarantees that the oven will be useless for anything else you could want to use it for. In short, don't try this at home.
In other news, I've added the chrome coat using Mirrachrome and it looks pretty okay:
I'm definitely having second thoughts about painting over this. Oh well.
OhioAstromech
Well-Known Member
I think that if you were going to weather one of these the Mirrachrome would make a great base coat so that scratches show up as bare metal.
Nice Helmet by the way.")
Nice Helmet by the way.
MisserCraig
Sr Member
these are just so cool.... i've never even played the game, but if i had the money, i'd snatch one up just for the quality alone
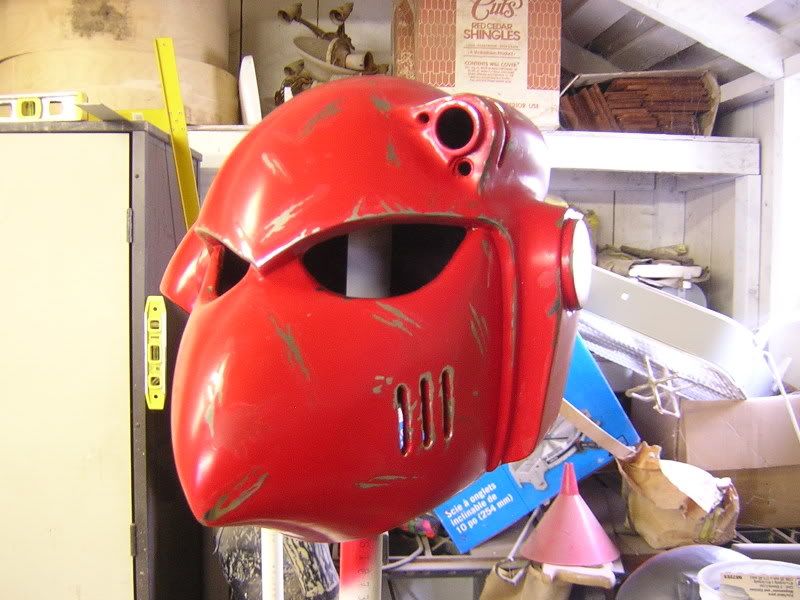
I've been a bit under the weather for the past week or so, so it was only yesterday when I made more progress on these. I've added a two-tone red base color complete with wear marks and scratches. Some scratches show through to bare metal while others only go through the top layer of paint. If all goes according to plan, I'm trying to make the helmet look like it's been used hard for a few years and has a couple of layers of paint jobs on it.Here's a pic of one of the helmets:
And here's a close-up of some of the damage. It's hard to capture with the lighting and flash and so on, but here it is:

And here's a close-up of some of the damage. It's hard to capture with the lighting and flash and so on, but here it is:
NikNak_aka
New Member
Sexy.
I would love to see a white verison of this helmet. I always painted my beak helmets white as veterns because of the old school armor.
I would love to see a white verison of this helmet. I always painted my beak helmets white as veterns because of the old school armor.
OldKen
Master Member
<div class='quotetop'>QUOTE(OdiWan72 @ Dec 16 2006, 04:50 AM) [snapback]1379129[/snapback]</div>
seriously.
with just some tarnish and blast marks here and there... but all metal. that would look sick... :eek
While I really love the red paintjob and the weathering you´ve done to the helmet, I have to say it´s a shame to cover that beautyful flawless chomed surface :cry
Do a chromed full costume with a subtle paintjob/ detailing dude, it´d rock...
Markus
[/b]
seriously.
with just some tarnish and blast marks here and there... but all metal. that would look sick... :eek
Geniepants
Well-Known Member
Nice veteran Blood Angel there. If you ever do a Space Wolves paintjob, I'd love to see it.
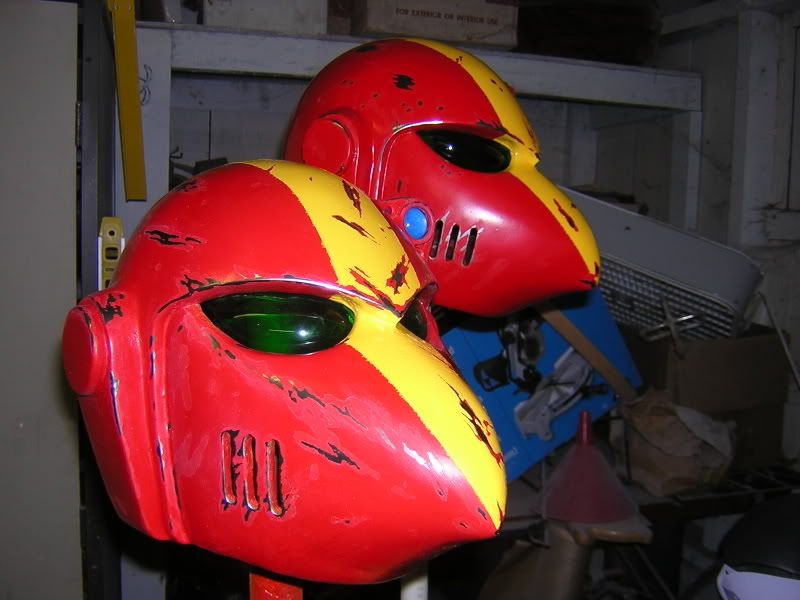
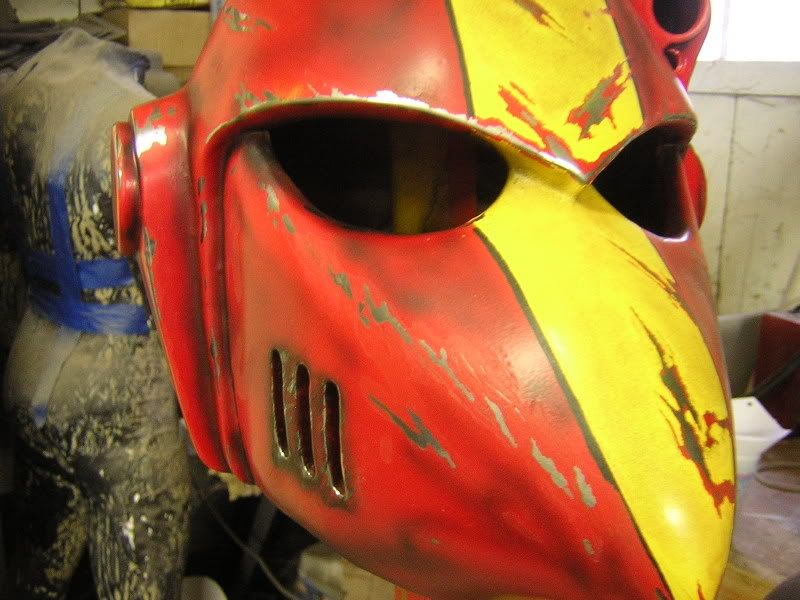
I decided to go ahead and add the yellow racing stripe. I used the same mustard masking technique for all of the scratches I have on the rest of the helmet. Here's a shot of the two helmets:
And me wearing the less-scratched one:
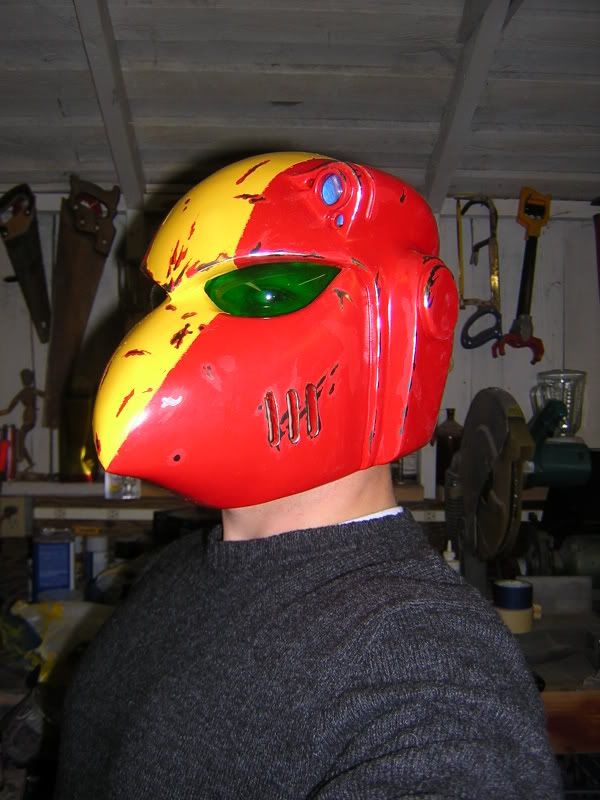
The next step will be a couple of black pinstripes to clean up the edge of the yellow racing stripe. Once that's done, I'm going to do some airbrush aging to tone down the bright yellow. Then I'll be adding a blackwash to the whole thing before I do some specific aging to grime up the creases and the vents. Then a clearcoat to stick it all together and I can add the electronics. Then it's on to the rest of the armor...
And me wearing the less-scratched one:
The next step will be a couple of black pinstripes to clean up the edge of the yellow racing stripe. Once that's done, I'm going to do some airbrush aging to tone down the bright yellow. Then I'll be adding a blackwash to the whole thing before I do some specific aging to grime up the creases and the vents. Then a clearcoat to stick it all together and I can add the electronics. Then it's on to the rest of the armor...
MisserCraig
Sr Member
as much as it pains me to see that awesome chrome finish covered up, your paintjobs are looking spectacular. i'm very much looking forward to seeing the finished products on these.
Getting closer:
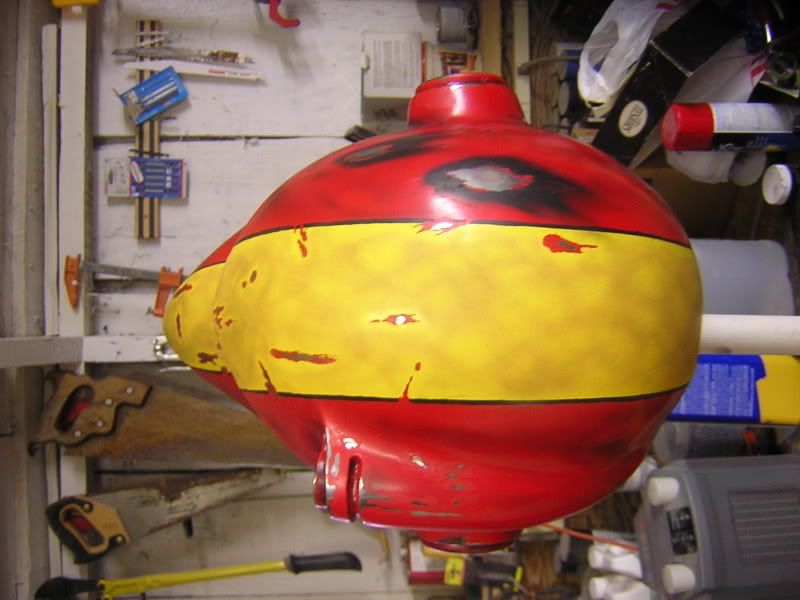
This is basically damage control. When I sprayed the yellow stripe there were two problems. First, the yellow actually lifted the red and caused some crackling. Second, the fine pigment of the hobby spray paint allowed it to seep under the blue masking tape that I was using. So since the last pics were posted I've added a black pinstripe to border the yellow racing stripe. Then the yellow stripe was sanded everywhere that the red had cracked through and recoated by hand using a brush. Once this had dried I color matched it using the airbrush and then aged it using a browner tint of yellow. Then I used Polly S Acrylic's Steam Power Black to darken the red and add scorch marks as needed. I'm thinking about adding a bit of dirt color, but I think I'll save that for some of the other parts of the armor (boots, knees, elbows, etc.)
The next thing I have to do is install the electronics in the helmet. Then it's on to sculpting the gorget (the piece of armor around the neck) and the bolter...
Similar threads
- Replies
- 2
- Views
- 1,362
- Replies
- 1
- Views
- 271