Various Friday the 13th (Jason Voorhees) Projects

Mr Mold Maker

Master Member
Hey folks. I’ve recently been doing a ton of Jason related projects for fun and figured I’d share some of them here.

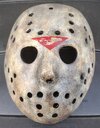
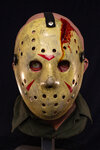
I guess I’ll start with my hock project. In the past I would purchase hock blanks from JDF Studios but unfortunately he closed his doors leaving quite a vacuum in the Jason mask community. I recently purchased a blank on Etsy that was honestly over priced and realized I should just make my own, so I went to Zbrush and sculpted this. I wasn’t really too concerned with accuracy, I just wanted something to pull blanks from. It was printed on my Phenom L and I pulled PETG plastic right on the printed buck with my home made vacuum former. I’ll come back to these later.

601FD2D3-F509-4CBA-A44D-1DFB24870057.jpeg646E18A7-EC81-4430-ADCE-1B8044DDCF45.jpeg6F1A0B5B-BE08-460C-9B84-56C6325434FE.jpeg


I figured I can’t just make the hock without the man behind the mask! So I went back in to Zbrush and sculpted my take on a Part 4 Jason. I also printed a mini bust, about 8 inches tall. Eventually I’d love to print the head Lifesize and make a bust.

0FE4544E-E612-48A0-BCF8-BC5784EC559C.jpeg8BE0D6F5-77F8-4B09-929D-F0996F8B61D4.jpeg

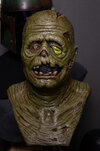
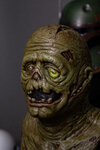
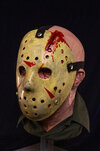
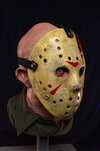
Once that was out of the way, I still had part 4 on my mind and remembered I have a Bloody Ending II bust from Marshall Bean that I had been meaning to repaint for a little while. I ended up resculpting both eyes as the original bust is a replica of the makeup/dummy look and has a closed left eye. After remaking the eyes I painted it up pretty quickly. The eyes are by Fourth Seal Studios by the way.

5B50C138-1EDE-4142-8DA4-5E1C32C63A78.jpeg897504EA-F185-4889-8486-2DDD0A289FF1.jpeg35A4FD58-838F-40C0-A06F-E7519799BB21.jpeg

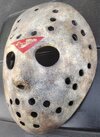
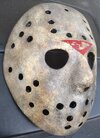
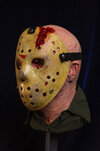
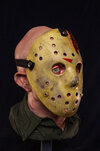
Now back to the hocks. I pulled two blanks in .060 PETG and painted one up part 4 style for this bust.

28D4BAD6-C873-4737-8643-4B784E6B37AA.jpeg28123835-FEDC-4B23-B0C6-DC2A15C38F0C.jpeg700EAA8F-6E32-4417-B562-3CFD0660CC76.jpeg1C565A41-E3CB-4913-A931-F56B51E67A83.jpeg099D35E2-8339-468D-BC55-CDA6EF748873.jpeg

More to come in a new post.
 
Last edited:
A little more detail on the hocks. I have spent the past few weeks trying to figure out the best way to do the unique cracking seen on the Part 3 hero and settled on a technique that folks use to “relic” their guitars. Nitrocellulose lacquer can be “shocked” by turning a canned air duster upside down and quickly freezing the surface. There are a lot of variables but it seems like doing two good coats of the lacquer and letting it sit for about 6-10 hours is perfect for this cracking effect. Unfortunately I made the mistake of trying to add the vertical cracking by hand on the forehead of the Part 3 and it was a total failure, so I will be remaking the Part 3.

The base colors were custom mixed automotive paints that I based on Color Shot Vintage Lace and Krylon Meringue for the 3 and 4 respectively. I used the custom mix because it is very consistent and sticks well to the plastic, though the spray paint colors would have worked just fine. The inside of both were painted with Krylon Dover White.

26D9B422-8D59-40A4-8523-04240E14DA6B.jpeg1A46E812-8DF9-4854-8BD5-F325629CFCD5.jpegC2533FB5-7C87-4913-B74D-EB9CEF3B20DF.jpegD074A26E-18C3-4693-8B19-7B3E95152671.jpeg54077180-3003-4FF5-81C9-DC1D82941DAF.jpeg8BE49317-8B61-4E3F-963E-8C9491D1CD61.jpeg591CE3B5-B208-4465-9329-25864348C6D6.jpeg

After making these two masks I wasn’t super happy with the shape of them, so I’m currently resculpting the buck a little with Apoxie Sculpt.

Now on to quite a fun one! I had a part 8 mask from Frightstuff that I purchased and finished when I was probably around 12-13 years old. It was absolutely horrible. I recently dug it out of the closet since I’m on this Jason kick and decided I’d turn it into the melted mask from the end of Part 8. I took a heat gun to it to deform the mask and then I latex masked everywhere but the burns and used a paint splatter technique for the texture. I painted the mask with a yellow automotive mix and weathered it up with a lot of layers of acrylic paint on a sea sponge.

99F75FAE-8116-49CB-8E22-91AD4F4B3096.jpegF966197C-0EF0-45EA-84AB-D445E6F5C539.jpeg8C19522B-C7FF-4944-999C-39471F591E8C.jpeg

Well that is all for now, but once I’ve reworked my buck I have at least three more hock paint ups planned! Hope you folks have enjoyed, and keep an eye out for more project updates soon.
 
Last edited:
Love your custom hock and the steps you went through to recreate something in the vein the originals were done! Very Part 4 but the slight taper on the lower half is very Part 7! Great stuff, man!

Your Part 4 bust looks great, too, both the custom sculpt and the reworked one you had on hand. I'd like to do an 'idealized' Jason one of these days. I know Part 4 based the look on the original make-up in the first film but I never understood the shapes on the face. An older Jason that looks like a matured version of the Part 1 "kid" look without all the senseless, weird contortions. Between that and the concept art for the "Karloff Frankenstein's Monster" zombie-Jason look for FvJ, is the perfect Jason for me.

The taper is something I very much am not happy with and I’ve gone in with some Apoxie sculpt since to change that a little. It also had the unintended effect of sort of adding that flare around the base that the real masks have. It’s certainly not accurate but it is quite authentic at the very least! Some day I’ll get a plante mask and do the process from the ground up by hand.

Totally understand what you mean. The part 4 is maybe my favorite look, but the forms are very weird. You may or may not like what I’m sculpting now, it’s sort of a part 3 mixed with a remake sort of look. It’s not ready to share just yet but when I can I’ll definitely post here. Would love to see you give your concept a go as well!
 
Some day I’ll get a plante mask and do the process from the ground up by hand.

More on this a bit sooner than I expected.


Pulled a thin styrene test mask to see what the hocks will look like after my mods. Happy with it for the most part, few things I can change but with a new project on the horizon that should lead to a much more accurate and authentic buck I don’t know if I’ll make those changes. Almost wasn’t even going to share this, as it’s just a super quick throw away paint job. But here is a (temporary) Part 5. The Imposter.
C9591E2F-5A42-4515-B06C-69AE6A38819E.jpeg13B77CFA-BA7F-4E7B-BDB9-B7EF830EE74E.jpeg5B3F5EC6-9514-4B22-A0A4-DD7D02DFBF33.jpegF4FA4405-C9DE-45C3-A513-56E3C9868072.jpeg

I base coated in a Krylon ivory satin and just sponged over top with a grey and a brown. The inside is the raw styrene that was given the same treatment.
 
Last edited:
First off, I apologize to any viewers using a desktop. I didn’t realize that the pictures were so big. I have switched them all to thumbnails and will continue that moving forward. Hopefully when clicked they open at an appropriate size.


I got my fibrosport recast in today and wasted no time beginning the process. I got great advice from Auz and can’t thank him enough. Anyone who knows Jason masks surely knows his work, it’s some of the best out there. Crash creations also did this process with an original fibrosport but I can’t find the write up anymore as his blog is gone. Though he does have some photos on his Facebook page, they’re just a vague overview. I tried to document it a little more here.

06EA242C-6C6B-4D61-820B-93CF0158D058.jpeg24B2083B-D619-4CAF-A5BD-B37EDF42CB15.jpeg
Here is the mask out of the box, and then with a very quick pass of sanding. The masks surface was quite rough. I’m not sure if the real vintage mask looked like that or if the guys mold is near the end of its life.. but either way, not a big deal. I secured it in place on top of my 3D printed buck.

5F67F252-81C1-4929-83AA-4F6CE0B13910.jpeg38E9B8AF-36A2-4EB2-B529-1EA1F1BCA837.jpeg
Here I’ve begun the process of pulling copies on top of each other to enlarge the mask. I ended up being very happy with three pulls, though I did pull all the way up to 5 layers thick to see what it looked like. Ironically, the 5th layer looks like it would make an absolutely wonderful part 5 mask, which makes sense because we assume the real part 5 is a recast off the front of the hero part 4 mask, or possibly the “mystery mask.”


C49606E3-A909-4630-9639-C6D287CA4FA7.jpegCB68A332-A5E6-4DE5-BE2E-773FD10A2FF4.jpegF96CAA42-6AD6-4250-B2BF-98D72F70468E.jpeg
Once I decided I was happy with three layers, I pulled and removed a fourth to get a good idea of what the finished masks will look like coming off the buck. I’m very happy.

975D6EAD-CDF1-4FA2-8BE8-E00A7C1167D3.jpeg
Here you can see a few steps in the enlargement process.

62629699-E429-4E40-9E22-036E7CDA04AA.jpeg

The final step taken before making a mold is claying up the edge. We can see evidence they did this on the original mask. I tried to base the shape and width on the Mystery Mask as it’s what I have the best reference of, but it was quite hard to really see what I was doing with the bright white mask and brown clay. I am sure once I have pulled the buck and can see it in a more homogeneous fashion I’ll reshape/retool it a little. I also plan to remove some of the waviness in the nose, remove the marks around the snap holes, and perhaps sharpen the eyes a little.

From here I am making a matrix mold and will produce a tooling buck, likely in stone. I made the epoxy shell tonight and will trim it and pour silicone tomorrow. Then I’ll make any final changes and start pulling some blanks! More to come soon.
 
Last edited:
3C3FF011-9DA5-4F56-BDCA-F05558FAF7D5.jpeg

Here are all the steps before the edges were sculpted in, laid out side by side. With every step it’s getting closer to Jason. I thought this was quite cool because while several people have gone through this process, I’ve never seen them laid out like this.

I caught an airbubble in the matrix which is embarrassing, but it was an easy fix. Pulling a buck tomorrow and we’ll see what needs to be fixed and then pull a test mask to replace 4v2 in the line up above.
 
A4C57801-4674-4FA7-830C-9DBF2BCDF8C0.jpeg

Still learning the best way to paint these things, but here are my first 3, 4, and 5 finished on my new blanks. I trimmed a mask and put it back on the buck and pulled one more on top for the 5. A light reshape was done to get that bloated mouth look.

More to come soon. May have to slow down on these as other work starts to pick back up, but I definitely have a few more I want to do.
 
Here is my take on the “shower scene” and “end scene” part 4 mask. Displayed on the wonderful Bloody Ending II bust.

I will be away for the weekend but when I come back I’ll be finishing up two part 3 masks (one cleaner and one more weathered), as well as the Part 5 Graveyard and Window Hallucination masks.
 

Attachments

  • 9659ECB6-D16C-440E-8ED4-B8F56D59EDBF.jpeg
    9659ECB6-D16C-440E-8ED4-B8F56D59EDBF.jpeg
    1.8 MB · Views: 152
  • 4C5EF517-E128-4ACE-A990-AC34CAF7BFFE.jpeg
    4C5EF517-E128-4ACE-A990-AC34CAF7BFFE.jpeg
    3.5 MB · Views: 140
  • 1BC4E452-C076-4953-A549-1364A346717A.jpeg
    1BC4E452-C076-4953-A549-1364A346717A.jpeg
    2.3 MB · Views: 99
  • 0972915C-E1B2-46F5-880A-3AFF310EC6AA.jpeg
    0972915C-E1B2-46F5-880A-3AFF310EC6AA.jpeg
    2.3 MB · Views: 118
  • 2B589FF7-8F29-4F44-9B07-07AC212F7C12.jpeg
    2B589FF7-8F29-4F44-9B07-07AC212F7C12.jpeg
    3.4 MB · Views: 94
  • 0AF5C77B-AE1F-43D1-8DCF-6C948EC4E6F3.jpeg
    0AF5C77B-AE1F-43D1-8DCF-6C948EC4E6F3.jpeg
    3.2 MB · Views: 147
502EDCDB-90D5-4A4F-8735-460746A92254.jpeg16042FE5-8B21-412E-A697-C0E579A718AA.jpeg60861F98-38A5-4EED-A028-23B076166261.jpeg
Cleaner Part 3

6AD31DDB-370F-4BED-9A38-E200C78BAA8A.jpegD7463F8B-3C10-4A90-BC91-F9506D1DB671.jpeg79A3DB30-7B0D-4472-85CD-513596FC9722.jpeg
Weathered part 3

72E6D439-F69F-44EA-9999-37D555EAC82A.jpegCEC02136-75CC-4B8B-BC8A-AB5676F8E9B9.jpegB95F1155-3095-4A34-BABC-2127A0B988C5.jpeg
Custom mask 1

51CE0968-8D5E-493D-8772-236F4A41790F.jpegD1D833F8-1A1D-48A9-B7DD-8FB23D899BEE.jpegC44254D5-02BE-436D-8FE8-370D40BD11E4.jpeg
Custom mask 2, vaguely window scene inspired.


Well folks it’s time for me to wind down on these Jason masks. I had a lot of fun and learned a lot in the process. I ended up using Krylon satin meringue for most of these, but Rustoleum Heirloom White with a yellow patina stain on top is very nice too. I spent a long time testing with Watco Nitrocellulose lacquer for real cracking and checking in the clear coat but it is much too finicky and the resulting cracking, while gorgeous in person, just doesn’t read well from any distance. I switched to clearing with 2K clear because I really like the glossy look on these. Weathering was all done with sponges and apple barrel acrylic paint. I got a lot of the nice natural scratching by rubbing the base coat down with lava rocks.

I do have a graveyard mask in progress which I’ll get back around to eventually, and I still want to do a better window hallucination mask but the eyecuts for it are hard to nail with my blanks. Whenever those happen I’ll post here.

Thanks for reading folks! Till next time..
 
Thank you! :)
View attachment 1621330View attachment 1621331View attachment 1621332
Cleaner Part 3

View attachment 1621333View attachment 1621334View attachment 1621336
Weathered part 3

View attachment 1621335View attachment 1621337View attachment 1621338
Custom mask 1

View attachment 1621339View attachment 1621340View attachment 1621341
Custom mask 2, vaguely window scene inspired.


Well folks it’s time for me to wind down on these Jason masks. I had a lot of fun and learned a lot in the process. I ended up using Krylon satin meringue for most of these, but Rustoleum Heirloom White with a yellow patina stain on top is very nice too. I spent a long time testing with Watco Nitrocellulose lacquer for real cracking and checking in the clear coat but it is much too finicky and the resulting cracking, while gorgeous in person, just doesn’t read well from any distance. I switched to clearing with 2K clear because I really like the glossy look on these. Weathering was all done with sponges and apple barrel acrylic paint. I got a lot of the nice natural scratching by rubbing the base coat down with lava rocks.

I do have a graveyard mask in progress which I’ll get back around to eventually, and I still want to do a better window hallucination mask but the eyecuts for it are hard to nail with my blanks. Whenever those happen I’ll post here.

Thanks for reading folks! Till next time..
Thank you very much for sharing all of this! If you don't mind my asking, what was the thickness of the plastic used for the successive levels of vacuum forming?
 
Thank you very much for sharing all of this! If you don't mind my asking, what was the thickness of the plastic used for the successive levels of vacuum forming?
Sure thing. I have all of them up on my wall still, I almost like having the progress displayed more than the final masks. It was 1/16” styrene
 
Sure thing. I have all of them up on my wall still, I almost like having the progress displayed more than the final masks. It was 1/16” styrene
Okay. That's very interesting - that at that level of thickness each level of vacuum forming has that amount of effect. Thank you very much!
 
Worked on another Jason project so I figured I’d update this thread.

This is the “Slimeball” from Fear of the Dark studios. My friend Jay was kind enough to send this my way and it’s been on the shelf for way too long. I don’t think it’s “finished,” I’ll probably spend some time punching up the details when I can. It was a translucent resin cast, I did a brown wash and then the rest was airbrush work with thinned acrylics. I painted the eye by hand and glossed it with Createx UVLS gloss. I’ll add a shirt and a hock eventually as well, just need to hit the second-hand stores for a good shirt.
 

Attachments

  • F6355293-34FD-4A24-AAFF-DF7DA60E2D1D.jpeg
    F6355293-34FD-4A24-AAFF-DF7DA60E2D1D.jpeg
    2.9 MB · Views: 43
  • AB67F082-D622-425F-A743-8DDA79A1AC7E.jpeg
    AB67F082-D622-425F-A743-8DDA79A1AC7E.jpeg
    4.8 MB · Views: 42

Your message may be considered spam for the following reasons:

If you wish to reply despite these issues, check the box below before replying.
Be aware that malicious compliance may result in more severe penalties.
Back
Top