Tron Legacy Costume

Hub update:

Inspired by Earendilgrey, I went back to Home Depot to get a flange. I found a 4" Closet Flange Spacer Ring that fit the plug. I'm going to insert eyelets on my hoodie and bolt it to a thin piece of plastic on the otherside that's going to be supported by a harness or suspenders.

f05f6464.jpg


685d71ad.jpg
 
Hi again, I found out some more information about Powerless Illuminating Polymer Ribbon. Here is the information I received from the manufacturer about what colors they have/will have.

"Hi there,

Right now, we offer Blue and Green but will be looking to add more colors soon. We are evaluating Purple, Red, Orange and a Blue/Green aqua color. We should have some information on new colors by the end of the summer.

Inventables will be stocking all Lunabrite ribbons as we introduce them.

Hope that info helps!"


Hmm my only question left is what does it look like in "regular" light.
 
Hmm my only question left is what does it look like in "regular" light.

Agreed. My guess is not very bright since it "charges" by being exposed to light. My assumption is about the same as anything glow in the dark quality, so slightly noticeable. I'll send a response to find out.

-Edit-

Oh, checked the FAQ part of the site, https://www.lunabrite.com/f-a-q and it has a picture on the top left that shows how it looks in day verse night. As I thought, it reacts like regular glow in the dark, different color in day then night. The ribbon may be slightly different, but I would doubt it.
 
Last edited:
alright so i decided to make disc hubs out of small sized ziploc tupperware bowls. they ended up being a bit on the small size but im going to use a ring or two of craft foam to add to its size and hold the disc in place.

Now I'm wondering, what would be the best way to hold tupperware to the back of a garment. thoughts? I'd rather go as simple as possible.

I'm considering poking or drilling holes in the lip that the lid goes on, then sewing it to the back of my jacket. It worked with my paper bowl really well, and it should only take a tiny bit more effort to drill small holes all the way around the bowl.
 
alright so i decided to make disc hubs out of small sized ziploc tupperware bowls. they ended up being a bit on the small size but im going to use a ring or two of craft foam to add to its size and hold the disc in place.

Now I'm wondering, what would be the best way to hold tupperware to the back of a garment. thoughts? I'd rather go as simple as possible.
I basically did the same thing with a container of candy I found at the dollar store and used over sized snaps I bought at Joann fabrics. I glued them to the lid of the container with E6000 and sewed the other half to the garment, though you could probably get away with gluing them to the garment as well so long as you didn't need to reposition them.
 
I might go in the direction of using velcro for the disc mounts but we shall see. But just so you guys know, the craft foam holds the disc in pretty tightly and I shook it up a bit
 
Dear David, I impressed with the Rinzler/Tron Outfit. But will you be producing a Helmet for Rinzler's outfit? There's certainly a market for it.
 
For all of you who've had experience with el wire:

I have a 9v battery inverter, and an 8aa-12v inverter and when I switch my wire
from one inverter to the other, the color of the wire actually changes.
My 9v makes it look blue, and my 12v makes it look very green-ish.
What would be causing this?
 
For all of you who've had experience with el wire:

I have a 9v battery inverter, and an 8aa-12v inverter and when I switch my wire
from one inverter to the other, the color of the wire actually changes.
My 9v makes it look blue, and my 12v makes it look very green-ish.
What would be causing this?

It's because there's much more power to it compared to the length. I don't know much about the wire, but it may be damaging/quickening the life of the wire.

I plan on using four 9volt packs and two AA packs for my C.L.U. costume I am making. Two for the bottom part of the costume, (I will need about 14 feet of wire per leg, the 9-volt rated for 12-17 feet,) as well as similar amounts for the torso part of the costume, then a AA pack (rated for 3-5 feet) for the disc, both sides, both inner and outer rings, and another AA pack for the helmet. I will house the 9volt packs, both of them, in a launch baton mounted on my right hip, sadly it won't be removeable. The two 9volt packs for the torso will be in the mount for the disc, the AA pack for the disc is rather easy to hide in it, (I'm making a 10" one compared to the deluxe 9" one you can buy,) and the AA pack for the helmet will be in the side/protruding chin part on the right. I may even get a voice distorter and put it in the left chin thing to balance it out. Don't know how much they cost though, or how good they really are. I've researched all of my other materials rather extensively though. I just know that certain packs can handle X-amount of wire, and I'm balancing it the best I can so it's all uniform... (And I'm using white wire instead of yellow, or in your case, blue or green.)

I'm not planning on having the wire show directly though, rather, I'm getting clear/colored rubber sheets and white rubber sheets and using dense foam as body armor. Foam is the first layer, (on top of the fabric that in some parts has hexagons on it,) then the white rubber will be cut wider than I want in the design. Cut even smaller than that yet still larger than the design visible will be the colored rubber, and the EL wire will rest on the edge of the colored rubber yet on top of the white rubber, so it lights up the colored rubber ans reflects off of the white rubber (not reflective because that messes with photos...) THEN the dense foam that I will have as the top layer will have the design of the light cut in it, hiding the EL wire and everything, only showing the design I cut! I have to do it for every body shell in the costume, and there are many. I then am cutting my own 1/16" thin foam hexagons (not one by one, with a tool,) yet I have to apply them one by one on the fabric layer where there are no foam armor shells. The printed hexagons on the lycra was cool, but doesn't have the same effect as the movie, and doing it the hard and long way costs $90 less. I plan on having the pants part underlap the top, so it can velcro together, and look seamless.

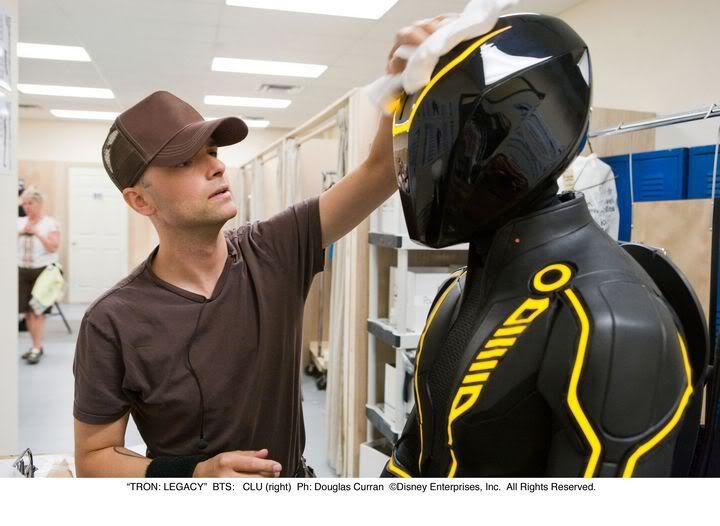
When I need to pass EL wire in-between body shells I will run it under the fabric and cover it in black tubing or electrical tape, if I can do it neatly. For the helmet I will carve it in clay, then warm up plastic sheets, mostly black with a few slightly transparent like sunglasses, so I can see, and a little bit completely clear, for the light, and shape them on the helmet... I'm using a helmet I have from a long time ago without it's plastic shell to put the new helmet on. It's the perfect size. All of the 3D models and such are NOT like the helmet in the movie, and I have yet to see one that someone has made for a costume that is like the one in the movie either... there's just something different with the center chin that nobody seems to pick up on... I have hundreds of reference photos though, (I have the Bluray,) so I will try... :D

Also, I need a pair of black boots I can ruin. Hmmm...

I am starting with the helmet, as it will take a few months for sure, and will finish the rest of the costume by NEXT halloween... That won't stop me from attempting to shop at a supermarket while wearing it... To test it out of course... :D

I am going to make it look nearly exactly like it does on screen, except dense foam instead of rubber, because it's lighter, and cheaper. I have, however, noticed that may costumes are done in big single pieces of foam... While some look awesome, it makes sense to me to do every different panel seperately, for mobility's sake, as well as not looking like a robot when moving. I expect to spend $145 on the whole thing. The most expensive thing being the lighting system, $85 for the wire and seperate power packs. With the helmet, hand-done hexagon texture, ID Disc from scratch, wiring the whole thing... My timeline to have it done for NEXT halloween, (18 months,) seems reasonable. When I start making progress on the helmet I will post pictures, and when I start to make the suit and disc, I will post my exact plans, body armor shell layouts, EL wire layouts, and everything else, as well as pictures, here for everybody to see.

BTW this is my first time attempting something like this, but, I really think I can do it. I mean, I really want to. Also, I finally registered, yet have been looking at some of these awesome projects for a long time. Hello everyone! Sorry for the wall-of-text and no pictures... Those will come soon enough.
 
Last edited:
All of the 3D models and such are NOT like the helmet in the movie, and I have yet to see one that someone has made for a costume that is like the one in the movie either... there's just something different with the center chin that nobody seems to pick up on... I have hundreds of reference photos though, (I have the Bluray,) so I will try... :D
I'm pretty sure I know what you're talking about regarding the center chin, but do you think you could elaborate? If it's what I'm thinking of, it could be a trick of the light to make it appear more pronounced since it's pretty small in the production stills I have.
 
It's because there's much more power to it compared to the length. I don't know much about the wire, but it may be damaging/quickening the life of the wire.


Actually, I have four segments of wire, and its all the same no matter how many feet are attached to the inverters...the 12v lights the wire up greenish, and the 9v lights up the wire blue....


The only issue concerning length vs. power is the brightness factor, which is pretty much knowledge by now for anyone reading this thread, NOT a change in color. That's something I haven't heard, read, or come across when working with el wire.

Anyone have any idea what is causing this!?

The 9V inverter is probably running a higher frequency then the 12V.
Higher frequency will increase brightness and create a more bluish light. It will also shorten the life of the wire. But we're talking about 2000 hours instead of 3000.
Listen to the 2 inverters, the 9V probably has a higher pitched buzz.
 
Just got my Luminous Film to redo my Quorra lighting.

I know one of the members here said he used staples to get the angles on strips of the LF lite tape. It worked for him but I tried this method myself and didn't work for me.

I have enclosed a couple photos of my results. As you can see, only the strip going straight into my inverter is lite up. The other is not. Am I doing something wrong? Do I need to use more than one staple? My staples are not coated or colored in any way, just regular staples.

I have never tried this before and glad I did before I went and cut any more of this pricey stuff and ruined my suit.

How else can I get the angles with LF tape? Bending it at 90 degree angles basically ruins the inner core and there will be dark pink spots in the bent area when you turn it on. Not attractive at all.

Anyway, help with the staple method for angles.... Anyone???
 
I'm pretty sure I know what you're talking about regarding the center chin, but do you think you could elaborate? If it's what I'm thinking of, it could be a trick of the light to make it appear more pronounced since it's pretty small in the production stills I have.

It looks curved inward with flared out edges. Look:

cluhelmet1.jpg


cluhelmet2.jpg


cluhelmet3.jpg


I haven't seen any helmets that have it, or have decent chin accents on the sides either...
 
Ahh yeah we are talking about the same thing then. It's not so much curved inwards as it is curved down. It's easier to see in this picture with regular light. It looks like the center front part of the visor is slightly shorter than the two on the sides giving the illusion of it curving inward when the light hits it a certain way.
Tron_Legacy_12913392606232.jpg

Awesome!!!

Yes, I know that's exactly what it looks like, I just didn't have a picture from that angle, so I posted some from the top-ish then one straight-on so you could picture it in your mind... And it's not a straight-cut, it is curved like in the photos I posted above, (at least, the different panels of the helmet curve around, making it look like that...) All of the helmets I've seen completely disregard this completely, or continue the front panels forward until it is flat. Awesome photo though, where does everyone find the ones off of the set? O_O
 
Last edited:
I found the picture in another thread on here actually. I'm not sure where the person that posted it found it. I see what you're saying about the curvature of the front though. I didn't do that with my helmet, but that's because the method I used didn't really allow for it. I'm going to be remaking it anyway since I'm not happy with certain things on it, namely the way I attached the lighting element. It wound up with a thicker profile than I thought it would so it sticks up awkwardly.
 
This thread is more than 3 years old.

Your message may be considered spam for the following reasons:

  1. This thread hasn't been active in some time. A new post in this thread might not contribute constructively to this discussion after so long.
If you wish to reply despite these issues, check the box below before replying.
Be aware that malicious compliance may result in more severe penalties.
Back
Top