Thanks, yeah I had heard the pack was entirely 3D printed. Mine will be a mix for sure. I'm just trying to be accurate to the design look and intention, not necessarily the actual found parts.Great build- though I'd like to note while we used a lot of those parts (like the Electrolux) for reference, they were modeled and 3D printed because they ended up as not quite 100% scale.
You are using an out of date browser. It may not display this or other websites correctly.
You should upgrade or use an alternative browser.
You should upgrade or use an alternative browser.
Tomorrowland Jetpack
- Thread starter Valor
- Start date
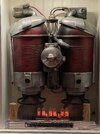
The aluminum backplate for the harness is actually an old street sign, which feels appropriate for a jetpack built in a barn.
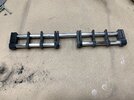
Working through the linkage system that attached the two shovels (flaps) to the pack. I'm using some aluminum tube with 3D modeled links.


Working through the linkage system that attached the two shovels (flaps) to the pack. I'm using some aluminum tube with 3D modeled links.
Last edited:
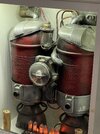
Today I printed the pieces for the flaps and assembled the mechanism. This will be mounted once I figure out how to connect it.
I also sewed the back pad and attached it to the aluminum plate. And finally, (because I've been WAITING for this step, I created the harness out of seat belt material and attached the lift-latch buckle. Which means I COULD STRAP IT ON TODAY!!! Well, for a few minutes. It's surprisingly comfortable.
I'm seriously considering a full Frank Walker costume ... The jacket he wore flying around Tomorrowland, not the farm outfit.
Attachments
Last edited:


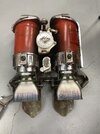
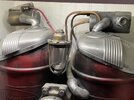
Today I received the last pieces of the folding handle assembly. I know these are not screen-accurate, but I really like how mechanical and robust they are. And they mimic the range of motion of the screen pack. They are elbows and pivots designed for boat canopies. Again, in the spirit of the story, certainly something that might be found in a barn.


Last edited:
Wayne Bakken
Well-Known Member
Sweet build


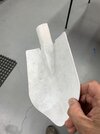
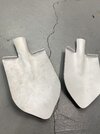
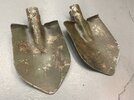
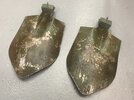
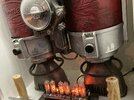
One of the final pieces, and a part I was really stressing about how to create was the two shovels used for engine flaps. I've seen others use the blades from small camp shovels. But I didn't want to add the weight to my pack (which is already getting heavy). My solution was to use sheet styrene. How did I get the curvature of a shovel? I heated the sheet up and pressed it into the head of a shovel! This captured just the right curvature. A couple rounds of military green, paint chips and rust and I had a couple great shovel heads.
Attachments


It's so pretty!Bumping this project because it was my favorite from 2021.
You did a fantastic job, and this was definitely one of my favorite threads to watch in 2021. Such a beautiful prop!

Valor that is epic, mine is pretty good but yours is really top notch, I want to finish my back and handles but then it won't fit in my cabinet, anyway great work, here is mine.
My Best,
AL
My Best,
AL
Attachments
Similar threads
- Replies
- 7
- Views
- 1,596
- Replies
- 126
- Views
- 13,247