Tomorrowland Jetpack

Valor

Sr Member
RPF PREMIUM MEMBER
This has been on my list for a long time. And there's been a couple lovely builds here over the years. So, I'm diving in on mine finally.

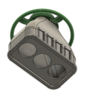
Some quick images of the screen accurate pack

IMG_6029.jpgTomorrowland 1964 jetpack prop.jpg6810177.jpg

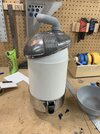
I was quickly able to acquire the two Electrolux Model 30 vacuum cleaners. Both for under $100. One in really clean condition. And one that was used to vacuum a bar for 50 years (gross). It took a bit to sort our exactly what parts to keep and what to discard.

69FBC62B-C5FF-4682-A16E-B786E31A9036.jpg642327FD-D5D9-4E60-A10D-18DC9593197C.jpg

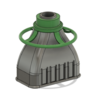
I number of the parts will be modeled and 3D printed on my Saturn printer. Appropriately, the central "Saturn" hub was printed. I looked into the accurate 1950s Oldsmobile horn button, but decided to create my own.

Screen Shot 2021-06-29 at 9.36.19 PM.png

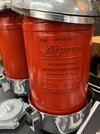
For the Fire extinguishers I ordered a couple feet of 6" thin wall PVC. Fair warning, this doesn't measure to an exact 6" diameter. More like 6-3/8" OD. For the tops of the extinguishers I could some shallow plastic bowls at Walmart. They we a tint bit too large to I used them as a mold to cast some resin shapes from the inside, which created a decent size.

2DpmTePSQ1SLPxBtbtsOBA.jpgnes98sWnRCKGl+NUbLdvag.jpgURQxccImQLGlcGSQPi4WPQ.jpg

It seems this build is going to be a mix of authentic parts, other found parts and 3D modeled parts.

Stay tuned.
 

Attachments

  • E75TUkquRpOvQh8U3aYhSQ.jpg
    E75TUkquRpOvQh8U3aYhSQ.jpg
    1.8 MB · Views: 314
Last edited:
I redid the mounting plate the Horn Button is attached to. Also built out the additional parts of the lower "transmission".
Screen Shot 2021-07-05 at 11.02.59 AM.pngScreen Shot 2021-07-05 at 11.03.18 AM.png
 
So, this is why they say 6" pipe is "nominally" 6" ... I bought some 6" Thin Wall PVC (white in the photos) which is actually 6-5/8"... But it really looks "stuffed" in the vac housing. It fits, but just barely. The screen pack seems to have a bit more space. So, I bought this black ABS "Riser" at Home Depot. It's only 6-1/4" diameter and I think it looks MUCH more like the profile of the screen pack. This was only a 2-foot piece which is more than I need, and it's lighter than PVC!

IMG_6065.jpegIMG_6066.jpeg
 
Okay, steady progress. After a bit of fumbling for the best way to get the rounded tops on the ABS Tubes, I found a rounded bowl that fit perfectly on the end. Like perfectly. So I simply rotocasted a dome right into the bowl and onto the end. Trimmed it with some Styrene. I also created the artwork for the enbossed plate on the side and printed in on my Saturn. TO get the curvature I heated it with my heatgun and pressed it onto the tube.

I also have a decent print of the glass fuel filter. Stained the inside of the glass with paint. Might fill it with oil.

And, I'm onto the bottom of the rocket bells. I built a model in 3D and printing one out on my Saturn. I tried like hell to find some of the green rings from the tops of old fire extinguishers. Not even sure what they are called. In the end I modeled one in Fusion and will use a print for that.

Oh, and I scored some lovely "Pre-weathered" Schwinn grips of ebay!

Onward!
 

Attachments

  • Screen Shot 2021-07-14 at 1.01.50 PM.png
    Screen Shot 2021-07-14 at 1.01.50 PM.png
    409.1 KB · Views: 86
  • IMG_6079.jpeg
    IMG_6079.jpeg
    1.8 MB · Views: 108
  • IMG_6081.jpeg
    IMG_6081.jpeg
    2.9 MB · Views: 103
  • IMG_6080.jpeg
    IMG_6080.jpeg
    1.4 MB · Views: 89
  • Screen Shot 2021-07-14 at 1.02.00 PM.png
    Screen Shot 2021-07-14 at 1.02.00 PM.png
    422.7 KB · Views: 81
Some more WIP images. I'm working through the main assembly and there's a need for some structure between the two fire hydrants that connect them. You only get glimpses of this area in the film, but it's necessary to mount all the central parts of the pack. This center mass is a scratch built piece of wood, styrene, and various bit and parts. It will all be black on the final prop.

I'm also through modeling most of the main parts, the center horn, the two "pods" on the top, etc. It's SOOO satisfying seeing this coming together. I don't know the last time I had this much fun on a project.

IMG_6203.jpegIMG_6218.jpegIMG_6216.jpegIMG_6215.jpegIMG_6214.jpegIMG_6210.jpegIMG_6213.jpegIMG_6211.jpegIMG_6212.jpegIMG_6209.jpegIMG_6206.jpegIMG_6207.jpegIMG_6208.jpeg
 
Last edited:
Okay, it took some reprinting to nail the size, but I have the two cylindrical things up top printed. They are bigger than I suspected, but look really great. Can't wait to paint them.

fullsizeoutput_2af1.jpegfullsizeoutput_2af4.jpeg

I'm also really proud of the end mechanism in the rocket bells. The design of the rocket bells was inspired by a hot rod hood scoop with opening flaps. So I made a simple mechanism that allows the three little flaps to open and close in tandem.

YmoU9B7iR7Gqo%wlkuFrQg.jpgIzZJ5XJNRESN5+6Y1MkSBg.jpghXABdpSXRbykImT8ntD57w.jpgUsuQC9+TT3u43Kj7ZNlETg.jpg
 
Okay, so there's no a lot of pictures or screenshots of the backside of the pack. Especially vague is how the pack mates with the back frame and padding. It appears to be essentially two levels, with space between the fire hydrants and the backplate the padding is on. I feel like I have a decent understanding of scale so I'm goin with a "close enough" mix of metal and wood for the back frame system.

The other challenge is the various pivot and hinge hardware on the 7/8" handlebars. I know some people have used a swivel socket ... I may have another solution. Boat canopy hardware is all 7/8" and offers various pivots and hinges. Shown here is a simple mounting piece that will mount the bars to the threaded rod I'm using to link the handle bars. The Hinges are on order. More on that soon.

aU0N77p7QsO9YioKmBAojQ.jpgsA%HMC40QRiwxQ0Ubb1Eiw.jpgavOgYbULSCK27phKuONRew.jpgdqnhwFS8TwWkrXPRsGFAlg.jpg
 
Awesome! Happy to share my reference. I'll drop any other shots I dig up into this folder as well. (Lots of unsorted files to look through, but the bulk of the good ones should be in there.)

I also have an extra vintage horncap, same as the one used on the pack, but one model year earlier, with a gold chrome saturn rather than silver. (The starfield is still silver.) If you'd be interested in trading, drop me a PM. My pack is still missing a few detail parts you're modeling, and I'd be happy to trade the horncap for a few prints.
 
Thanks for the photos! I hadn't seen some of those. Very interesting.
Other than the couple pieces of production art, I took the rest of the pictures in that folder myself. (And unless I'm forgetting something, I don't think I've shared them anywhere before.)
 
Yeah, the ones I have seem to be from the same location, similar angles, probably different photographer.
 
Great build- though I'd like to note while we used a lot of those parts (like the Electrolux) for reference, they were modeled and 3D printed because they ended up as not quite 100% scale.
 

Your message may be considered spam for the following reasons:

If you wish to reply despite these issues, check the box below before replying.
Be aware that malicious compliance may result in more severe penalties.
Back
Top