TIE Advanced AMT model

JediMichael

Master Member
So friends of mind just moved to Costa Rica in December and needed to condense a lot of stuff.
Well, they had found this kit at a garage sale and got it for her kids, but they are more into legos, so it never got touched, by them.
It already has a few pieces glued together, but not very well.
The edges have a ton of really bad flash hanging off it.
I see its from 1997, so probably all the rushed kits made because of the Special Editions.

So I'm hoping every piece is here, although, at a glance, looks like they should be, or possibly something small I could scratch up.
I'm not planning to go to over crazy reworking a lot, and mostly just clean it up and get it looking as best it possibly can. Then, hang it close to the Falcon I redid last year.
1000014751.jpg

1000014749.jpg


These four parts were already glued together, and the one part kind of painted black. The two wouldn't come apart, so guess I'll just leave them. They seem alright.
1000014757.jpg

The edges are so badly molded.
1000014750.jpg


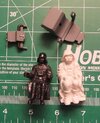
And then there is THIS guy.
I was like, Is that supposed to be Yoda wearing Vaders costume???
Look at those hands...lol.
1000014754.jpg

Bugged eyed Vader?
1000014755.jpg


So let the fun begin....right?
 
The Vader...who thought that was okay??

But for real, that was a magical time for SW fans. I was peak fan in like 1994-95, and basically everything was scouring thrift stores and yard sales, and a few weird things in stores like the Bend-Ems figures. Then all of a sudden new toys and merch were everywhere by '97 or so. Shame some of it was so sub-par, but I'd give anything to go back and be excited about it all over again.
Yep...absolutely. I remember finding one of the 4" Boba Fett figures and the price was $8. I thought that was so stupidly high priced...of course I bought it anyways.
And also that super excited feeling late 96 that these new Special Editions were coming out soon, and then in 2 years Episode I.
To be excited for a Star Wars film again....now I dread the thought of more....how sad.....
 
I think that was originally an MPC kit (along with X-Wing) that hit stores shortly after ANH dropped on the world...? My dad (RIP) helped me build it when I was seven or eight and miraculously, I still have it (now sitting on my home office shelf). What's funny is that even back then, I remember wondering what the heck was going on with that Vader figure. :lol:
 
Indeed it was, Attirex ! This is the AMT/ERTL repop of the MPC kit originally issued in conjunction with the ANH (ugh!) Star Wars movie release (or soon after the theatrical release).

JediMichael, I have a spare of the Vader figure from the Revell X-1 TIE kit, which even though it is molded in a 'rubbery' plastic and is prepainted is still far superior and a perfect size for this kit, if you want it. Just drop me a PM and I'll mail it out to you.

Cheers!
R/ Robert
 
It figures it would be a much older mold, from late 70s, maybe early 80s at most....then reused/rebranded in 1997.

Holding the pieces together, a bit warped and doesn't quite line up. But using both hands, and I'm once adding some super glue, it looks like it will line up alright.
Might have to add filler in the seams in parts, but nothing too crazy I think.
1000014771.jpg
 
Had to sand the edges in the fins a whole lot. I also end up up oversanding the edges and the middle part not enough.
I probably need a machine to help.
The top one is a little worst, but the way I plan to hang it, that side will be facing the wall more, thankfully.
1000014773.jpg


All the edges look like their as good as I'll get them, so now I need to wash all these parts.
Really dirty. I guess thats 27 years of dust and dirt....perhaps. Depending on when it was first opened.
 
They shamelessly re-popped the kit several times. Each iteration was worse than the previous with mould wear causing more flash and shrinkage. I've only seen the R2 repop in pictures, but it does look like they did a few improvements.

TazMan2000
 
I noticed underneath this with 1996 date.
I wonder if they make that part interchangeable for future updates, but still using those original molds.
1000014782.jpg
 
I washed everything yesterday, then left it to totally dry for a day.
For the parts inside, where Vader will be, I went ahead and primed it. I'll start getting that painted up soon.
1000014829.jpg

Also glued on the parts for the fins. All looking good with no issues.
1000014833.jpg

GGota bunch for the top and bottom.
The instructions are drawn and not really so easy to quite follow. I found some good pics of the studio model to help.
Obviously a lot of details are missing for the kit, but, pretty much expected. Once hanging, it will look alright I believe.
1000014831.jpg

1000014835.jpg

The big rectangle hole is to attach to the base for the stand. I'll just fill that in.
 
Got a lot.done today.
Started with the hole and some other gaps.
1000014839.jpg

Added a small piece of thin styrene on the backside, and added putty on the sides here.
1000014841.jpg

That fixes gaps you could clearly see.
1000014842.jpg

Then this one. Funny how the picture shows so much more detail then my eyes can, even close up.
1000014844.jpg

Also, since I'm not adding the landing gear, and looking at the studio model, the giant hole on the left isn't there at all. The smaller one on the right looks like it is there, so Ill leave that one.
1000014845.jpg

Once done and primed, it still has a little indentation, but it at least looks like it could be there, as opposed to an actual hole. Also is on the backside, I'll leave it.
1000014852.jpg

The whole top piece looks really good.
1000014853.jpg

Its all dry to the touch, but I know it will need a good day or so to really set and be fully dry.
I can probably paint the inside of the cockpit, which looks to be mostly a dark gray, like the primer. Might still add a few more things, and some red dots, like in the movie.

I need to find what color would look best.
I know tie fighters have that bluish tint to them, but looking the Advanced one,.is looking more gray in pics.
I kinda like the more gray look, with maybe just a slight hint of the blue at most.
I'll look at some color charts, but if anyone also has any recommendations.
 
I figured for the inside, since its not really accurate at all, to basically do my own thing. The Vader figure will cover a lot up anyways. Although, I decided to leave out the clear plastic for the windows, since it will match the cockpit of the Falcon I did last year, since it didn't have plastic.
1000014855.jpg


I also wanted to do a quick test fit to see how it all goes in anyways.
Not bad, and I see I'll have to prime a bit of the inside and add a few more things.
I thought I had grabbed the flat black, so when it dried, I was like, why is it shiny....oh, I grabbed the gloss by mistake...glad I only did that for the inside and not paint the fins a gloss black.
1000014856.jpg

Guess I need sleep....
 
Got some more finished for the inside. So here its just taped together to see how it all looks.
Without Vader, its got a bit of a Star Warsy feeling.
1000014873.jpg

1000014872.jpg

The bad Vader, for now, to check it all out.
I see I need to add more paint where I thought it would be covered up.
But, I like it.
1000014879.jpg

I was at Walmart getting some meds, and decided to at least check out the paint.
The only color that even looked close to the gray I have in mind was gloss.
I know you could hit it with a flat clear coat, but, might as well keep looking and find something that is already flat.
Looks like I'll be checking out the hobby store.
 
JM, getting the Revell Vader out with tomorrow's mail, and he comes with a seat! As you can see, the Revell kit figure is much nicer looking than the AMT/MPC kit version. The seat was made to fit into two fore-and-aft slots in the floor with tabs molded on the seat bottom edges (barely visible in my image). The other piece is the 'control yoke' that matches up with the figures hands like he is holding the handles. I plan on adding pieces of a small staple as pins to keep the hands and yoke aligned. The yoke attaches to the back of the front viewport plate, the one that is sort of "W" shaped.

On another topic, on my MPC X-Wing build, I made a 'blanking plug' that slotted into the stand slot using a piece shaped like the stand's mounting 'hook'. This is under a thin sheet rectangle so when I wanted, I just remove the plug and place on the stand. When using the plug, it just looks like another little raised panel detail. Little more work, but allows for display on the stand (for display case or shelf, etc.), giving me some flexibility.

Hope this helps!
R/ Robert
 

Attachments

  • RevellKit_Vader n Seatparts.jpg
    RevellKit_Vader n Seatparts.jpg
    319.1 KB · Views: 58
  • Kit figure compare.jpg
    Kit figure compare.jpg
    250.3 KB · Views: 61
Last edited:
That Vader is a million times better. Can't wait to see how it will all fit and look inside. Its almost sad that its hard to actually see into the cockpit once finished.

I also have these 3 X-wing models. One I get in 1999, so probably the MPC/AMT kit. I actually forget where I got the 2nd one.
The 3rd was from a roommate I had in 2002/03. The model had gotten damaged, so he was going to throw it away....but I was like, NO....I'll take it. So a few years later, I made it look like it was blowing up with this tie fighter chasing all three.
This was it hanging a room I had over 6 years ago.
P1010918.JPG


Then in 2020, I redid the explosion part for a Trunk of Treat at Halloween in a 1 Ton truck. That was a fun night. Since covid had been thriving that year, the church decided to go ahead and do the event, since most everyone else had canceled their events. They were thinking maybe Two or Three hundred might show up......they lost count by around 1200 and estimated over 1500 probably came....
20201030_203906new.jpg

I only used the one complete X-wing and then half destroyed one.
20201030_204101new.jpg

Sadly since then, it all got put in a box and they are all getting more and more broken.
I guess I need to fix it all up and maybe hang it somewhere in the house again.
 
I almost was making a big and a bit of a costly mistake I made last year working on the Falcon.
That was using the gray primer, and then using the lighter white colored paint, which took a LOT of coats to cover.
Since one can is around $10, and took 4 cans over all, that ended up being $40.
Money is even tighter this year, so I re-primed it all with a flat white, so then when I get the gray I'm happy with, hopefully only the one can will be enough.
This also has much less area to paint then the Falcon.
1000014913.jpg


I might check out Hobby Lobbies paints first, as it is closest to me, but if they also do not have that just right color, I'll go to Hobby Town USA, and hope they do.
 
After going to different stores, just wasn't finding the color I was really looking for.
But, I just settled for this color from Hobby Town USA. Still not exactly what I had in mind, but the closest one.
Ill spray a little test eventually, its just raining now.
The guy said its a matte finish and not gloss like the cap looks. Hope so, and then I can at least hit it with a clear flat.
1000014932.jpg
 
I was looking at the "exploding" x-wing. Actually got it out of the closet. Needs work to fix up. The cotton is definitely needing reworked. I wonder if I were to spray it with hairspray if that would help stiffen it enough. My Dad has some. I'll try a test. I need to see how the one x-wing is. I know parts have broken off, so hope they are all still ok.
I had an idea that I think should work...so, that will be my next project, after this one.
You know....sometimes it feels like a curse to be creative. It just never ends....
 
Well what do you know....this was suppose to come by next Monday, but came in today.

A HUGE shout out and THANKS to Robert, rbeach84, for sending out the MUCH better Vader.
Fits nicely.
1000014954.jpg

Bad Vader is now dying....
1000014955.jpg


The weather has also been very odd.
Was sunny, so I sprayed a quick test...mins later, raining...mins later again, sunny. To bad the weather isn't as efficient as the post office.....
Like my reference?

That quick test, outside, but in the shade.
1000014957.jpg


And inside, about where it will hang.
That gray is probably closest I'll get, without mixing something of my own.
1000014959.jpg
 

Your message may be considered spam for the following reasons:

If you wish to reply despite these issues, check the box below before replying.
Be aware that malicious compliance may result in more severe penalties.
Back
Top