You are using an out of date browser. It may not display this or other websites correctly.
You should upgrade or use an alternative browser.
You should upgrade or use an alternative browser.
stormtrooper armor build (pepakura)- first time costume build (pic heavy)
- Thread starter ewok18
- Start date
Blaxmyth
Sr Member
Sorry, no, it's acetone that's the only solvent I know off. Petrol doesn't work, that I do know...
I went through a ton of disposable chip brushes, though, so they're as good a way as any to start off with.
I went through a ton of disposable chip brushes, though, so they're as good a way as any to start off with.
I have cups and Popsicle sticks however i dont have acetone. I didnt know you could reuse the brushes after they have resin on them. Is it possible to clean them with paint thinner?
Lflank
Well-Known Member
I have cups and Popsicle sticks however i dont have acetone. I didnt know you could reuse the brushes after they have resin on them. Is it possible to clean them with paint thinner?
"Acetone" is "nail polish remover". You should be able to find it anywhere.
Hey guys! I'm here with an update, I worked on my project last week but I've been too busy this week because school started for me. So I wanted to show you I got done last week. Tell me what you think:
Chest:


This turned out pretty nice, the place where the shoulder straps aren't very even and it it curves in a little too abruptly. I tried heating it up with a blow dryer and then bending some of the warped parts back and that worked ok.
Shoulders:


These didn't turn out as well (other one not pictured). They turned out very warped and when I try to fix them with the blow dryer I could get them to stay in the right position but when I left and came back they would bend again. I'm thinking I might need to use a clamp or something to brace it.
Chest:
This turned out pretty nice, the place where the shoulder straps aren't very even and it it curves in a little too abruptly. I tried heating it up with a blow dryer and then bending some of the warped parts back and that worked ok.
Shoulders:
These didn't turn out as well (other one not pictured). They turned out very warped and when I try to fix them with the blow dryer I could get them to stay in the right position but when I left and came back they would bend again. I'm thinking I might need to use a clamp or something to brace it.
More updates:

Here are the chest and shoulders again. I cut off the jagged edges and sanded them down. Now it is possible to wear them without getting stabbed. However I think after trying on the shoulders a little bit, they seem to be too small. As a result I'm going to re-pep them and see if they fit better before fiberglassing. This may not be so bad though because I know how to brace them better before I fiberglass them.


Next up I have my bicep pieces. I reinforced these with green paddle wire. This worked EXTREMELY well. Before they would not hold their shape at all but this reinforcement has been awesome.


These are the forearm pieces. I got all of these reinforced too. very helpful.
I don't have pictures yet but I did resin the outside of the bicep pieces. I hopefully will have more updates by tomorrow.
Here are the chest and shoulders again. I cut off the jagged edges and sanded them down. Now it is possible to wear them without getting stabbed. However I think after trying on the shoulders a little bit, they seem to be too small. As a result I'm going to re-pep them and see if they fit better before fiberglassing. This may not be so bad though because I know how to brace them better before I fiberglass them.
Next up I have my bicep pieces. I reinforced these with green paddle wire. This worked EXTREMELY well. Before they would not hold their shape at all but this reinforcement has been awesome.
These are the forearm pieces. I got all of these reinforced too. very helpful.
I don't have pictures yet but I did resin the outside of the bicep pieces. I hopefully will have more updates by tomorrow.
Attachments

Ok, So I mentioned in an earlier post that I thought I made the shoulders too small. I built another shoulder that I think might fit a little better.


Here are some size comparison pictures of the old shoulder and new shoulder I made. It looks a little big but that is also what I thought when I made the first one.


Also, Here are some comparisons of actual shoulder bells and the ones I made. I may consider trimming my shoulder bells so they look more like the actual ones. The picture on the left shows my what the shoulder bells would look like if I trimmed them.
Here are some size comparison pictures of the old shoulder and new shoulder I made. It looks a little big but that is also what I thought when I made the first one.
Also, Here are some comparisons of actual shoulder bells and the ones I made. I may consider trimming my shoulder bells so they look more like the actual ones. The picture on the left shows my what the shoulder bells would look like if I trimmed them.
Hey guys, Im here with another update, I know it has been a while (a month) but I have been working on it. Here is the progress that I've made:


Here are the biceps. I cut and sanded the edges, then glued them together. I just need to do a little more sanding and It will be ready for filler.


This was an unfortunate accident. My cat pushed some boxes onto the new shoulder I made and the butt/kidney plate. So, I built a 2 new shoulders of the same size and I'm currently working on a new butt/kidney plate.
Here are the biceps. I cut and sanded the edges, then glued them together. I just need to do a little more sanding and It will be ready for filler.
This was an unfortunate accident. My cat pushed some boxes onto the new shoulder I made and the butt/kidney plate. So, I built a 2 new shoulders of the same size and I'm currently working on a new butt/kidney plate.
Hello everybody, I've been doing a little bit of work on my project so here are some pictures of what I've done for the last month:


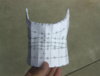
I finished remaking the butt/kidney plate. It's ok but I will probably need to add dowel rods so it will keep its form.


I also started a pep for the helmet and it was ok, but too big so I had to remake it


Here is the second helmet that I started to build. The scale seems a lot better and the last picture is a size comparison of the two.
I live in the midwest and it is getting pretty cold so fiberglassing outside is not really an option. I can't use the resin inside because it's too toxic. Does anyone have any suggestions on less toxic resin that I could use in my garage?
I finished remaking the butt/kidney plate. It's ok but I will probably need to add dowel rods so it will keep its form.
I also started a pep for the helmet and it was ok, but too big so I had to remake it
Here is the second helmet that I started to build. The scale seems a lot better and the last picture is a size comparison of the two.
I live in the midwest and it is getting pretty cold so fiberglassing outside is not really an option. I can't use the resin inside because it's too toxic. Does anyone have any suggestions on less toxic resin that I could use in my garage?
Blaxmyth
Sr Member
Hey, nice work!
Just a heads up before you start fibreglassing the butt/kidney plate. Make the whole backside piece as thick and solid as you can get it! My first one was quite solid and I thought I'd be able to sit down on it, but it cracked, causing some delamination. My next one is going to be much thicker and I'll layer all of the fibreglass mat in one long session to make it really strong.
After six hours of trooping, standing the whole time, you'll long to take the weight off your feet, even for a few minutes!
Just for what it's worth.
Keep the photos coming, too. They are excellent.
Toxx
Well-Known Member
. I can't use the resin inside because it's too toxic. Does anyone have any suggestions on less toxic resin that I could use in my garage?
Try epoxy or polyurethane resin.
.
joshvanrad
Sr Member
Try epoxy or polyurethane resin.
.
Will poly resin work just as well with fiberglass matte or do you just apply a base coat of poly resin and then do your fiberglass with fiberglassing resin?
Sent from my Kindle Fire using Tapatalk 2
Toxx
Well-Known Member
Will poly resin work just as well with fiberglass matte or do you just apply a base coat of poly resin and then do your fiberglass with fiberglassing resin?
Sent from my Kindle Fire using Tapatalk 2
I think it doesn't matter...
I have used my epoxy resin for the reinforcement of the paper an also for the fiberglass.
Worked well !
.
rlwolf: thank you very much, for pepakura files I got the helmet from this
ANH_Hero_TK_helmet_unfold_by_Fierfek - ?? - 4shared
As for the armor, I got those files from dungbeetle, although I'm not sure which forum of his I found them on and I don't know whether or not he is still letting people use his files. I would suggest looking for those files online and if you can't find them then you could always try fierfek's files for armor because those are good too.
Feledran: thanks a lot to you too! So far the wire has worked great and surprisingly it sticks to the glue pretty well.
I also finished the helmet! here it is:


Here are some other close-ups:


The second and pictures show the second brow. On the original file it has the rubber brow built in. Seeing as I want to make the rubber trim out of actual rubber I tried to modify the helmet so the dome connected seamlessly to the first brow. However the dome was slightly larger so it warped when I tried to glue it together. Instead I had to make another brow which is where the rubber trim will go.
Finally the last picture shows reinforcements that I put in the mouth area. Hope you guys enjoy!
ANH_Hero_TK_helmet_unfold_by_Fierfek - ?? - 4shared
As for the armor, I got those files from dungbeetle, although I'm not sure which forum of his I found them on and I don't know whether or not he is still letting people use his files. I would suggest looking for those files online and if you can't find them then you could always try fierfek's files for armor because those are good too.
Feledran: thanks a lot to you too! So far the wire has worked great and surprisingly it sticks to the glue pretty well.
I also finished the helmet! here it is:
Here are some other close-ups:
The second and pictures show the second brow. On the original file it has the rubber brow built in. Seeing as I want to make the rubber trim out of actual rubber I tried to modify the helmet so the dome connected seamlessly to the first brow. However the dome was slightly larger so it warped when I tried to glue it together. Instead I had to make another brow which is where the rubber trim will go.
Finally the last picture shows reinforcements that I put in the mouth area. Hope you guys enjoy!
Similar threads
- Replies
- 1
- Views
- 563
- Replies
- 15
- Views
- 1,606
- Replies
- 2
- Views
- 241