You are using an out of date browser. It may not display this or other websites correctly.
You should upgrade or use an alternative browser.
You should upgrade or use an alternative browser.
Step-byStep Sintra Kingsguard Armor Guide (Game of Thrones)
- Thread starter mattdash
- Start date
-
- Tags
- game of thrones
Re: Another Kingsguard Armor (Game of Thrones)
Pauldrons (Shoulder things)
At long last, we come to the shoulders. This is where the @#$% hits the fan. If you can make the shoulders, you can easily handle everything else in this costume. I'm gonna stretch this out over several posts, beginning with the mold used to make the basic round shape.
The reason the shoulders are so difficult is that they're a very specific, awkward, roundish shape. So there's two main challenges: 1) make the round shape, 2) conform the raised scrollwork design to fit this shape.
The method described here can be used to reproduce them very accurately, although it is rather involved. There are certainly easier ways to make them if you're not concerned with getting an extremely accurate reproduction of the shape. That said, the method described here isn't all that difficult... it just has a lot of steps that have to be precisely followed. I will describe and provide templates for making both the overall round shape, and the scrollwork design that is exactly sized to fit this shape. (Generally i think following templates takes some of the fun out of it, but this part required some serious serious math and computer programming to make these shapes, which I wouldn't want to subject anyone else to if that's not their cup of tea.)
The templates are sized to fit my shoulders... as you can see in pic at the top of the thread that i'm fairly thin. If you're a bigger person, you may need to scale these up. Specifically, the templates are sized so that the width of the opening at the bottom of the shoulder is 6.75 inches. To check if this is right for you, you can cut out the bottom layer of the template (labelled 0.4, as will be explained below) and see if your upper arm fits through it. (I have about 1/2" of space on all sides when i test fit the template on my arm... you want some breathing room, not a snug fit)
Scaling up/down the templates to fit different sizes should be pretty easy by just printing them at a different resolution. I will also attach x/y/z coordinates of the surface of the round shape below, which can be scaled in Excel or whatever if that's more your thing. Scaling the scrollwork pattern might be more difficult... i'm honestly not sure how that'll work. You may just need to resort to trial and error. I *think* that if you just scale all the templates by the exact same (uniform in every direction) factor, the scrollwork pattern will match if it is uniformly scaled the same way. A slight complicating factor is that the templates are made to be cut from 5mm plywood... so you can't really scale that thickness (height of the shoulder) arbitrarily... you're limited to what wood you can find. So you may need to do some interpolating... add/remove layers of the existing templates to achieve the right overall height of the shoulders.
I'm getting ahead of myself. The overall round shape of the shoulders is made by stretching/forming a sheet of sintra over a wooden mold. The wood mold is make up of many sheets of 0.25" (aka 5mm) plywood (Important: more precisely, the plywood is just about exactly 0.205" thick, or 5.2mm. I bought it at Lowes and it was labelled 0.22". But importantly it is nowhere near that thick. Be sure to actually measure the thickness of your wood and adjust your plans if necessary.). This is the part that seems a little excessive, since it requires a LOT of cutting with either a bandsaw or jigsaw, then some shaping with a rasp, power sander, putty, etc. to turn the stair-step glued-together layers into a smooth, round, mold. But it is easily reproducible and results in a very accurate shape. Potentially you could achieve the exact same result by making a mold out of foamcore or some other material, but the plywood is nice because you can be rough with it when it comes time to shape the sintra around it.
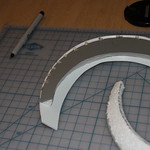
Attached below is a zip file that contains 26 templates. These will be actual size for a 6.75" shoulder when printed at 300dpi. Each of these is labeled with it's relative height (0.4" to 5.4"). Trace each one onto plywood and cut them out with a bandsaw or jigsaw. Important: Make two copies of the "2.2" template. This is the largest template, and doubling it up ensures that once you bevel all the edges, everything will be the correct shape. If i recall correctly, this will end up taking a little more than 4 sq ft of plywood (unfortunately one of the 2'x2' squares you can find a lowes is slightly too small).
You will see that the templates are two colors: blue and purple. (Sorry the color difference is kind of subtle... color choices are always driven by what color inks my printer isn't out of ) Cut out the whole shape, but mark on the wood piece where the border between blue and purple is. (Important: make this mark on the EDGE of the plywood, so you can see it once they're all glued together) This marks the boundary of where the actual sintra shape will end. (For ease of assembly, the templates extend out the back so they're all the same length, but the sintra shape will end up covering only a portion of the final mold. These lines mark where the sintra will eventually get trimmed to fit. This will make more sense in the photos later.)
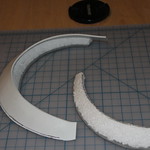
Once all the templates are cut out, stack them in order, and glue them together. Of course don't try to glue all 27 layers at once, glue a few at a time. To get the alignment right, it also helps to mark the center of each template along it's back edge (unfortunately i neglected to mark this on the templates). Be sure to use weight or clamps when you're gluing, as thin boards can warp from the wetness of the glue. (dont clamp directly on the ones you're gluing, sandwich them between other boards to more evenly distribute the clamp force... it's the board edges that will tend to warp.
Ok, time for pictures:
All templates cut out:

Templates being glued together:

Here is the zip with the templates:
View attachment shoulder.zip
Here is a zip of x/y/z coordinates of the shape. Units are inches:
View attachment shoulderCoords.zip
I'll pick up next time with smoothing the shape of the glued-together mold, and using it to shape the sintra.
Pauldrons (Shoulder things)
At long last, we come to the shoulders. This is where the @#$% hits the fan. If you can make the shoulders, you can easily handle everything else in this costume. I'm gonna stretch this out over several posts, beginning with the mold used to make the basic round shape.
The reason the shoulders are so difficult is that they're a very specific, awkward, roundish shape. So there's two main challenges: 1) make the round shape, 2) conform the raised scrollwork design to fit this shape.
The method described here can be used to reproduce them very accurately, although it is rather involved. There are certainly easier ways to make them if you're not concerned with getting an extremely accurate reproduction of the shape. That said, the method described here isn't all that difficult... it just has a lot of steps that have to be precisely followed. I will describe and provide templates for making both the overall round shape, and the scrollwork design that is exactly sized to fit this shape. (Generally i think following templates takes some of the fun out of it, but this part required some serious serious math and computer programming to make these shapes, which I wouldn't want to subject anyone else to if that's not their cup of tea.)
The templates are sized to fit my shoulders... as you can see in pic at the top of the thread that i'm fairly thin. If you're a bigger person, you may need to scale these up. Specifically, the templates are sized so that the width of the opening at the bottom of the shoulder is 6.75 inches. To check if this is right for you, you can cut out the bottom layer of the template (labelled 0.4, as will be explained below) and see if your upper arm fits through it. (I have about 1/2" of space on all sides when i test fit the template on my arm... you want some breathing room, not a snug fit)
Scaling up/down the templates to fit different sizes should be pretty easy by just printing them at a different resolution. I will also attach x/y/z coordinates of the surface of the round shape below, which can be scaled in Excel or whatever if that's more your thing. Scaling the scrollwork pattern might be more difficult... i'm honestly not sure how that'll work. You may just need to resort to trial and error. I *think* that if you just scale all the templates by the exact same (uniform in every direction) factor, the scrollwork pattern will match if it is uniformly scaled the same way. A slight complicating factor is that the templates are made to be cut from 5mm plywood... so you can't really scale that thickness (height of the shoulder) arbitrarily... you're limited to what wood you can find. So you may need to do some interpolating... add/remove layers of the existing templates to achieve the right overall height of the shoulders.
I'm getting ahead of myself. The overall round shape of the shoulders is made by stretching/forming a sheet of sintra over a wooden mold. The wood mold is make up of many sheets of 0.25" (aka 5mm) plywood (Important: more precisely, the plywood is just about exactly 0.205" thick, or 5.2mm. I bought it at Lowes and it was labelled 0.22". But importantly it is nowhere near that thick. Be sure to actually measure the thickness of your wood and adjust your plans if necessary.). This is the part that seems a little excessive, since it requires a LOT of cutting with either a bandsaw or jigsaw, then some shaping with a rasp, power sander, putty, etc. to turn the stair-step glued-together layers into a smooth, round, mold. But it is easily reproducible and results in a very accurate shape. Potentially you could achieve the exact same result by making a mold out of foamcore or some other material, but the plywood is nice because you can be rough with it when it comes time to shape the sintra around it.
Attached below is a zip file that contains 26 templates. These will be actual size for a 6.75" shoulder when printed at 300dpi. Each of these is labeled with it's relative height (0.4" to 5.4"). Trace each one onto plywood and cut them out with a bandsaw or jigsaw. Important: Make two copies of the "2.2" template. This is the largest template, and doubling it up ensures that once you bevel all the edges, everything will be the correct shape. If i recall correctly, this will end up taking a little more than 4 sq ft of plywood (unfortunately one of the 2'x2' squares you can find a lowes is slightly too small).
You will see that the templates are two colors: blue and purple. (Sorry the color difference is kind of subtle... color choices are always driven by what color inks my printer isn't out of
) Cut out the whole shape, but mark on the wood piece where the border between blue and purple is. (Important: make this mark on the EDGE of the plywood, so you can see it once they're all glued together) This marks the boundary of where the actual sintra shape will end. (For ease of assembly, the templates extend out the back so they're all the same length, but the sintra shape will end up covering only a portion of the final mold. These lines mark where the sintra will eventually get trimmed to fit. This will make more sense in the photos later.) Once all the templates are cut out, stack them in order, and glue them together. Of course don't try to glue all 27 layers at once, glue a few at a time. To get the alignment right, it also helps to mark the center of each template along it's back edge (unfortunately i neglected to mark this on the templates). Be sure to use weight or clamps when you're gluing, as thin boards can warp from the wetness of the glue. (dont clamp directly on the ones you're gluing, sandwich them between other boards to more evenly distribute the clamp force... it's the board edges that will tend to warp.
Ok, time for pictures:
All templates cut out:
Templates being glued together:
Here is the zip with the templates:
View attachment shoulder.zip
Here is a zip of x/y/z coordinates of the shape. Units are inches:
View attachment shoulderCoords.zip
I'll pick up next time with smoothing the shape of the glued-together mold, and using it to shape the sintra.
Re: Another Kingsguard Armor (Game of Thrones)
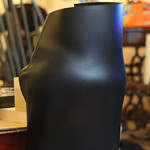
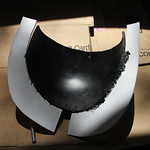
Shaping the shoulder mold
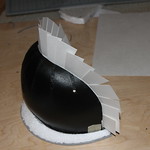
Once everything is glued together, you need to round it out so it's all smooth. Start off just going crazy with a rasp, then move onto a power sander. Once it's close to the right shape, I started filling in gaps with 5 minute epoxy, alternating that with sanding until it was pretty smooth. Final final dips are filled with tamiya putty, which is easier to work precisely with than 5 minute epoxy (which just kind of drips everywhere).
Pictures of the finished mold:


Things to note: Along the back you can see the vertical centerline marked in pencil... this is used to align everything when gluing it together. On the front there is a red line and a similar pencil line. The pencil line marks the actual cut line to get the final shape... the red line is a "warning" line so I knew when i was getting close while trimming down the piece.
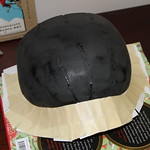
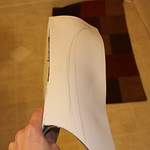
Ok, so now it's time to shape the shoulders. Start with a very big piece of sintra... make sure it's big enough to get all the way around the mold and still have enough extra to really wrap around the back. You need to wrap enough around the back to really lock the sintra piece in place on the mold while you're shaping it. First, mount the mold somewhere that you can easily work with it. I double-sided-taped a 1x4 to the bottom of it, reinforced with another block of wood behind the mold (see pics below). Then i could clamp the 1x4 to a table with the mold hanging over the edge to be able to work with it. Stick a sheet of sintra in the oven, and when it's soft, quickly wrap it around the center of the mold as well as you can (wearing heat-proof gloves). Try to stretch it as much as you can to conform to the mold shape... whatever progress you can make in this first attempt will make everything else easier later on.
But probably the best you're going to get is something like this:
Everthing else is done with a heat gun. The next step is to work on wrapping the sides around the back to really secure the sintra in place so it can't move around at all. Since the mold is very round, the sintra will want to rotate around on it once you start trimming it to fit, so make sure it's really locked in place by wrapping the edges around the back to prevent this.
Once that's done, you kind of just have to wing it. Start working from the center (i.e. the part that is already well shaped from the initial oven wrap) upward. Heat an area with the heat gun, and smooth it into place (you may have to really apply some force until it stiffens again). As you go, start also trimming off excess as needed. You will have to cut out a lot of wedge shapes to make the rectangular sintra conform to the sphere shape of the mold. DON'T drive yourself crazy trying to trim it exactly right. If anything it's easier if you cut too much out, and then go back and weld in a patch wherever you have to. But still... this is a pretty complicated shape and it might take about an hour for each shoulder. Note that the top half is much harder to shape than the bottom, because the curvature is a lot more extreme near the top.
Here's some pictures showing the shaping process:
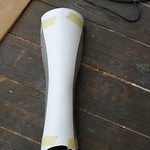
This picture really shows the idea of how you need to just shape and cut as you go. You can see that there's a lot of excess sintra scrunched up near the top. This will eventually get cut out until it lies flat. This picture also shows how i had the mold mounted on a board to be able to work with it, and how the sides wrap around the back to hold the whole thing in place.
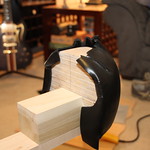
This picture shows it closer to the final shape. You can see some holes cut out that will eventually get little patches welded in. You can see some little cusps that form at the inside point of where some of the wedges have been cut out... this is just something sintra does because it expands a little when heated. Don't worry about those though, you can easily sand them down later to get a perfectly round surface.

Once it's all shaped, you can weld together all the cuts, and patch any larger holes. Then just cut it off the mold with a hobby knife, watching for the "Warning" line as you cut, and then more precisely trimming it to the final shape.
Next up: Shaping the flanges that go around the shoulder.
Shaping the shoulder mold
Once everything is glued together, you need to round it out so it's all smooth. Start off just going crazy with a rasp, then move onto a power sander. Once it's close to the right shape, I started filling in gaps with 5 minute epoxy, alternating that with sanding until it was pretty smooth. Final final dips are filled with tamiya putty, which is easier to work precisely with than 5 minute epoxy (which just kind of drips everywhere).
Pictures of the finished mold:
Things to note: Along the back you can see the vertical centerline marked in pencil... this is used to align everything when gluing it together. On the front there is a red line and a similar pencil line. The pencil line marks the actual cut line to get the final shape... the red line is a "warning" line so I knew when i was getting close while trimming down the piece.
Ok, so now it's time to shape the shoulders. Start with a very big piece of sintra... make sure it's big enough to get all the way around the mold and still have enough extra to really wrap around the back. You need to wrap enough around the back to really lock the sintra piece in place on the mold while you're shaping it. First, mount the mold somewhere that you can easily work with it. I double-sided-taped a 1x4 to the bottom of it, reinforced with another block of wood behind the mold (see pics below). Then i could clamp the 1x4 to a table with the mold hanging over the edge to be able to work with it. Stick a sheet of sintra in the oven, and when it's soft, quickly wrap it around the center of the mold as well as you can (wearing heat-proof gloves). Try to stretch it as much as you can to conform to the mold shape... whatever progress you can make in this first attempt will make everything else easier later on.
But probably the best you're going to get is something like this:
Everthing else is done with a heat gun. The next step is to work on wrapping the sides around the back to really secure the sintra in place so it can't move around at all. Since the mold is very round, the sintra will want to rotate around on it once you start trimming it to fit, so make sure it's really locked in place by wrapping the edges around the back to prevent this.
Once that's done, you kind of just have to wing it. Start working from the center (i.e. the part that is already well shaped from the initial oven wrap) upward. Heat an area with the heat gun, and smooth it into place (you may have to really apply some force until it stiffens again). As you go, start also trimming off excess as needed. You will have to cut out a lot of wedge shapes to make the rectangular sintra conform to the sphere shape of the mold. DON'T drive yourself crazy trying to trim it exactly right. If anything it's easier if you cut too much out, and then go back and weld in a patch wherever you have to. But still... this is a pretty complicated shape and it might take about an hour for each shoulder. Note that the top half is much harder to shape than the bottom, because the curvature is a lot more extreme near the top.
Here's some pictures showing the shaping process:
This picture really shows the idea of how you need to just shape and cut as you go. You can see that there's a lot of excess sintra scrunched up near the top. This will eventually get cut out until it lies flat. This picture also shows how i had the mold mounted on a board to be able to work with it, and how the sides wrap around the back to hold the whole thing in place.
This picture shows it closer to the final shape. You can see some holes cut out that will eventually get little patches welded in. You can see some little cusps that form at the inside point of where some of the wedges have been cut out... this is just something sintra does because it expands a little when heated. Don't worry about those though, you can easily sand them down later to get a perfectly round surface.
Once it's all shaped, you can weld together all the cuts, and patch any larger holes. Then just cut it off the mold with a hobby knife, watching for the "Warning" line as you cut, and then more precisely trimming it to the final shape.
Next up: Shaping the flanges that go around the shoulder.
SmilingOtter
Master Member
Re: Another Kingsguard Armor (Game of Thrones)
I know I'm jumping ahead a bit, but I'm interested in the cloak - shape, material, and how you connected it to the armor... You keep on with your planned schedule, though - this is a good read.
I know I'm jumping ahead a bit, but I'm interested in the cloak - shape, material, and how you connected it to the armor... You keep on with your planned schedule, though - this is a good read.
Re: Another Kingsguard Armor (Game of Thrones)
Quick details: Definitely make all the cape attachments out of metal... though this doesn't have to require serious tool... i hand cut them out of a thin brass sheet with a <$10 jewelers saw. I had originally made them plastic but they broke. For cape material i used a flannel, but i really don't like it... it's too lightweight so it doesn't move like it should, and it wrinkles a lot. I'm going to try to find something better to make another one this year.
EDIT: I just noticed that if you look at the big version of the first pic in the thread you can see that the cape is held on the right shoulder with a bent piece of wire where the original plastic clasp broke off.
I know I'm jumping ahead a bit, but I'm interested in the cloak - shape, material, and how you connected it to the armor... You keep on with your planned schedule, though - this is a good read.
Quick details: Definitely make all the cape attachments out of metal... though this doesn't have to require serious tool... i hand cut them out of a thin brass sheet with a <$10 jewelers saw. I had originally made them plastic but they broke. For cape material i used a flannel, but i really don't like it... it's too lightweight so it doesn't move like it should, and it wrinkles a lot. I'm going to try to find something better to make another one this year.
EDIT: I just noticed that if you look at the big version of the first pic in the thread you can see that the cape is held on the right shoulder with a bent piece of wire where the original plastic clasp broke off.
Last edited:
Re: Another Kingsguard Armor (Game of Thrones)
Before proceeding, it occurred to me that i should say a few words about where i got the shape for those shoulder molds. I made it by finding two screenshots of the shoulders, one from the front, and one from the side. Here comes the math: I assumed that the cross section of the shoulder is always a half-ellipse (if you slice it with a plane parallel to the ground, i.e. the same slicing that's done in the templates i uploaded) But the ellipses are not stacked on top of each other in a straight line, they are stacked in a way where their centerlines are leaning outward. So i needed 3 bits of information from the photos:
1) ellipse major axis length (this is traced from the side view)
2) ellipse minor axis length( traced from the front view)
3) centerline curve (traced from the front view)
Ok, so i took the photos and scaled them so they were both the same height, so i could get consistent "axis" measurements between the two photos. Lots of math: set up a coordinate system in each photo, then read off x/y measurements for the axes and centerlines. Convert these to polar coordinates to fit a curve to them, yada yada, scale the whole thing up to "life size", and then this results in a function that can be used to generate the ellipse shapes at arbitrary heights, i.e. at whatever height increment is the thickness of the plywood used to make the mold, and THAT is what i used to make those mold templates.
The first thing i did once i had the functions was make a "wireframe" version of the shape out of cardboard to make sure it fit over my shoulder (if it doesnt, just uniformly scale the whole shape up/down to make it fit).
Here's some pictures that hopefully explain the whole thing: The wireframe from the front view and side view, and using the wireframe to make sure it fits my shoulder: (the width of the cardboard pieces doesnt mean anything... they're just there for support. It's the interior measurements that matter, although the two biggest cardboard pieces kind of approximate how the shoulder will look once we add the flanges.)
These pictures also show the weird not-quite-a-sphere shape of the shoulder:
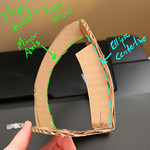
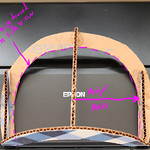

A note about sizing: Make sure you don't make the shoulder too tight... we still need to add the leather/fabric that hang down on the interior, and some foam padding on the inside. It looks like a pretty tight fit in the picture above, but that's just cuz it's resting on my shoulder. Adding the padding just lifts the whole thing off my shoulder a little bit.
EDIT: When you're checking to see if it fits, you really want to be wearing the chest armor piece, so you can make sure the shoulders line up correctly with the top/arm hole of the chest armor. (Basically they should abut each other without overlapping... just a small gap between them.) Eventually the shoulders will get connected to the chest with leather straps.
Speaking of adding flanges to the shoulders... that's what's coming up next!
Before proceeding, it occurred to me that i should say a few words about where i got the shape for those shoulder molds. I made it by finding two screenshots of the shoulders, one from the front, and one from the side. Here comes the math: I assumed that the cross section of the shoulder is always a half-ellipse (if you slice it with a plane parallel to the ground, i.e. the same slicing that's done in the templates i uploaded) But the ellipses are not stacked on top of each other in a straight line, they are stacked in a way where their centerlines are leaning outward. So i needed 3 bits of information from the photos:
1) ellipse major axis length (this is traced from the side view)
2) ellipse minor axis length( traced from the front view)
3) centerline curve (traced from the front view)
Ok, so i took the photos and scaled them so they were both the same height, so i could get consistent "axis" measurements between the two photos. Lots of math: set up a coordinate system in each photo, then read off x/y measurements for the axes and centerlines. Convert these to polar coordinates to fit a curve to them, yada yada, scale the whole thing up to "life size", and then this results in a function that can be used to generate the ellipse shapes at arbitrary heights, i.e. at whatever height increment is the thickness of the plywood used to make the mold, and THAT is what i used to make those mold templates.
The first thing i did once i had the functions was make a "wireframe" version of the shape out of cardboard to make sure it fit over my shoulder (if it doesnt, just uniformly scale the whole shape up/down to make it fit).
Here's some pictures that hopefully explain the whole thing: The wireframe from the front view and side view, and using the wireframe to make sure it fits my shoulder: (the width of the cardboard pieces doesnt mean anything... they're just there for support. It's the interior measurements that matter, although the two biggest cardboard pieces kind of approximate how the shoulder will look once we add the flanges.)
These pictures also show the weird not-quite-a-sphere shape of the shoulder:
A note about sizing: Make sure you don't make the shoulder too tight... we still need to add the leather/fabric that hang down on the interior, and some foam padding on the inside. It looks like a pretty tight fit in the picture above, but that's just cuz it's resting on my shoulder. Adding the padding just lifts the whole thing off my shoulder a little bit.
EDIT: When you're checking to see if it fits, you really want to be wearing the chest armor piece, so you can make sure the shoulders line up correctly with the top/arm hole of the chest armor. (Basically they should abut each other without overlapping... just a small gap between them.) Eventually the shoulders will get connected to the chest with leather straps.
Speaking of adding flanges to the shoulders... that's what's coming up next!
Last edited:
Re: Another Kingsguard Armor (Game of Thrones)
Shoulder Flanges!
Next up is making the shoulder flanges, we'll make both the top and bottom flange here, but only the top one gets attached to the shoulder now. The bottom stays off so we can add the scrollwork design later without it getting in the way. But you need to make the bottom flange first so you can mark where it will go on the shoulder so you know where to place the scrollwork.
The bottom flange is made of two pieces of sintra that meet at an angle, so it fill some space. The top flange is just a flat pieces of sintra, bent to match the shape of the shoulder. Both flanges have Apoxie Sculpt added later to cover the melt marks and give them some more thickness. The Apoxie Sculpt also adds a LOT of weight, so you might want to use something else as a filler to keep the shoulders light. (Not that the weight is really a problem, but without the apoxiesculpt they weigh almost nothing.)
Ok, bottom flange first: Just trace the bottom of the shoulder onto a piece of 3mm sintra, and then freehand draw another curve offset from that to represent the extent of the flange. Well, actually, draw the curve about 3/16" inward of where you want the extent to be, cuz we're gonna add another piece of sintra that will thicken it. The flange should be widest near the center of the shoulder (about 1.25") and tapers down to about 5/8" on either end (those measurements already have the 3/16" subtracted. Here's basically what i'm talking about:
 IMG_7031
In this picture i left a little bar across the back of the sintra just to keep its shape a little more while i was working with it. Not critical. It gets cut off later in any case. Next step: cut out this shape. Using a hobby knife, bevel the outer edge to about 45 degrees. Then trace the sintra onto a piece of styrofoam about 1" thick, and stick the foam to it with double sided tape. Then use a knife (steak knife works fine) + sandpaper or a file or whatever to carve the styrofoam out to a 45 degree angle as shown in the picture above and the picture below. IMPORTANT: you need to carve both the outside of the flange AND the inside where it butts up against the shoulder because the shoulder gets larger as it goes up. (If this isn't clear, it will be immediately obvious when you try test fitting the flange on the shoulder.
Here's what it looks like test fitting with the shoulder:
 IMG_7034
Next step is a little tricky. We want to cut a piece of sintra to cover the foam. So place the sintra+foam on a flat sheet of sintra (i used 2mm here, but if you don't have any 3mm is fine too), so it's like a letter U with the center of the U resting on the new sintra sheet at a 45 degree angle. Then roll the U along the sintra, tracing the shape it makes. (It will end up looking like a much wider, larger U. Cut out this shape, giving it plenty of margin (standard sintra shrinkage rules apply). Then, use a soldering iron to make a little point weld at the center of the U. It now looks like this:
 IMG_8586
The new piece of sintra is the white one. You can see the marks where i traces the shape while rolling along the foam, and the flange is now held in place by a tiny weld at the center. Now pick it up (gently of course), and use a heat gun to soften the white sintra piece and let it lay down onto the foam. An easy way to do this is to soften the sintra, then lay the piece down and use the exact same rolling motion as before, but this time instead of rolling the foam along the white piece, you're rolling them both together along a flat surface, letting the white piece take on the shape of the foam as it rolls. CAUTION: the heat gun may melt your styrofoam if it gets to close, so only soften the sintra from the outside so it blocks the hot air from directly hitting the styrofoam. (Another reason 2mm is better than 3mm here... less heat required to soften it)
Once you've successfully rolled one half of the U, apply a few more little spot welds along the bottom to hold it in place, then repeat on the other half of the U. When you're done, use a hobby knife to trim the white sintra down to size, test fitting it against the shoulder to try to get a good tight fit. A little gap is ok and mostly unavoidable... we'll fill it later. But make sure it's touching the shoulder in enough places that we can weld it on later.
Shoulder shape showing welds along the bottom, before trimming excess white sintra:
 IMG_7939
And after trimming:
 IMG_7940
You can see even after trimming i left the ends long. These might need to get cut at a weird angle to match the shape of the other flange, So just leave them long for now and then trim them later after adding the other flange.
(Random note: Be sure to label all your parts as either left or right shoulder. The shoulders are identical, but you'll have enough tiny inconsistencies between them that it's important to know which flange you intended for which shoulder. Ditto for everything else we'll add to the shoulders later.)
That's about it for the bottom flange. At this point you can take a hobby knife and cut the styrofoam core out, then run a soldering iron along the inside of the joint to melt it together for more strength. Later when we install it on the shoulder, we'll cover the bottom of it with apoxiescult to hide those little welds.
IMPORTANT: If you havent already, powersand the shoulder down so it has a smooth surface before applying the top flange. Once the flange is installed it will be much trickier to maneuver a power sander on the shoulder.
The top flange is made entirely differently. It's just a single sheet of sintra, but it has a very weird curve. Basically you want it to be locally perpendicular to the shoulder at each point it touches. To do this, I cut a bunch of little cardboard strips, bent at a 90 degree angle and taped to the shoulder (so that the bend occurs right at the edge of the shoulder so the pieces stick out a a 90 degree angle. Use your hand to hold them at exactly the angle you want, then tape them to each other so they get locked into place. Repeat this all the way around the shoulder and you'll be left with a nice "mold" that you can use to size the sintra.
Shoulder with all the strips applied: Taped to the inside of the shoulder to hold them in place, but not yet taped to each other:
 IMG_7035
And now taped to each other to lock in exactly the angle I want:
 IMG_7036
(Note you can see that sintra has been powersanded in the above picture... gaps havent been filled with putty yet... that should be done in this step too at some point.)
Unfortunately, this mold isnt nearly flat enough to just heat a piece of sintra and press it against the mold... you'd see all those little seams on the cardboard get transferred to the sintra. Instead we're just going to use this to get the shape of the sintra piece, and then remove this mold from the shoulder and freehand it when it's time to attach the flange.
Now we need to cut a piece of sintra in the shape of this "mold". So figure out some way to transfer the shape to a flat piece of paper. I basically did a similar process of taping together multiple pieces of paper around the shape... you'll figure it out. (Potentially you could just cut the mold off the shoulder and lay it flat and trance it.) Anyway, once you have the shape, it's a simple matter of cutting a piece of sintra in that shape, heating it, and tack welding it in place.
Just kidding! It's never simple. Sintra shrinkage will be a real problem here. As soon as you heat the sintra it will lose the very specific shape you need and it will be very hard to get it lined up correctly. Expect to have to assemble this flange out of several pieces. Basically just cut the piece you think you need, and once you heat it and it takes on a different shape, see if you can find somewhere that it matches the curvature you need. You may need to add in little bandaid pieces to fill gaps etc.
This picture shows the process of applying these: First off, you can see i'm doing it in two main pieces... no point in trying to do the whole thing at once, it'll never work. But you can see even with the two pieces i ended up with a big gap in the middle, and you can see down near the bottom of the shoulder (top of the picture) the flanges are really curving away from the shoulder (due to sintra changing shape when heated). So all of those gaps later got filled with smaller strips of sintra melted onto these ones. The picture shows a few tack welds on the left, as i was still fitting that flange, but the right side is pretty much finished, so i went over it with a much beefier weld.
 IMG_7936
All of those welds will get covered with ApoxieSculpt later. (You could do it now, but the extra weight of the apoxiesculpt makes the shoulder more likely to break if you drop them, so you might as well wait. And of course im speaking from experience on the breaking.)
That's about it. It's a lot of work to get the top flanges installed at a good angle, but be sure to put some effort into getting a nearly perpendicular angle all the way around. I experimented with some other angles and they really didn't look right. Once you get it all welded on, trim the outside edge down to the right side (which is similar to the side of the bottom flange... especially where they meet at the bottom corner maker sure they are both the same width.
Next up: the shoulder scrollwork, which is the craziest (though maybe not the hardest) and most rewarding part of the costume!
Shoulder Flanges!
Next up is making the shoulder flanges, we'll make both the top and bottom flange here, but only the top one gets attached to the shoulder now. The bottom stays off so we can add the scrollwork design later without it getting in the way. But you need to make the bottom flange first so you can mark where it will go on the shoulder so you know where to place the scrollwork.
The bottom flange is made of two pieces of sintra that meet at an angle, so it fill some space. The top flange is just a flat pieces of sintra, bent to match the shape of the shoulder. Both flanges have Apoxie Sculpt added later to cover the melt marks and give them some more thickness. The Apoxie Sculpt also adds a LOT of weight, so you might want to use something else as a filler to keep the shoulders light. (Not that the weight is really a problem, but without the apoxiesculpt they weigh almost nothing.)
Ok, bottom flange first: Just trace the bottom of the shoulder onto a piece of 3mm sintra, and then freehand draw another curve offset from that to represent the extent of the flange. Well, actually, draw the curve about 3/16" inward of where you want the extent to be, cuz we're gonna add another piece of sintra that will thicken it. The flange should be widest near the center of the shoulder (about 1.25") and tapers down to about 5/8" on either end (those measurements already have the 3/16" subtracted. Here's basically what i'm talking about:
IMG_7031In this picture i left a little bar across the back of the sintra just to keep its shape a little more while i was working with it. Not critical. It gets cut off later in any case. Next step: cut out this shape. Using a hobby knife, bevel the outer edge to about 45 degrees. Then trace the sintra onto a piece of styrofoam about 1" thick, and stick the foam to it with double sided tape. Then use a knife (steak knife works fine) + sandpaper or a file or whatever to carve the styrofoam out to a 45 degree angle as shown in the picture above and the picture below. IMPORTANT: you need to carve both the outside of the flange AND the inside where it butts up against the shoulder because the shoulder gets larger as it goes up. (If this isn't clear, it will be immediately obvious when you try test fitting the flange on the shoulder.
Here's what it looks like test fitting with the shoulder:
IMG_7034Next step is a little tricky. We want to cut a piece of sintra to cover the foam. So place the sintra+foam on a flat sheet of sintra (i used 2mm here, but if you don't have any 3mm is fine too), so it's like a letter U with the center of the U resting on the new sintra sheet at a 45 degree angle. Then roll the U along the sintra, tracing the shape it makes. (It will end up looking like a much wider, larger U. Cut out this shape, giving it plenty of margin (standard sintra shrinkage rules apply). Then, use a soldering iron to make a little point weld at the center of the U. It now looks like this:
IMG_8586The new piece of sintra is the white one. You can see the marks where i traces the shape while rolling along the foam, and the flange is now held in place by a tiny weld at the center. Now pick it up (gently of course), and use a heat gun to soften the white sintra piece and let it lay down onto the foam. An easy way to do this is to soften the sintra, then lay the piece down and use the exact same rolling motion as before, but this time instead of rolling the foam along the white piece, you're rolling them both together along a flat surface, letting the white piece take on the shape of the foam as it rolls. CAUTION: the heat gun may melt your styrofoam if it gets to close, so only soften the sintra from the outside so it blocks the hot air from directly hitting the styrofoam. (Another reason 2mm is better than 3mm here... less heat required to soften it)
Once you've successfully rolled one half of the U, apply a few more little spot welds along the bottom to hold it in place, then repeat on the other half of the U. When you're done, use a hobby knife to trim the white sintra down to size, test fitting it against the shoulder to try to get a good tight fit. A little gap is ok and mostly unavoidable... we'll fill it later. But make sure it's touching the shoulder in enough places that we can weld it on later.
Shoulder shape showing welds along the bottom, before trimming excess white sintra:
IMG_7939And after trimming:
IMG_7940You can see even after trimming i left the ends long. These might need to get cut at a weird angle to match the shape of the other flange, So just leave them long for now and then trim them later after adding the other flange.
(Random note: Be sure to label all your parts as either left or right shoulder. The shoulders are identical, but you'll have enough tiny inconsistencies between them that it's important to know which flange you intended for which shoulder. Ditto for everything else we'll add to the shoulders later.)
That's about it for the bottom flange. At this point you can take a hobby knife and cut the styrofoam core out, then run a soldering iron along the inside of the joint to melt it together for more strength. Later when we install it on the shoulder, we'll cover the bottom of it with apoxiescult to hide those little welds.
IMPORTANT: If you havent already, powersand the shoulder down so it has a smooth surface before applying the top flange. Once the flange is installed it will be much trickier to maneuver a power sander on the shoulder.
The top flange is made entirely differently. It's just a single sheet of sintra, but it has a very weird curve. Basically you want it to be locally perpendicular to the shoulder at each point it touches. To do this, I cut a bunch of little cardboard strips, bent at a 90 degree angle and taped to the shoulder (so that the bend occurs right at the edge of the shoulder so the pieces stick out a a 90 degree angle. Use your hand to hold them at exactly the angle you want, then tape them to each other so they get locked into place. Repeat this all the way around the shoulder and you'll be left with a nice "mold" that you can use to size the sintra.
Shoulder with all the strips applied: Taped to the inside of the shoulder to hold them in place, but not yet taped to each other:
IMG_7035And now taped to each other to lock in exactly the angle I want:
IMG_7036 (Note you can see that sintra has been powersanded in the above picture... gaps havent been filled with putty yet... that should be done in this step too at some point.)
Unfortunately, this mold isnt nearly flat enough to just heat a piece of sintra and press it against the mold... you'd see all those little seams on the cardboard get transferred to the sintra. Instead we're just going to use this to get the shape of the sintra piece, and then remove this mold from the shoulder and freehand it when it's time to attach the flange.
Now we need to cut a piece of sintra in the shape of this "mold". So figure out some way to transfer the shape to a flat piece of paper. I basically did a similar process of taping together multiple pieces of paper around the shape... you'll figure it out. (Potentially you could just cut the mold off the shoulder and lay it flat and trance it.) Anyway, once you have the shape, it's a simple matter of cutting a piece of sintra in that shape, heating it, and tack welding it in place.
Just kidding! It's never simple. Sintra shrinkage will be a real problem here. As soon as you heat the sintra it will lose the very specific shape you need and it will be very hard to get it lined up correctly. Expect to have to assemble this flange out of several pieces. Basically just cut the piece you think you need, and once you heat it and it takes on a different shape, see if you can find somewhere that it matches the curvature you need. You may need to add in little bandaid pieces to fill gaps etc.
This picture shows the process of applying these: First off, you can see i'm doing it in two main pieces... no point in trying to do the whole thing at once, it'll never work. But you can see even with the two pieces i ended up with a big gap in the middle, and you can see down near the bottom of the shoulder (top of the picture) the flanges are really curving away from the shoulder (due to sintra changing shape when heated). So all of those gaps later got filled with smaller strips of sintra melted onto these ones. The picture shows a few tack welds on the left, as i was still fitting that flange, but the right side is pretty much finished, so i went over it with a much beefier weld.
IMG_7936All of those welds will get covered with ApoxieSculpt later. (You could do it now, but the extra weight of the apoxiesculpt makes the shoulder more likely to break if you drop them, so you might as well wait. And of course im speaking from experience on the breaking.)
That's about it. It's a lot of work to get the top flanges installed at a good angle, but be sure to put some effort into getting a nearly perpendicular angle all the way around. I experimented with some other angles and they really didn't look right. Once you get it all welded on, trim the outside edge down to the right side (which is similar to the side of the bottom flange... especially where they meet at the bottom corner maker sure they are both the same width.
Next up: the shoulder scrollwork, which is the craziest (though maybe not the hardest) and most rewarding part of the costume!
Last edited:
Re: Another Kingsguard Armor (Game of Thrones)
Alright alright alright! It's time for the scrollwork design on the shoulders, which is where things go from crazy to bat$#!% insane. There was lots of programming involved here... i'm glossing over all that and just describing what it does, but if anyone is interested in more internal details let me know.
First the good news: the design on the shoulders is basically the same as the design on the chest. The main difference being that the chest design flares outward at the top, and the shoulder design needs to bend inward to account for the fact that the roundness of the shoulders means they get narrower as you go up. Now the bad news: the shoulders are round. So we need to get our flat chest design to conform to the round shoulders.
I originally drew the chest design in illustrator, which becomes critical at this point. The first thing is to scrunch up the top of the design to account for the narrowing of the shoulder. This isn't a particularly severe change compared to the chest version, and can easily be done using the warp tool in illustrator. Here's a comparison with the chest version (red) and the shoulder version (black).
 shoulderDesign
The design will get a lot more warped when we map it to the sphere... this is just a little preprocessing to make it work out better (in real life i ran through the whole mapping process first, and then tweaked the initial design until the mapping came out right)
Next, we need to map this design to a sphere. This is where the illustrator part becomes critical... I needed to extract the coordinates of all the curves. To do this, save the file as an .eps, which is just a plain text format you can read in notepad. (Tip: to make it simpler, save it as the oldest eps format illustrator offers... they tend to be less complex than the newer versions. Also make sure the file you're saving ONLY contains the design to keep it simple). The eps file stores curves like this:
@
278.279 215.421 mo
280.291 214.615 282.17 213.811 283.512 213.542 cv
286.328 217.297 287.268 229.371 287.133 233.935 cv
285.39 242.789 282.84 240.641 282.975 235.007 cv
283.242 230.176 281.097 220.518 278.279 215.421 cv
cp
All curves in illustrator are Bezier curves, which are defined by 4 points. So each row here shows 3 of the points, with the 4th point being the last point of the previous line. (Incidentally, mo means "move to", cv means "draw curve" and cp mean "close polygon". You might also see some "li" which is "draw line" and is only defined by one new point instead of 3.)
The equation that defines bezier curves is fairly crazy, but with sufficient googling you can figure it out and turn these points into simple x/y coordinates interpolated along the curve. I interpolated each curve into 300 points, so now i have the entire design represented as just a bunch of individual points that are close enough together to see how they are meant to connect.
The sphere mapping works like this: divide the shoulder into layers, exactly the same way as was done to make the mold a few steps ago. Divide the design into these same layers. Measure the "arc length" of each layer, i.e. if you wrapped a string around the outside of the shoulder at each layer, how long would the string be? Well, really you're making this measurement between layers, so for each layer you have the length at the bottom of that layer and the length at the top of that layer. Now stretch/squish the points in that layer of the design so that their overall length matches the arc length of they layer they are in (linearly interpolating the length across the height of the layer so that the adjacent layers match up). The final step of the mapping is to now "wrap" each layer of the design around the sphere that defines the shoulder so we have a 3D representation of the design.
I hope that made sense... here's what it looks like after it's done:
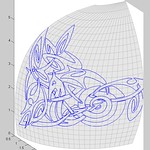 mapped
I don't know if i can adequately describe how excited i was that this actually worked. I'm making it sound like I knew what I was doing... but no, I was completely making it up as I went along and it took about a million tries to get this math right.
(For some reason it came out perfect except for that one little spot near the horse head looking part. I have no idea what's up with that.)
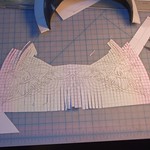
But we're only just getting started. Now we have the design mapped to the sphere, but we need to re-flatten it so we can cut the pieces out of cardboard. We also need to cut a similar pattern that shows us where to put them on the shoulder.
First, notice in the picture above that the shoulder design i have is actually made up of flat faces. So we're going to flatten it basically the same was Pepakura works. Starting at the center line of the shoulder, each polygon (and the portion of the design in that polygon) is rotated so that it lies in the x/y plane, and is moved to be adjacent to its neighbors. The result looks like this:

This is the final pattern that is used to mark where the pieces go on the shoulder.
The last step: we need a similar pattern that shows the shapes we will actually cut out of cardboard. This is very similar to the above pattern, but the polygons are locally moved around to be adjacent to their neighbors so they form continuous shapes. Here is that pattern:
View attachment shoulderPrintPattern.png
(Clearly it's a little messed up near the top where the curvature gets really extreme, but you can easily eyeball how that spiral is supposed to look)
I glossed over some very messy details in the last couple steps... it was hard. That should be the main takeaway message.
The 2 patterns posted above are the actual ones i used. They are sized correctly to match the shoulder pattern i posted before (the zip file with all the layers). IMPORTANT: when i did all this, I didnt account for the thickness of the sintra. The patterns above are the exact same size as the shoulder pattern when printed at 600dpi. But the actual shoulder is bigger than the shoulder pattern because the sintra is 3mm thick. So to print the patterns at the appropriate size, use a slightly lower dpi. I printed at 571 dpi, equivalent to scaling up the size 5%, and they came out right.
Next up: back to actual photos showing how these patterns are used
Alright alright alright! It's time for the scrollwork design on the shoulders, which is where things go from crazy to bat$#!% insane. There was lots of programming involved here... i'm glossing over all that and just describing what it does, but if anyone is interested in more internal details let me know.
First the good news: the design on the shoulders is basically the same as the design on the chest. The main difference being that the chest design flares outward at the top, and the shoulder design needs to bend inward to account for the fact that the roundness of the shoulders means they get narrower as you go up. Now the bad news: the shoulders are round. So we need to get our flat chest design to conform to the round shoulders.
I originally drew the chest design in illustrator, which becomes critical at this point. The first thing is to scrunch up the top of the design to account for the narrowing of the shoulder. This isn't a particularly severe change compared to the chest version, and can easily be done using the warp tool in illustrator. Here's a comparison with the chest version (red) and the shoulder version (black).
shoulderDesignThe design will get a lot more warped when we map it to the sphere... this is just a little preprocessing to make it work out better (in real life i ran through the whole mapping process first, and then tweaked the initial design until the mapping came out right)
Next, we need to map this design to a sphere. This is where the illustrator part becomes critical... I needed to extract the coordinates of all the curves. To do this, save the file as an .eps, which is just a plain text format you can read in notepad. (Tip: to make it simpler, save it as the oldest eps format illustrator offers... they tend to be less complex than the newer versions. Also make sure the file you're saving ONLY contains the design to keep it simple). The eps file stores curves like this:
@
278.279 215.421 mo
280.291 214.615 282.17 213.811 283.512 213.542 cv
286.328 217.297 287.268 229.371 287.133 233.935 cv
285.39 242.789 282.84 240.641 282.975 235.007 cv
283.242 230.176 281.097 220.518 278.279 215.421 cv
cp
All curves in illustrator are Bezier curves, which are defined by 4 points. So each row here shows 3 of the points, with the 4th point being the last point of the previous line. (Incidentally, mo means "move to", cv means "draw curve" and cp mean "close polygon". You might also see some "li" which is "draw line" and is only defined by one new point instead of 3.)
The equation that defines bezier curves is fairly crazy, but with sufficient googling you can figure it out and turn these points into simple x/y coordinates interpolated along the curve. I interpolated each curve into 300 points, so now i have the entire design represented as just a bunch of individual points that are close enough together to see how they are meant to connect.
The sphere mapping works like this: divide the shoulder into layers, exactly the same way as was done to make the mold a few steps ago. Divide the design into these same layers. Measure the "arc length" of each layer, i.e. if you wrapped a string around the outside of the shoulder at each layer, how long would the string be? Well, really you're making this measurement between layers, so for each layer you have the length at the bottom of that layer and the length at the top of that layer. Now stretch/squish the points in that layer of the design so that their overall length matches the arc length of they layer they are in (linearly interpolating the length across the height of the layer so that the adjacent layers match up). The final step of the mapping is to now "wrap" each layer of the design around the sphere that defines the shoulder so we have a 3D representation of the design.
I hope that made sense... here's what it looks like after it's done:
mapped I don't know if i can adequately describe how excited i was that this actually worked. I'm making it sound like I knew what I was doing... but no, I was completely making it up as I went along and it took about a million tries to get this math right.
(For some reason it came out perfect except for that one little spot near the horse head looking part. I have no idea what's up with that.)
But we're only just getting started. Now we have the design mapped to the sphere, but we need to re-flatten it so we can cut the pieces out of cardboard. We also need to cut a similar pattern that shows us where to put them on the shoulder.
First, notice in the picture above that the shoulder design i have is actually made up of flat faces. So we're going to flatten it basically the same was Pepakura works. Starting at the center line of the shoulder, each polygon (and the portion of the design in that polygon) is rotated so that it lies in the x/y plane, and is moved to be adjacent to its neighbors. The result looks like this:
This is the final pattern that is used to mark where the pieces go on the shoulder.
The last step: we need a similar pattern that shows the shapes we will actually cut out of cardboard. This is very similar to the above pattern, but the polygons are locally moved around to be adjacent to their neighbors so they form continuous shapes. Here is that pattern:
View attachment shoulderPrintPattern.png
(Clearly it's a little messed up near the top where the curvature gets really extreme, but you can easily eyeball how that spiral is supposed to look)
I glossed over some very messy details in the last couple steps... it was hard. That should be the main takeaway message.
The 2 patterns posted above are the actual ones i used. They are sized correctly to match the shoulder pattern i posted before (the zip file with all the layers). IMPORTANT: when i did all this, I didnt account for the thickness of the sintra. The patterns above are the exact same size as the shoulder pattern when printed at 600dpi. But the actual shoulder is bigger than the shoulder pattern because the sintra is 3mm thick. So to print the patterns at the appropriate size, use a slightly lower dpi. I printed at 571 dpi, equivalent to scaling up the size 5%, and they came out right.
Next up: back to actual photos showing how these patterns are used
Last edited:
springsteel
Well-Known Member
Re: Another Kingsguard Armor (Game of Thrones)
You just answered every question I have ever had about sintra ever. Thank you for that.
And astonishing work! Your armor is spectacular.
You just answered every question I have ever had about sintra ever. Thank you for that.
And astonishing work! Your armor is spectacular.
Re: Another Kingsguard Armor (Game of Thrones)
Thanks, springsteel and Trout!
Today: finishing all the structural work on the shoulders.
I left off with the main round shape of the shoulders made, and the top and bottom flanges made. The top flange is attached to the main piece, but the bottom flange is not.
The rest of the process goes like this:
1) trace the scrollwork design on the shoulder
2) add snaps along the bottom of the shoulder to eventually attach the leather/scales that hang from the shoulder
3) attach the bottom flange
4) add apoxiesculpt everywhere there is a seam that needs to be covered
5) add cardboard scrollwork design.
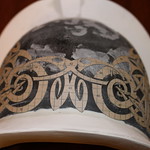
First up, transferring the scrollwork pattern. THis works exactly the same as before. Cut it out, spray with adhesive, apply to the sintra, trace with a hobby knife, peel the paper away. This one is a little harder than before though because of the roundness. So first, mirror the pattern in the previous post so you have both sides on the same piece of paper. Print and cut it out. Cut all the vertical strips between the panels so you have something like a comb shape. some of the gaps between the strips are thick enough that you can actually cut out a wedge of paper... for others just cut a straight slit. Cut up from the bottom and down from the top, leaving about an inch uncut near the center of the design (so you have like a double sided comb... fringes on the top and bottom but uncut across the center. Like so:
Now give the back a spray with adhesive, let it dry til it's not too sticky (but sticky enough that it will stand up to a few repositionings. If it leaves residue behind you can clean it up with acetone or alcohol). Now the tricky part: line it up where you think it should go, and working from the uncut center part outward, smooth down all the little comb fringes. They should magically fall into place and give you a nicely covered sphere like this:
But! this will probably take a few tries to get it properly centered and symmetric, so don't stick it down too hard until you're sure you like its placement. ALSO: IMPORTANT: place the bottom flange piece over it to make sure the design will probably butt up against the flange, like this:
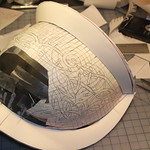
Once you get it lined up just right, use scotch tape or clear packing tape to hold down any loose ends sticking up. Then just trace along all the lines to transfer the design... same technique as used before (see earlier posts for details). Remember to cut a little inside the lines so that your cut marks will be covered by the cardboard pieces.
Step 2: Peel off all the paper so you're back to bare sintra, now with a nicely transferred design. Next up, apply three snap halves (as in, these things: https://www.tandyleatherfactory.com/en-usd/home/department/hardware/snaps/1263-045.aspx) on the inside of the shoulder, along the bottom of the shoulder, positioned such that the rivet on the backside on the snap will be covered up by the flange once you add it. Add one snap near each "corner" of the shoulder, and one in the middle... if you just had the two on the corners the leather would be able to rotate... the 3rd snap in the middle ensures the leather can't move (and if you want it to be able to rotate you can always just unsnap the center one). Tip: I installed different snap halves (male vs female) on each shoulder so that later it is obvious which leather piece goes on each shoulder since there will be only one way to get the snaps to match up.
Step 3: Once the snap halves are installed on each shoulder you can melt the bottom flange into place.
Step 4: And add apoxiesculpt wherever it is needed to cover up welds or fill in gaps. I completely covered the back/underside of the flanges, where the weld marks are. And also add rounded beads to smooth the transition from the flanges to the main piece on the visible side of the shoulder. Basically you want it completely smooth/ready to paint at this point.
One word of caution: try not to add more apoxiesculpt than you need... it is really heavy, and although it probably won't be heavy enough to really weigh you down (eventually we'll add some padding inside the shoulders), it WILL be heavy enough that if you drop one of the shoulders on a hard surface it is likely to break (foreshadowing...)
Picture up to this point... note the position of the snaps on the inside of the shoulder:
(Well, looks like i still have some more puttying to do here)
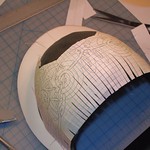
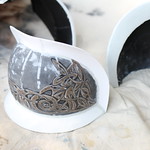
Step 5: Last up, adding the cardboard scrollwork details. This works exactly the same as before. Print the pieces on cardboard, cover the back with double sided masking tape, then cut out the pieces and stick them in place. When you're all done, give it a good coating with thin CA to soak into the cardboard and turn it into once nice solid plasticky piece.
Cutting out all these cardboard pieces is REALLY painful. Definitely use a big fat ergonomic grip hobby knife, not one of those little aluminum things or your fingers will fall off. Also I use scissors wherever possible, but unfortunately these pieces have a lot of little concave areas that scissors can't get into.
The good news is that applying them to the shoulder once they're cut is really easy, and the results will make you feel super accomplished!
Assorted pictures of this process:
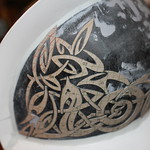
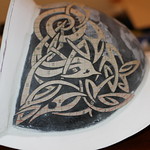
Note that in addition to using the pattern we traced onto the sintra, you can use the colored grid on the cardboard to help precisely line up the pieces. You DO need to be fairly precise with these since they have such small gaps between all the pieces... if you get careless you might find bad placement snowballing...
When you add the CA it might cause some loose ends to flare up... I use pins to hold down anything that needs it... then when the CA dries you can just pull the pins out with pliers. (Also, don't try to CA the whole shoulder in one go... take your time and do it in sections. )

The last step is to just lightly sand the hardened CA to smooth down any bumps/bubbles in it. Here's the finished product, ready for painting:
I think next i'll cover the leg armor, and then FINALLY i'll move on to some non-sintra stuff... leather, scales, painting, and all that fun stuff.
Thanks, springsteel and Trout!
Today: finishing all the structural work on the shoulders.
I left off with the main round shape of the shoulders made, and the top and bottom flanges made. The top flange is attached to the main piece, but the bottom flange is not.
The rest of the process goes like this:
1) trace the scrollwork design on the shoulder
2) add snaps along the bottom of the shoulder to eventually attach the leather/scales that hang from the shoulder
3) attach the bottom flange
4) add apoxiesculpt everywhere there is a seam that needs to be covered
5) add cardboard scrollwork design.
First up, transferring the scrollwork pattern. THis works exactly the same as before. Cut it out, spray with adhesive, apply to the sintra, trace with a hobby knife, peel the paper away. This one is a little harder than before though because of the roundness. So first, mirror the pattern in the previous post so you have both sides on the same piece of paper. Print and cut it out. Cut all the vertical strips between the panels so you have something like a comb shape. some of the gaps between the strips are thick enough that you can actually cut out a wedge of paper... for others just cut a straight slit. Cut up from the bottom and down from the top, leaving about an inch uncut near the center of the design (so you have like a double sided comb... fringes on the top and bottom but uncut across the center. Like so:
Now give the back a spray with adhesive, let it dry til it's not too sticky (but sticky enough that it will stand up to a few repositionings. If it leaves residue behind you can clean it up with acetone or alcohol). Now the tricky part: line it up where you think it should go, and working from the uncut center part outward, smooth down all the little comb fringes. They should magically fall into place and give you a nicely covered sphere like this:
But! this will probably take a few tries to get it properly centered and symmetric, so don't stick it down too hard until you're sure you like its placement. ALSO: IMPORTANT: place the bottom flange piece over it to make sure the design will probably butt up against the flange, like this:
Once you get it lined up just right, use scotch tape or clear packing tape to hold down any loose ends sticking up. Then just trace along all the lines to transfer the design... same technique as used before (see earlier posts for details). Remember to cut a little inside the lines so that your cut marks will be covered by the cardboard pieces.
Step 2: Peel off all the paper so you're back to bare sintra, now with a nicely transferred design. Next up, apply three snap halves (as in, these things: https://www.tandyleatherfactory.com/en-usd/home/department/hardware/snaps/1263-045.aspx) on the inside of the shoulder, along the bottom of the shoulder, positioned such that the rivet on the backside on the snap will be covered up by the flange once you add it. Add one snap near each "corner" of the shoulder, and one in the middle... if you just had the two on the corners the leather would be able to rotate... the 3rd snap in the middle ensures the leather can't move (and if you want it to be able to rotate you can always just unsnap the center one). Tip: I installed different snap halves (male vs female) on each shoulder so that later it is obvious which leather piece goes on each shoulder since there will be only one way to get the snaps to match up.
Step 3: Once the snap halves are installed on each shoulder you can melt the bottom flange into place.
Step 4: And add apoxiesculpt wherever it is needed to cover up welds or fill in gaps. I completely covered the back/underside of the flanges, where the weld marks are. And also add rounded beads to smooth the transition from the flanges to the main piece on the visible side of the shoulder. Basically you want it completely smooth/ready to paint at this point.
One word of caution: try not to add more apoxiesculpt than you need... it is really heavy, and although it probably won't be heavy enough to really weigh you down (eventually we'll add some padding inside the shoulders), it WILL be heavy enough that if you drop one of the shoulders on a hard surface it is likely to break (foreshadowing...)
Picture up to this point... note the position of the snaps on the inside of the shoulder:
(Well, looks like i still have some more puttying to do here)
Step 5: Last up, adding the cardboard scrollwork details. This works exactly the same as before. Print the pieces on cardboard, cover the back with double sided masking tape, then cut out the pieces and stick them in place. When you're all done, give it a good coating with thin CA to soak into the cardboard and turn it into once nice solid plasticky piece.
Cutting out all these cardboard pieces is REALLY painful. Definitely use a big fat ergonomic grip hobby knife, not one of those little aluminum things or your fingers will fall off. Also I use scissors wherever possible, but unfortunately these pieces have a lot of little concave areas that scissors can't get into.
The good news is that applying them to the shoulder once they're cut is really easy, and the results will make you feel super accomplished!
Assorted pictures of this process:
Note that in addition to using the pattern we traced onto the sintra, you can use the colored grid on the cardboard to help precisely line up the pieces. You DO need to be fairly precise with these since they have such small gaps between all the pieces... if you get careless you might find bad placement snowballing...
When you add the CA it might cause some loose ends to flare up... I use pins to hold down anything that needs it... then when the CA dries you can just pull the pins out with pliers. (Also, don't try to CA the whole shoulder in one go... take your time and do it in sections. )
The last step is to just lightly sand the hardened CA to smooth down any bumps/bubbles in it. Here's the finished product, ready for painting:
I think next i'll cover the leg armor, and then FINALLY i'll move on to some non-sintra stuff... leather, scales, painting, and all that fun stuff.
Last edited:
Re: Another Kingsguard Armor (Game of Thrones)
Greaves (Leg Things)
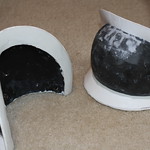
Time for the last big sintra piece: the leg armor. (Well, there is the back plate too, but my current version of that is pretty simple. I plan on making a new one this year, so I won't be posting about that for a while.)
The kingsguards' legs are almost never shown in the show, so there's not a lot of reference for these. In some scenes they don't wear these at all, and instead have long leather boots, so that's an option too. The best reference for these seem to be a photoshoot in Entertainment Weekly from the 1st season... you can easily find the photos online.
The basic construction consists of two plates, one for the front of the leg, one for the back of the leg. The front of the front plate is reinforced with a second layer, which comes to a sharp ridge in the center. I've never seen a picture of the backs, so I assume they're just plain.
I started off with a flat sheet, as always, larger than you think it needs to be. I cut some slits along the side to provide relief points to make it easier to bend into shape:
This goes in the oven, same process as usual... then I took it out of the oven and directly onto my leg for shaping before it cools. If you already have boots, it would be a good idea to wear them here so that the bottom of the armor can be correctly shaped. You'll want to be wearing fairly thick pants cuz of the heat, but also to give a little extra space so they don't end up TOO form fitting. In this picture i'm wearing the actual pants I wear with the costume, with another layer of sweatpants underneath.

Repeat this process for all 4 parts, which as usual is followed by LOT of rework with the heat gun and trimming to size until you get them just right. I wanted these to have a very contoured, form fitting look, but you could simplify this process a bit by going with a simpler, more cylindrical design. The hardest part was making sure the left and right legs looked very similar. I didn't use any templates/drawings for these... just go slowly and trim down a little at a time until you like them.
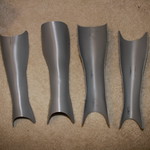
Note the way the tops and bottoms are shaped... these are as accurate as I could make them based on the references i could find. At the bottom, they dip down along the ankles (make sure you account for this when you're measuring/cutting the sintra... if you measure the front of the legs the'll be too short). Also notice that the fronts (center in the photo above) are much longer than the backs, and that the tops of the backs are cut down in a semi circle. This is needed to make sure you can bend your knee... this will become obvious when trying them on... just make sure you try walking/sitting/standing when you're sizing them! The same idea applies with the rounded bottoms... this makes sure you have a full range of motion of your ankle.
Next up, the front plate needs the reinforcing piece added. At first I tried to make this out of two pieces of sintra, butted up against each other to get the sharp ridge at the center. But this didn't work at all... the topology is just too weird... too hard to get the sharp ridge but also heat/melt the piece to conform around the curve.
Picture of what didn't work:
So instead I just heated a sheet and wrapped it around the front, using it like a mold, and then trimmed it to the right shape. Then the two are glued together with pvc cement.
(Not clear in the photo above: AFAICT in the reference photos, the white reinforcing piece actually stick up about 1cm above the top of the gray piece.)
I used appoxiesculpt to make the sharp ridge on the front. But first, I added a third piece of sintra: a thin strip down the center that becomes the ridge line. This strip is exactly the same as the seam lines we added to the front of the breastplate, held in place with CA and pins. Then I mixed up a bunch of appoxiesculpt and used it to smooth out the transition from this central ridge down to the white sintra piece:
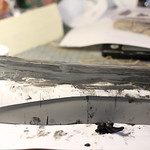
I found that the best way to do this was to first distribute the appoxiesculpt fairly well by hand, but for the final smoothing, apply plenty of water to it and then rapidly rub (not roll) an aerosol can along it, pressing it down until you get a nice flat surface. Here's what it looks like during this smoothing process. Note how you can see the central white ridge poking through. I used black appoxiesculpt here, but I REALLY don't recommend it... stick with white. As you can see the black leaves black stains on EVERYTHING and it's just an accident waiting to happen.
Next step is to powersand the appoxiesculpt down to smooth out whatever imperfections are left. Here's what it looked like before sanding:

The final step (for now) is to apply the scrollwork design to the front. This can't be seen clearly in any reference photo (again, the Entertainment Weekly photo is probably the best), so I follwed the advice of teranmx and fuzzydrawings and made it match the design on the sides of the breastplate (which is also the design that makes up the sides of the central crown). This is applied with the same engraving-cardboard-CA method used everywhere else. Super close up of this process:
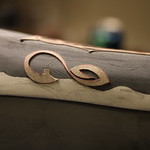
(Tip: to make the engraved lines easier to see on white sintra, rub over the area with a pencil after you do the engraving, then wipe with a wet paper towel. The pencil will remain in the engraved lines)
Here is the finished product, after applying CA to the cardboard details. You can see here that the design is actually wider than the white sintra piece, so it goes off the sides and down onto the gray sintra. This is kind of silly, although looking at the Entertainment Weekly photo it looks like this actually happens on the real armor too. Still... I wish I had planned a little better and made the two legs more symmetric. More of the design goes on the gray on one leg than the other. Oh well... no one will ever notice it in real life!
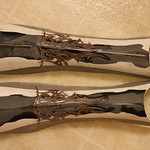
The real finishing, attaching the front and back and adding leather straps, will be covered in a future post.
Next up I'll cover adding the leather "skirt" to the bottom of the breastplate, and the scales beneath that.
Greaves (Leg Things)
Time for the last big sintra piece: the leg armor. (Well, there is the back plate too, but my current version of that is pretty simple. I plan on making a new one this year, so I won't be posting about that for a while.)
The kingsguards' legs are almost never shown in the show, so there's not a lot of reference for these. In some scenes they don't wear these at all, and instead have long leather boots, so that's an option too. The best reference for these seem to be a photoshoot in Entertainment Weekly from the 1st season... you can easily find the photos online.
The basic construction consists of two plates, one for the front of the leg, one for the back of the leg. The front of the front plate is reinforced with a second layer, which comes to a sharp ridge in the center. I've never seen a picture of the backs, so I assume they're just plain.
I started off with a flat sheet, as always, larger than you think it needs to be. I cut some slits along the side to provide relief points to make it easier to bend into shape:
This goes in the oven, same process as usual... then I took it out of the oven and directly onto my leg for shaping before it cools. If you already have boots, it would be a good idea to wear them here so that the bottom of the armor can be correctly shaped. You'll want to be wearing fairly thick pants cuz of the heat, but also to give a little extra space so they don't end up TOO form fitting. In this picture i'm wearing the actual pants I wear with the costume, with another layer of sweatpants underneath.
Repeat this process for all 4 parts, which as usual is followed by LOT of rework with the heat gun and trimming to size until you get them just right. I wanted these to have a very contoured, form fitting look, but you could simplify this process a bit by going with a simpler, more cylindrical design. The hardest part was making sure the left and right legs looked very similar. I didn't use any templates/drawings for these... just go slowly and trim down a little at a time until you like them.
Note the way the tops and bottoms are shaped... these are as accurate as I could make them based on the references i could find. At the bottom, they dip down along the ankles (make sure you account for this when you're measuring/cutting the sintra... if you measure the front of the legs the'll be too short). Also notice that the fronts (center in the photo above) are much longer than the backs, and that the tops of the backs are cut down in a semi circle. This is needed to make sure you can bend your knee... this will become obvious when trying them on... just make sure you try walking/sitting/standing when you're sizing them! The same idea applies with the rounded bottoms... this makes sure you have a full range of motion of your ankle.
Next up, the front plate needs the reinforcing piece added. At first I tried to make this out of two pieces of sintra, butted up against each other to get the sharp ridge at the center. But this didn't work at all... the topology is just too weird... too hard to get the sharp ridge but also heat/melt the piece to conform around the curve.
Picture of what didn't work:
So instead I just heated a sheet and wrapped it around the front, using it like a mold, and then trimmed it to the right shape. Then the two are glued together with pvc cement.
(Not clear in the photo above: AFAICT in the reference photos, the white reinforcing piece actually stick up about 1cm above the top of the gray piece.)
I used appoxiesculpt to make the sharp ridge on the front. But first, I added a third piece of sintra: a thin strip down the center that becomes the ridge line. This strip is exactly the same as the seam lines we added to the front of the breastplate, held in place with CA and pins. Then I mixed up a bunch of appoxiesculpt and used it to smooth out the transition from this central ridge down to the white sintra piece:
I found that the best way to do this was to first distribute the appoxiesculpt fairly well by hand, but for the final smoothing, apply plenty of water to it and then rapidly rub (not roll) an aerosol can along it, pressing it down until you get a nice flat surface. Here's what it looks like during this smoothing process. Note how you can see the central white ridge poking through. I used black appoxiesculpt here, but I REALLY don't recommend it... stick with white. As you can see the black leaves black stains on EVERYTHING and it's just an accident waiting to happen.
Next step is to powersand the appoxiesculpt down to smooth out whatever imperfections are left. Here's what it looked like before sanding:
The final step (for now) is to apply the scrollwork design to the front. This can't be seen clearly in any reference photo (again, the Entertainment Weekly photo is probably the best), so I follwed the advice of teranmx and fuzzydrawings and made it match the design on the sides of the breastplate (which is also the design that makes up the sides of the central crown). This is applied with the same engraving-cardboard-CA method used everywhere else. Super close up of this process:
(Tip: to make the engraved lines easier to see on white sintra, rub over the area with a pencil after you do the engraving, then wipe with a wet paper towel. The pencil will remain in the engraved lines)
Here is the finished product, after applying CA to the cardboard details. You can see here that the design is actually wider than the white sintra piece, so it goes off the sides and down onto the gray sintra. This is kind of silly, although looking at the Entertainment Weekly photo it looks like this actually happens on the real armor too. Still... I wish I had planned a little better and made the two legs more symmetric. More of the design goes on the gray on one leg than the other. Oh well... no one will ever notice it in real life!
The real finishing, attaching the front and back and adding leather straps, will be covered in a future post.
Next up I'll cover adding the leather "skirt" to the bottom of the breastplate, and the scales beneath that.
Hi Mattdash,
Do you have the dimensions of the the individual scales available? Or perhaps a template for it?
Hi, sorry I didn't see this until now. I assume you're referring to the scales along the bottom of the armor, not the ones on the wrist guards. I made them 2.2 inches long and 1.125 inches wide, which was my best estimate based on reference photos. Here is a template:
View attachment scales.pdf
(I exported from Illustrator straight to pdf, so i guess they'll be the right size if you just do a default pdf print without scaling... it should fit an 8.5x11" page)
I'll talk more about these in my next long post, but an important thing to notice is that the top of the scales (the part that gets covered by the previous row) is wider than the bottom. This makes it MUCH easier to get them to overlap without having any fabric visible in between. The scales are placed so that they are 1.27" apart in width (ie just slightly wider than the scales) and 1.625" in height (so lots of overlap in the height direction. Here is a template for the placement:
View attachment scalePlacement.png
A good test is to cut out some of the scales from paper and staple them to the corresponding points on the template and see if you like how t hey overlap, then you can adjust either template as necessary. Also, as will become obvious, it doesnt matter exactly what point of the scale you line up with the dots on the placement template, as long as you're always consistent.
E.g.
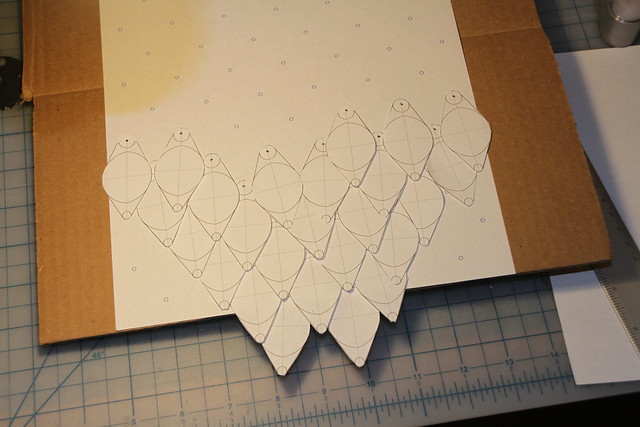
Good luck!
Similar threads
- Replies
- 2
- Views
- 678
- Replies
- 0
- Views
- 1,341
- Replies
- 0
- Views
- 121