Re: Guardians of the Galaxy: Star Lord with lights and sound.
So we're off and running again with the Star Lord accoutrements.
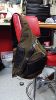
My bag came from China in about a week, which I thought was impressive.
I happened to be in Manhattan yesterday and I tried to find a matching fabric to the screen bag:
... nobody had anything close, which is not a surprise, because the bag is probably screenprinted just for the movie. Whatever. I found a brocade that might work, and it was cheap, so I bought half a yard of it and brought it home with me. The colors are... kind of right? And it's squares, not circles, but come on, I'm trying here. We'll see if I have the time and inclination to do anything with that. Worst case, the bag is good by itself.
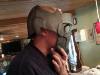
The helmet gave me, appropriately enough, quite a logistical headache for a couple days. I just did not like the fit on my big, dumb lightbulb-shaped head.
I could barely even get my head in there because it was too narrow side-to-side, even after removing a lot of material inside. I tried using a heat gun to flex the sides out, which helped a bit, but overall I just was not happy with it. So, back to the drawing board I went. I spent 4-5 hours remodelling a large section of the mask and re-proportioning features.
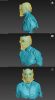
I flattened out the front of the face a bit (although, in hindsight, maybe not as much as I wanted). I also bulged the back of the helmet out to give me a bit more room to work with, and brought the edge by the nape of the neck up substantially so I could fit the thing over my head easier. It's wider than
Helagak had on his original model, but that's what I need to wear it comfortably. I'm probably going to have to carve a section out of the underside of the chin to give me the clearance to get my nose through, but the fit on this one should be a lot better.
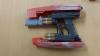
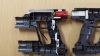
A lot of time was spent looking at the guns and trying to figure out what I was doing. I finally refined the model for the barrel down to the point where I'm happy with it.
It's available for download
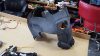
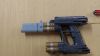
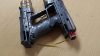
here. Should work with minimal effort. In the mean time, progress has been made on the interior, mostly around the battery area, which I had to rejigger a little bit:
It looks a little messy, but this thing is actually engineered very tightly, and I'm kind of proud of it. The battery can be pushed straight into the slot, and will snap into battery connectors snugly without moving around. A ribbon is in place at the moment to help me pop the battery out.
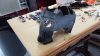
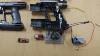
I spent a couple days toying around with my greeting card circuit before I decided I wanted to do better. I took a dive into the strange and exciting world of arduinos and breakout boards, and have been working on some solutions that I think will do the trick:
I'm going to be using an
Arduino Pro Mini to control each gun and I'm embedding an
Audio-sound Breakout that will have all the sounds I need on a microSD card. I'm still waiting on a parts order at the moment to get everything wired up. This is also my first endeavor into anything involving arduinos, but
oh my god they are so much easier to use than I first thought. Like, I can't see ever
not using one of these in a project in the future. They are dirt cheap, smart, adaptable, and small.
Here's what I'm thinking, as far as ultimate functionality on the guns:
- An on-off switch hidden somewhere on the body of the gun to isolate the 9V from the rest of the circuits, including the arduino.
- When powered on, the gun will make a 'power up' noise as it comes to life. A standby LED will slowly pulse once 'ready'.
- When the trigger is pulled, it will turn on blue LEDs in the barrel at full intensity, then quickly fade them out over the next second and a half. One of half a dozen blaster sound effects will play from the speaker, chosen at random.
- When I hit the secondary trigger on the gun, it will 'overheat'. The speakers will play a winding-down sound, the physical movement of the gun will open up the two slides, exposing the interior barrels. A red LED will come on in the barrel shroud.
- When the gun is closed back up, it will re-engage the same 'power up' sound as when initially powered on. Red LEDs will turn off.
Thankfully, I know Java, and these arduinos seem like a snap to program up, so with a bit of trial and error I'm confident I'll be able to come up with something cool.
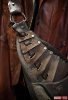
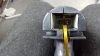
I was also going to show off the boot rockets, but right before I was taking the pictures I managed to mistakenly hook up the wrong power source to one of them and burned out the electronics I had embedded (I was working with 5v for the arduino, and the poor LED in the boot rocket didn't know what hit it). Woops. As a consolation prize, here's a completed strut, while I figure out how to fix my boo-boos:
I'm currently printing out a copy of the orb interior by @
tonyyoungblood - I may be making a cold-cast aluminum version for myself once I'm done cleaning the Infinity Orb up, and depending on Tony's disposition, I may be able to offer a run of these things! We'll see.


")