Show your custom Lightsabers!

View attachment 1704231
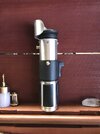
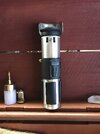
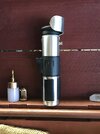
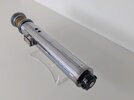
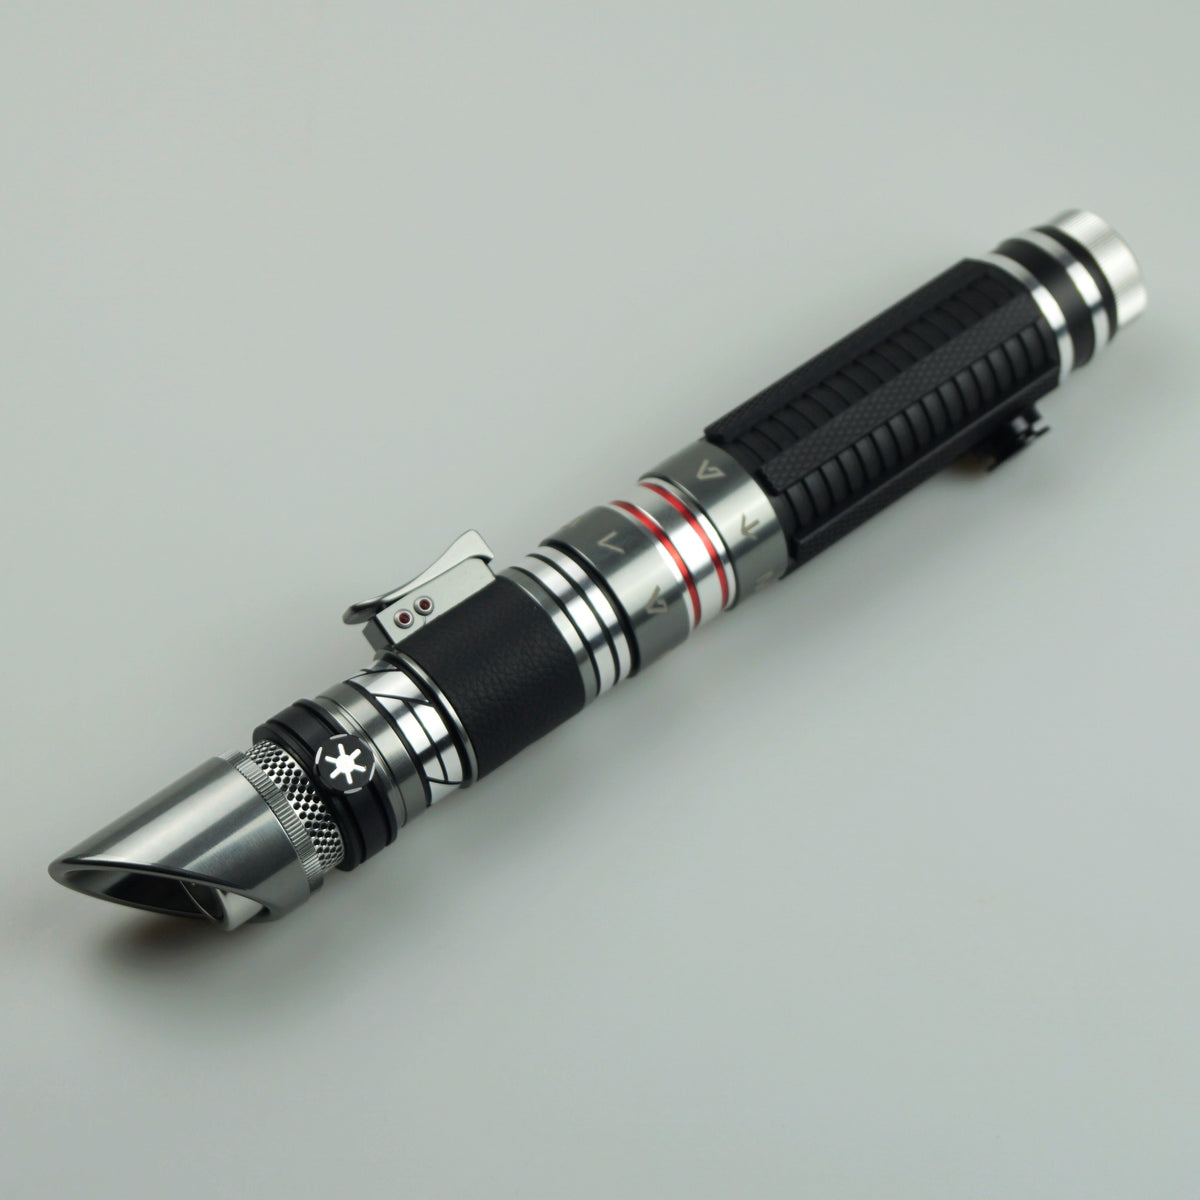
A duel wield pair, shoto and main hand. Built mostly from MHS parts, these sabers are meant to evoke a sense of found relics. They obviously take a pile of inspiration from the ESB Graflex, but also feature Obi-Wan EP IV elements and a Canon Y clamp for the main hand saber. These have been a long time coming, with the shoto built almost two years ago and the main started last summer before life put my saber building in the back seat.

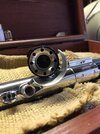
Both are installed with pixel connectors, Proffieboards and 18650 batteries. The shoto features a removable cell while the main hand is hard wired due to space constraints. both sabers have full shine through glass eyes and the main hand saber also has three blinking LEDs set in a ring just below the clamp. The main saber features two buttons under the clamp card and the shoto has a single button in the choke.

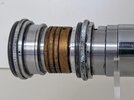
I‘ve made heavy use of aluminum black and sur-fin brass patina in addition to varying grits of sandpaper and scotch brite. I like to turn the parts to five a more consistent surface treatment, apply heavy patina and then knock that patina back until I get to a good place.

Any and all comments and suggestions are welcome.

Sweet! I have a Graflex extension I have been saving to do something along those lines. You proved my idea would in fact look great! :lol:
 
Let's call it Fallen Order Friday, with this Cal Kestis build. The hilt is a bit of a mystery, actually. I'm not sure who sells it, as I picked it up second hand. It came with a pretty solid chassis and a rocker switch setup in one of the small control boxes, along with a blade plug.

I couldn't get both buttons working reliably, the aux tends to jam, but in one button config it works brilliantly. Blade retention is the knurled thumbscrew/button just under the shroud, so the blade sits pretty deep.

Install is a Proffieboard V2, an Acebeam 18650 battery with integrated USB recharge and a kill switch. The crystal is a real quartz, illuminated with a single pixel. The blade connector is a CC Sabers. The chassis is retained by two 4-40 screws hidden by the second small control box (which is kept in place with a magnet)

The hilt came clean, so it got a medium / heavy weathering to match the state of the hilt in the opening of the Jedi Survivor game using Jax aluminum blackener and some flat black spray paint. Topcoat is ModPodge flat acrylic, which goes on quite well and seems to be much less resistant to flaking than the Rustoleum I've used in the past.
IMG_4535.jpeg
IMG_4528.jpeg

IMG_4534.jpeg


A few more pics can be seen here:
 
When I "finished" my personal lightsaber, I was rather disappointed at the lack of volume. I quickly discovered that it was because I didn't have a good resonance chamber in the pommel. The speaker was 28mm, in 1.14 chassis. But in the inside of the pommel was 1.25. So began searching for something to reduce the interior diameter. And I figured out that a 1 1/4” PVC tail piece slides perfectly into the pommel. And just slips over the speaker. The result is a huge volume increase.
PXL_20230619_024238059.jpg
PXL_20230619_024145871.MP.jpg

 
I think it's time I threw my hat in the ring. This is my custom, the Torchbearer. It's named for my favorite superhero, the Green Lantern Kyle Rayner, and because I think it has a sort of space age torch look to it (flamey torch, not a flashlight). It's based on the third saber I ever constructed out of hardware parts. The neck is a piece of copper piping around a nice thick bit of aluminum. The control box is aluminum as well, 3D printed and painted black. The arrows are cutoffs from a set of LEDs. A white LED underneath shines through them both. It's running a Proffieboard 2.2. I did the weathering myself with sandpaper and a hobby knife. Overall design and 3D modeling was done by me. Install was done by Jeremy Kitts, aka The Saber Merchant. It's also running his two custom fonts.
20230707_121632.jpg
20230707_120247.jpg
20230707_120244.jpg
20230707_120227.jpg
 
I think it's time I threw my hat in the ring. This is my custom, the Torchbearer. It's named for my favorite superhero, the Green Lantern Kyle Rayner, and because I think it has a sort of space age torch look to it (flamey torch, not a flashlight). It's based on the third saber I ever constructed out of hardware parts. The neck is a piece of copper piping around a nice thick bit of aluminum. The control box is aluminum as well, 3D printed and painted black. The arrows are cutoffs from a set of LEDs. A white LED underneath shines through them both. It's running a Proffieboard 2.2. I did the weathering myself with sandpaper and a hobby knife. Overall design and 3D modeling was done by me. Install was done by Jeremy Kitts, aka The Saber Merchant. It's also running his two custom fonts.View attachment 1717992View attachment 1717993View attachment 1717994View attachment 1717995
The Covertec D ring is the equivalent of a spoon fork. But in this case I love it.
spork.jpg
 
What a great hobby I’ve stumbled upon. Two years ago I bought my then 5 year old and I a couple cheap dueling lightsabers. I didn’t know it was a start of a new hobby. Like I need another one of those. Regardless, I’m addicted. I’ve quickly moved from buying name brand sabers to making them from flash guns to now completely found and modifying parts. Here’s my latest completed hilt. It’s a Yoda / Praco flash maker inspired saber. Completely made from scrap metal and other items around my home. The tube is 1 1/4” Aluminium tube I had laying around. The emitter is a mix of Argus Lens casing parts from a telephoto lens. The clamp was sheet metal I formed round, welded and fitted with an ABS inner sleeve made from a Semi truck mud flap I pick up years ago. The control box is made from shaved down LEGO block sides and a sharpie marker cap thats held together with modeling glue. The grips are also from the mud flap. Sanded them to the radius of the tube. The bottom cap is a Argus lens cover. The brass side button works and is made from brass lamp parts, turned down by chucking them in my cordless drill and running them against a grinding disc running at the same time. Sketchy thing to witness. I couldn’t find anything that resembled the Lamborghini wheel for top of emitter so I used a roller skate speed wheel hub. Or half of it. Perfect for a 7/8” blade. The aluminum shroud was made from an old stop sign that’s had many pieces of metal cut off of it for various projects. I loosely followed the prints for the Yoda saber as it’s scaled a bit larger than the original Praco design. All in all I’m stoked how it turned out. Eventually I’ll install electronics as it’s built pretty heavy duty. My first custom saber, from scratch. Did I say I’m making These for my kid and not me.
 

Attachments

  • 610030B6-863B-4AEB-BA59-9570566F7FA0.jpeg
    610030B6-863B-4AEB-BA59-9570566F7FA0.jpeg
    1.1 MB · Views: 146
  • 2CDD74E2-3811-48C4-AC00-DA0149125954.jpeg
    2CDD74E2-3811-48C4-AC00-DA0149125954.jpeg
    1.1 MB · Views: 135
  • 59CBA6E2-ACFF-4F99-89BD-12C88F421C20.jpeg
    59CBA6E2-ACFF-4F99-89BD-12C88F421C20.jpeg
    1.3 MB · Views: 120
  • 55C6946E-1B2F-4A1E-9495-5D27A1842BCE.jpeg
    55C6946E-1B2F-4A1E-9495-5D27A1842BCE.jpeg
    1.5 MB · Views: 135
A while back (post #2632) I made my interpretation of Mara Jades saber if it were made for the OT, with all the flashgun/found part trappings that fit the aesthetic. I really enjoyed the process of seeing which elements define a particular saber. Looking at what specific design elements would need to be reimagined in order for it to be recognisable as the thing it's based on.

Since then I've been gathering parts and waiting for the right combination to come together and I think I've finally got a build which works.

Here is my Revan (sith) saber in the OT style.

revan_compare_image.png


Most of the detail on this saber happens at the emmiter and pomel so I used the most minimal flash gun I had (it's unlabeled by I think it's a Gilbert flash?)

PXL_20230905_104214841.PORTRAIT.jpg

PXL_20230905_104253489.PORTRAIT.jpg


For my emitter I stacked together various cameras lens parts and an aluminium cap, alternating the diameters to get something close to the original.

PXL_20230905_104214841.PORTRAIT~2.jpg

PXL_20230905_104235698.PORTRAIT.ORIGINAL~2.jpg


The pomel was the trickiest part for me. I tried many configurations of various parts but it never felt right. Then I took an old vacuum to pieces and found these two cog wheel things. Back to back with a knurled spacer and I finally had something which worked.

PXL_20230905_104303382.PORTRAIT.jpg

PXL_20230905_104309480.PORTRAIT.jpg


As with my Mara Jade saber I wanted to add an activation box with clamp card to finish the look. Luckily the flashgun had a well placed clip/bracket for attaching to the camera and it was fairly small which wouldn't interfere with the clean, minimal hilt. I bent the ends over to hold in a small piece of PCB added a few replacement bolts and it was done.

PXL_20230905_111220100~2.jpg

PXL_20230905_104103284.PORTRAIT~2.jpg
 

Attachments

  • PXL_20230905_104235698.PORTRAIT.ORIGINAL~2.jpg
    PXL_20230905_104235698.PORTRAIT.ORIGINAL~2.jpg
    488.2 KB · Views: 57
  • PXL_20230905_104253489.PORTRAIT.jpg
    PXL_20230905_104253489.PORTRAIT.jpg
    2.7 MB · Views: 33
Certainly not to the level of what you ladies and gentlemen do but I made one smallish change to a standard part and the results are really satisfying. Well, to me, at least. I've had this SF ASP build for a while and wanted to put a drop in core in it but the really cool looking switch housing wasn't compatible. SF does offer a couple different drop in core housings but I'd be losing the cool control box and nifty surface detail. I ordered a sleeve with control box that I liked with the intent of grinding out the inside of the box and installing a button extension...then I got all the parts and changed my mind into doing something risky but might yield visually better results. A dozen Dremel cuts after a lot of measuring and checking later and poof! I have some visually engaging surface detail back in that part of the hilt. I filed and sanded the edges so it's safe in the hands for fighting and twirling. Certainly not the level of investment you "from scratch" folks put in but sometimes something simple does the trick.
1693918148236.png

1693918181100.png
1693918192682.png

1693918211924.png
 
Certainly not to the level of what you ladies and gentlemen do but I made one smallish change to a standard part and the results are really satisfying. Well, to me, at least. I've had this SF ASP build for a while and wanted to put a drop in core in it but the really cool looking switch housing wasn't compatible. SF does offer a couple different drop in core housings but I'd be losing the cool control box and nifty surface detail. I ordered a sleeve with control box that I liked with the intent of grinding out the inside of the box and installing a button extension...then I got all the parts and changed my mind into doing something risky but might yield visually better results. A dozen Dremel cuts after a lot of measuring and checking later and poof! I have some visually engaging surface detail back in that part of the hilt. I filed and sanded the edges so it's safe in the hands for fighting and twirling. Certainly not the level of investment you "from scratch" folks put in but sometimes something simple does the trick.
View attachment 1736603
View attachment 1736605View attachment 1736606
View attachment 1736608
Reminds me of the Acolyte one that KR Sabers just released.

 
One of my builds is my TCSS which includes a custom part I had them fabricate. I'm looking forward to this one getting all the bells and whistles when the time comes as I am chatting with a good and talented friend about doing an install for me.
1693921306294.png

1693921318863.png
 
Certainly not to the level of what you ladies and gentlemen do but I made one smallish change to a standard part and the results are really satisfying. Well, to me, at least. I've had this SF ASP build for a while and wanted to put a drop in core in it but the really cool looking switch housing wasn't compatible. SF does offer a couple different drop in core housings but I'd be losing the cool control box and nifty surface detail. I ordered a sleeve with control box that I liked with the intent of grinding out the inside of the box and installing a button extension...then I got all the parts and changed my mind into doing something risky but might yield visually better results. A dozen Dremel cuts after a lot of measuring and checking later and poof! I have some visually engaging surface detail back in that part of the hilt. I filed and sanded the edges so it's safe in the hands for fighting and twirling. Certainly not the level of investment you "from scratch" folks put in but sometimes something simple does the trick.
View attachment 1736603
View attachment 1736605View attachment 1736606
View attachment 1736608
I really love the Ani/Obi control box.
One of my builds is my TCSS which includes a custom part I had them fabricate. I'm looking forward to this one getting all the bells and whistles when the time comes as I am chatting with a good and talented friend about doing an install for me. View attachment 1736632
View attachment 1736633
Beautiful shroud work!
 
A while back (post #2632) I made my interpretation of Mara Jades saber if it were made for the OT, with all the flashgun/found part trappings that fit the aesthetic. I really enjoyed the process of seeing which elements define a particular saber. Looking at what specific design elements would need to be reimagined in order for it to be recognisable as the thing it's based on.

Since then I've been gathering parts and waiting for the right combination to come together and I think I've finally got a build which works.

Here is my Revan (sith) saber in the OT style.

View attachment 1736559

Most of the detail on this saber happens at the emmiter and pomel so I used the most minimal flash gun I had (it's unlabeled by I think it's a Gilbert flash?)

View attachment 1736560
View attachment 1736562

For my emitter I stacked together various cameras lens parts and an aluminium cap, alternating the diameters to get something close to the original.

View attachment 1736563
View attachment 1736565

The pomel was the trickiest part for me. I tried many configurations of various parts but it never felt right. Then I took an old vacuum to pieces and found these two cog wheel things. Back to back with a knurled spacer and I finally had something which worked.

View attachment 1736567
View attachment 1736566

As with my Mara Jade saber I wanted to add an activation box with clamp card to finish the look. Luckily the flashgun had a well placed clip/bracket for attaching to the camera and it was fairly small which wouldn't interfere with the clean, minimal hilt. I bent the ends over to hold in a small piece of PCB added a few replacement bolts and it was done.

View attachment 1736568
View attachment 1736571
This looks amazing. Well done for a canon found parts saber.
 

Your message may be considered spam for the following reasons:

If you wish to reply despite these issues, check the box below before replying.
Be aware that malicious compliance may result in more severe penalties.
Back
Top