So, I'm starting a Zaku II build that I'm busting ass to have done in time for DragonCon. I would've got to this earlier, but I needed to finish my damn Cyberman. HAHA.
This will be a group costume with my buddy in an RX and two gender bent pilots.
First off, go look up Clive Lee! He is the master at making gundams and has done the definitive instructional book on the basics of gundam building. This is an incredibly valuable resource and it well worth your time to read the 70 or so pages he's put together.
http://www.therpf.com/showthread.php?t=160555
Basically, first thing I did was buy myself a Zaku II model kit from Bandai. If you've never had one of these things, get it! It's worth it and you can see how all the parts fit together. Takes a few hours to build, but it helps as visual representation when you're building the pieces. So far, this has worked for me.
The other big advantage with these gundam models is that they have something similar to a blue print in the instruction manual... it's a line drawing of straight on front, one side, and back view. This IS perfect for developing your patterns. I taught myself sewing, so I work with patterns. I sometimes due stuff by eye, but normally I will develop a pattern first out of tin foil or paper and then convert it over to the foam. My thought is that maybe in the future I will possibly make these patterns available on this forum as wondersquid did for the cyberman (which I build and it's wonderful).
First thing I did was figure out how this thing was going to scale. With my model kit, I could measure it and then scale it up to the size I wanted. Basically, I decided I wanted it to be 7 ft tall from the floor to top of the helmet fin. The thing to understand about gundams is that they are not truly proportional. They have longer legs than humans and the shoulders are square to the body... etc etc. I'm 6ft tall, I'm going to add the extra height to the legs so that the rest of the body will scaled proportionally.
Next, I did a scan those B&W line drawings of the Zaku. Then I took a full body picture of me. Then I took those two pictures in photoshop. First we scale the picture of zaku to the height I want. To do this, I took them into photoshop and turned on my ruler function. Then we merge the two images together and I fit my zaku scan to be the size I want.

The red line is where the bottom of my foot will go... I know it looks a little weird... because it's impossible to get a perfectly head on picture. Anyway, this will start to give you a great idea of proportion. As you can see, all the additional height is going to come from some sort of lifts in the shoes...
I took these properly scaled images in jpg format to Kinkos. They will print them out, life size, on there plotter. Ask for the cheapest paper they have... mine worked out be .80 or something a sq ft. So, printing full front, side and back view... then detail of each of the sections, arms, torso, and leg (front/side/back)... all in, it cost me about $70/$80. Quickly, we realized that this was a VERY worthwhile investment. Especially since I'm under a bit of a time crunch to get this turn around a 7ft full foam costume in less than two months!
We could take these print outs, but them against a wall and put me directly against it. With this we could fine tune the height.


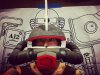
You can see what a huge help this method will be toward a build. The first thing that I did, even before I did the printout, is the base of the helmet just to get a feel for the build and get myself in the mood. In the picture above, I'm super pleased that I scaled the helmet correctly even though I didn't have this wonderful reference.
I decided to start from the bottom up. Sorry, I didn't start taking pictures of my patterns until I got to the thighs.

The legs mostly assembled, minus the top of the foot/ankle... the pattern pieces are done, but I just haven't had time to put them in yet because of my real job.


The other advantage of this resource is that you can place your finished products up against the line drawing to check scale (such an important factor to making the costume look right). It kind looks like it's loading the 3D costume from the bottom up. Heh.
I'll be updating more regularly than I will here (unfortunately) on my instagram feed @EvILpenguinlabs so follow me there if you want more up-to-date pictures of the build process. I'll be happy to answer any questions you have... I'll try my best to update as often as I can.
Cheers....
This will be a group costume with my buddy in an RX and two gender bent pilots.
First off, go look up Clive Lee! He is the master at making gundams and has done the definitive instructional book on the basics of gundam building. This is an incredibly valuable resource and it well worth your time to read the 70 or so pages he's put together.
http://www.therpf.com/showthread.php?t=160555
Basically, first thing I did was buy myself a Zaku II model kit from Bandai. If you've never had one of these things, get it! It's worth it and you can see how all the parts fit together. Takes a few hours to build, but it helps as visual representation when you're building the pieces. So far, this has worked for me.
The other big advantage with these gundam models is that they have something similar to a blue print in the instruction manual... it's a line drawing of straight on front, one side, and back view. This IS perfect for developing your patterns. I taught myself sewing, so I work with patterns. I sometimes due stuff by eye, but normally I will develop a pattern first out of tin foil or paper and then convert it over to the foam. My thought is that maybe in the future I will possibly make these patterns available on this forum as wondersquid did for the cyberman (which I build and it's wonderful).
First thing I did was figure out how this thing was going to scale. With my model kit, I could measure it and then scale it up to the size I wanted. Basically, I decided I wanted it to be 7 ft tall from the floor to top of the helmet fin. The thing to understand about gundams is that they are not truly proportional. They have longer legs than humans and the shoulders are square to the body... etc etc. I'm 6ft tall, I'm going to add the extra height to the legs so that the rest of the body will scaled proportionally.
Next, I did a scan those B&W line drawings of the Zaku. Then I took a full body picture of me. Then I took those two pictures in photoshop. First we scale the picture of zaku to the height I want. To do this, I took them into photoshop and turned on my ruler function. Then we merge the two images together and I fit my zaku scan to be the size I want.
The red line is where the bottom of my foot will go... I know it looks a little weird... because it's impossible to get a perfectly head on picture. Anyway, this will start to give you a great idea of proportion. As you can see, all the additional height is going to come from some sort of lifts in the shoes...
I took these properly scaled images in jpg format to Kinkos. They will print them out, life size, on there plotter. Ask for the cheapest paper they have... mine worked out be .80 or something a sq ft. So, printing full front, side and back view... then detail of each of the sections, arms, torso, and leg (front/side/back)... all in, it cost me about $70/$80. Quickly, we realized that this was a VERY worthwhile investment. Especially since I'm under a bit of a time crunch to get this turn around a 7ft full foam costume in less than two months!
We could take these print outs, but them against a wall and put me directly against it. With this we could fine tune the height.
You can see what a huge help this method will be toward a build. The first thing that I did, even before I did the printout, is the base of the helmet just to get a feel for the build and get myself in the mood. In the picture above, I'm super pleased that I scaled the helmet correctly even though I didn't have this wonderful reference.
I decided to start from the bottom up. Sorry, I didn't start taking pictures of my patterns until I got to the thighs.
The legs mostly assembled, minus the top of the foot/ankle... the pattern pieces are done, but I just haven't had time to put them in yet because of my real job.
The other advantage of this resource is that you can place your finished products up against the line drawing to check scale (such an important factor to making the costume look right). It kind looks like it's loading the 3D costume from the bottom up. Heh.
I'll be updating more regularly than I will here (unfortunately) on my instagram feed @EvILpenguinlabs so follow me there if you want more up-to-date pictures of the build process. I'll be happy to answer any questions you have... I'll try my best to update as often as I can.
Cheers....
Last edited:
")


