superjedi
Sr Member
Hi all!
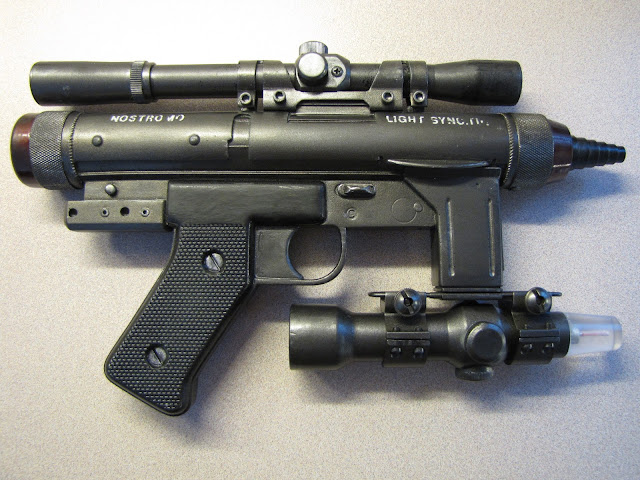
Had some time to work on the amazing Nostromo pistol kit by Shawn Morgan.
Very nicely cast kit! The Rexim is terrific, and the add on parts are great, too. There are a couple of metal parts comprising the upper and lower scope mounts, as well as a clear cone tip for the Singlepoint scope. The upper scope is a genuine functional Tasco scope. The "nozzle" at the muzzle end is a separate piece as well.
Shawn did all the prep and pre-assembly before shipping the kit. He did an excellent job on designing and constructing the pistol. It was basically ready to paint right out of the box. :thumbsup
He also provided a painting tutorial, and a source for the rub-on lettering used on the pistol's receiver.
I didn't take any in progress shots on this, but since I decided to do a weathered version, I still have some more work to do.
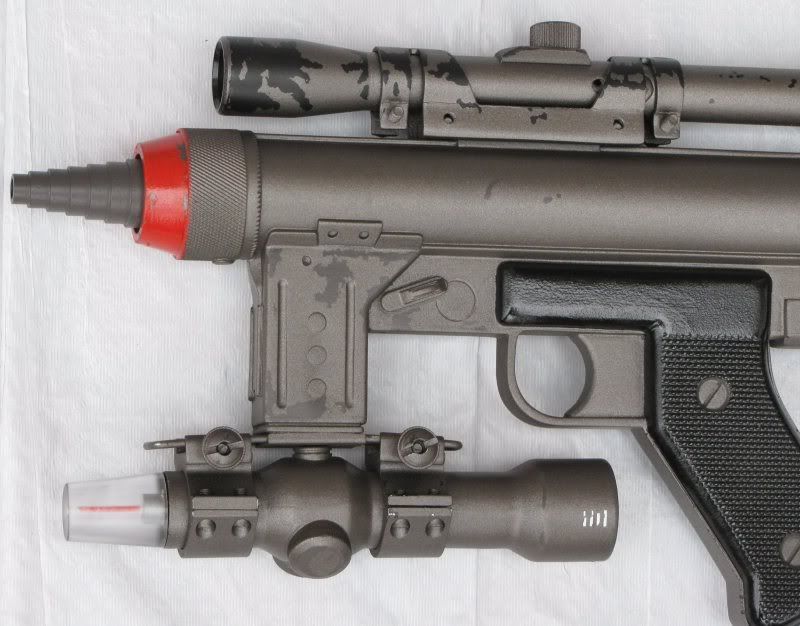
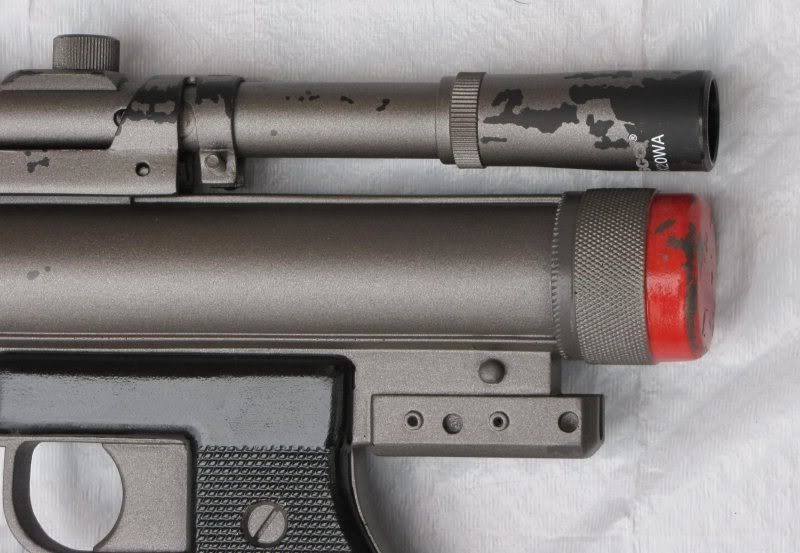
Here are a couple of overall shots of both sides.
I partially disassembled the kit to make painting a bit easier. I wound up with 5 subassemblies for painting:
1) main body
2) Singlepoint scope (removed scope rings)
3) Tasco scope
4) Tasco scope mount
5) front nozzle piece
I began by using Duplicolor self-etching primer on all the resin parts to make sure the color coats had something to bite on. I've used this primer before and it gives a very smooth base.
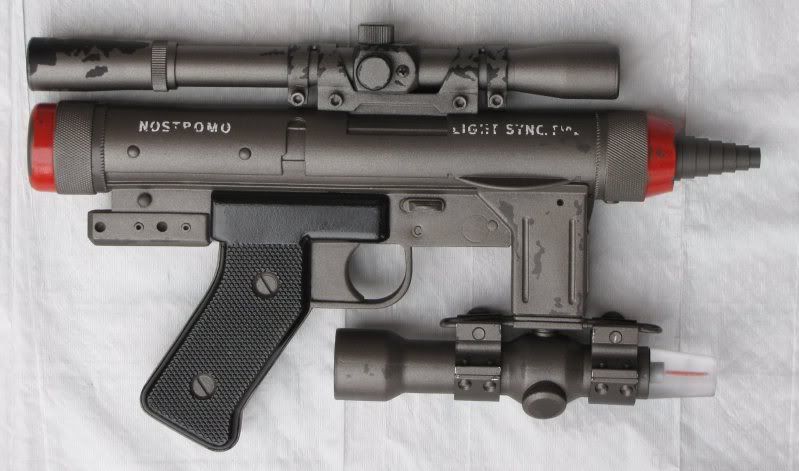
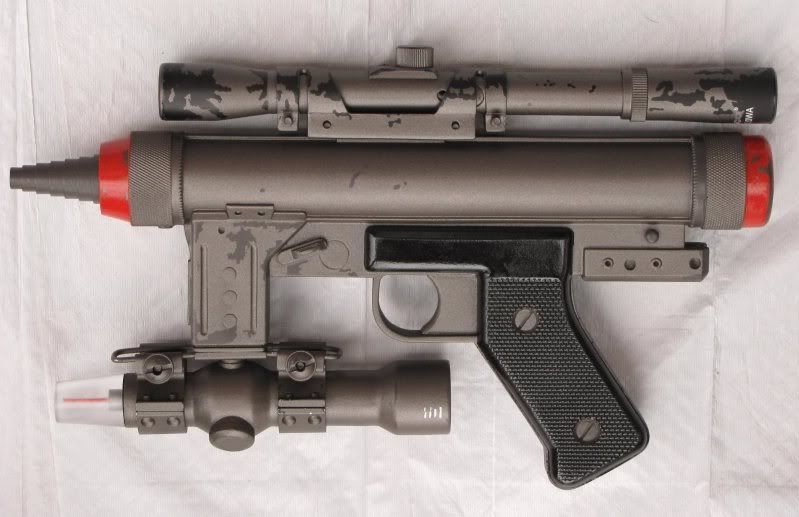
Shawn recommended a dark "machine" gray (or black) for the base color. I used a dark Rustoleum gray that I had left over from another project. I used the dark gray on the pistol body, Singlepoint scope, and nozzle.
I didn't paint the Tasco scope at all at this point as I wanted the black to show through my weathering. The resin Tasco scope mount was sprayed semi-flat black after primer.
After the base coat was dry I reassembled all components (except for the clear Singlepoint tip) in preparation for weathering.
To begin, I used some Winsor & Newton liquid mask with a Microbrush to mask off portions I wanted to show through the weathering. I've used this technique many times on other full scale props and helmets and it works really well.
Once the masking fluid was dry, I used Shawn's recommended Rustoleum Bronze color to apply several light coats over the entire pistol.
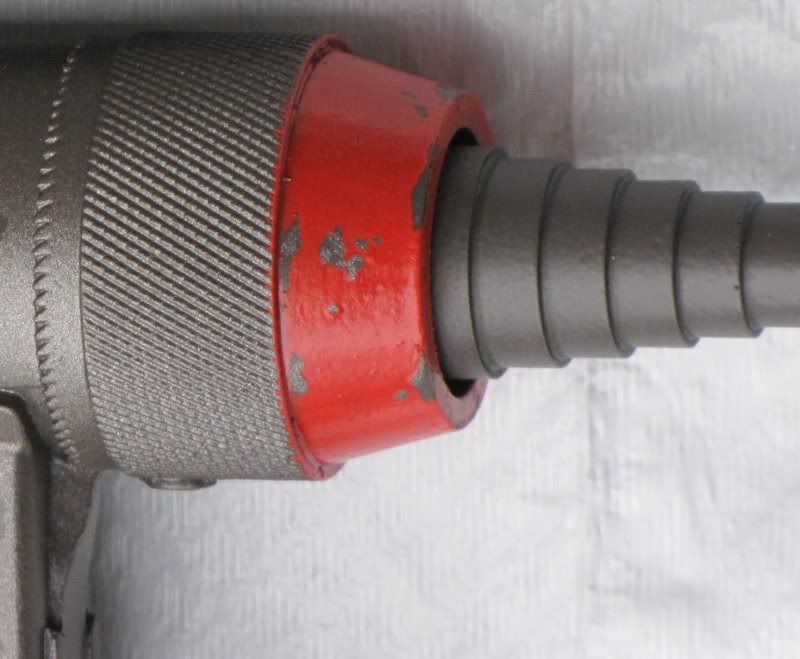
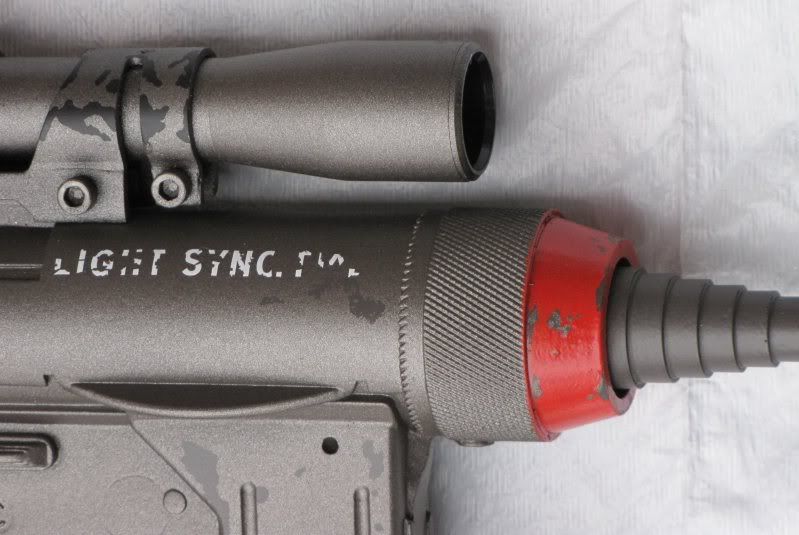
Once dry, I used a rubber cement pickup to rub off the masking fluid, and got a nice chipped effect. Here are a couple of closer shots.
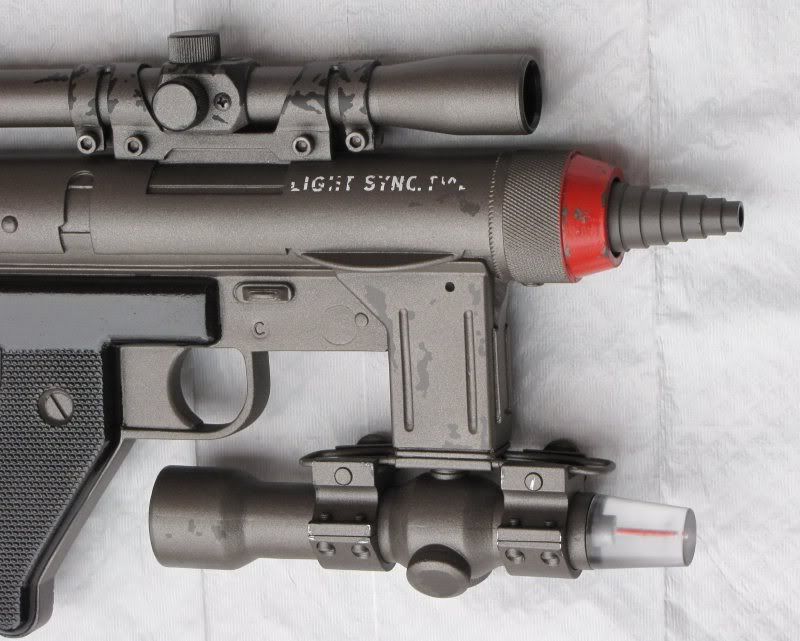
I did some more detailing by masking off for the red sections. I wrapped blue painters tape around both knurled sections and used the liquid mask again to mask off the chips and scratches. I used Testors Ford Engine Red, which (in my opinion) simulates the slightly orangish red on the pics of the screen used prop.
The grip panels were painted with Testors Gloss Black.
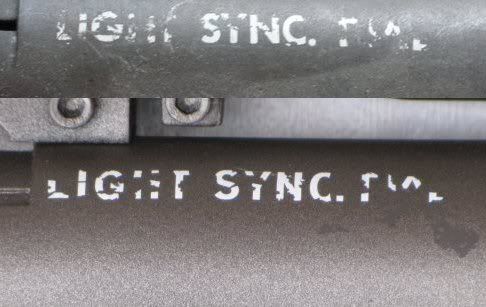
The lettering was done with white dry transfers. Since I wanted to mimic the screen used pistol, which has very worn lettering, I took some time to scratch and cut up each letter before applying them to the receiver. This took a while, but I really like the end result!
In the reference pics of the screen used pistol, the word "Nostromo" is quite noticeably slanted down to the right. . . but I simply couldn't bring myself to put it on crooked!

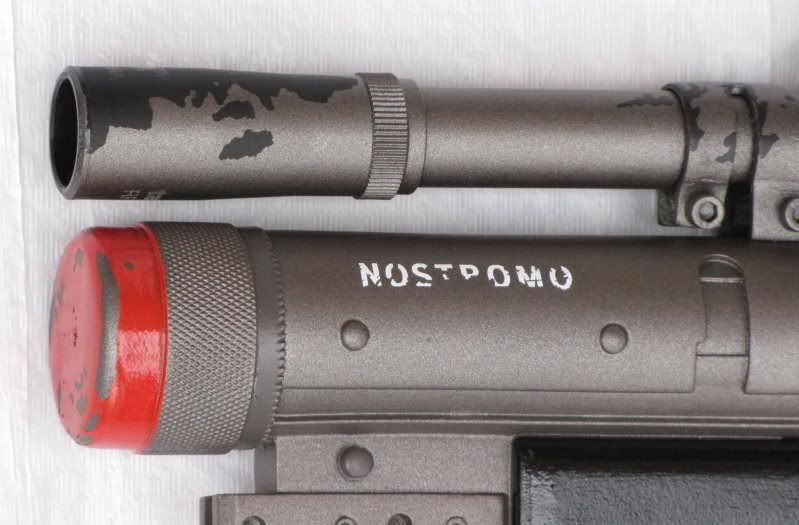
EDIT: Just for fun, here's a comparison of the screen used pistol with the lettering on mine. (Credit to Jason Eaton for the original pic.) The original is on top of course.

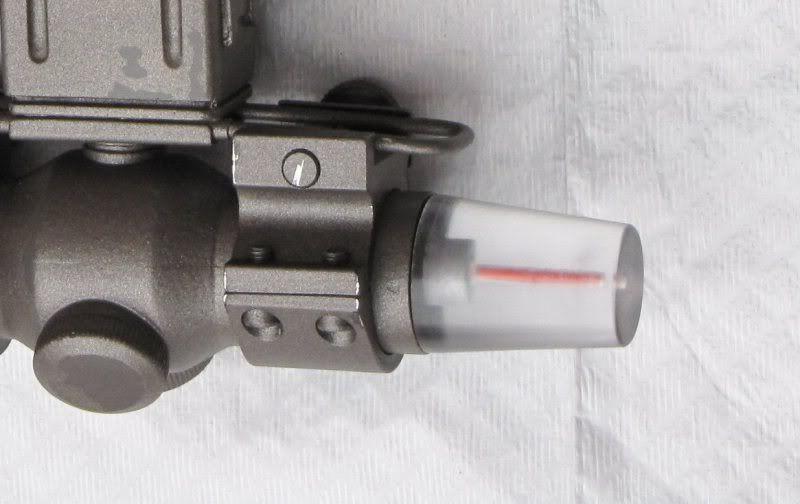
Shawn recommended using thinned red paint into the thin drilled out depression in the clear Singlepoint tip, but I found some thin red coated wire in my spares box that fit very nicely into the hole! I cut off a section and pressed it down inside. The clear tip was completed by painting the slightly larger depression silver, then the base was painted black.
So that's where she sits this afternoon.
 Still to come: a general "dirtying down" of the entire pistol.
Then I'll find a display case and show it off next to my Nostromo AES helmet by Steve and Richie!
Thanks for reading,
Eric
Had some time to work on the amazing Nostromo pistol kit by Shawn Morgan.
Very nicely cast kit! The Rexim is terrific, and the add on parts are great, too. There are a couple of metal parts comprising the upper and lower scope mounts, as well as a clear cone tip for the Singlepoint scope. The upper scope is a genuine functional Tasco scope. The "nozzle" at the muzzle end is a separate piece as well.
Shawn did all the prep and pre-assembly before shipping the kit. He did an excellent job on designing and constructing the pistol. It was basically ready to paint right out of the box. :thumbsup
He also provided a painting tutorial, and a source for the rub-on lettering used on the pistol's receiver.
I didn't take any in progress shots on this, but since I decided to do a weathered version, I still have some more work to do.
Here are a couple of overall shots of both sides.
I partially disassembled the kit to make painting a bit easier. I wound up with 5 subassemblies for painting:
1) main body
2) Singlepoint scope (removed scope rings)
3) Tasco scope
4) Tasco scope mount
5) front nozzle piece
I began by using Duplicolor self-etching primer on all the resin parts to make sure the color coats had something to bite on. I've used this primer before and it gives a very smooth base.
Shawn recommended a dark "machine" gray (or black) for the base color. I used a dark Rustoleum gray that I had left over from another project. I used the dark gray on the pistol body, Singlepoint scope, and nozzle.
I didn't paint the Tasco scope at all at this point as I wanted the black to show through my weathering. The resin Tasco scope mount was sprayed semi-flat black after primer.
After the base coat was dry I reassembled all components (except for the clear Singlepoint tip) in preparation for weathering.
To begin, I used some Winsor & Newton liquid mask with a Microbrush to mask off portions I wanted to show through the weathering. I've used this technique many times on other full scale props and helmets and it works really well.
Once the masking fluid was dry, I used Shawn's recommended Rustoleum Bronze color to apply several light coats over the entire pistol.
Once dry, I used a rubber cement pickup to rub off the masking fluid, and got a nice chipped effect. Here are a couple of closer shots.
I did some more detailing by masking off for the red sections. I wrapped blue painters tape around both knurled sections and used the liquid mask again to mask off the chips and scratches. I used Testors Ford Engine Red, which (in my opinion) simulates the slightly orangish red on the pics of the screen used prop.
The grip panels were painted with Testors Gloss Black.
The lettering was done with white dry transfers. Since I wanted to mimic the screen used pistol, which has very worn lettering, I took some time to scratch and cut up each letter before applying them to the receiver. This took a while, but I really like the end result!
In the reference pics of the screen used pistol, the word "Nostromo" is quite noticeably slanted down to the right. . . but I simply couldn't bring myself to put it on crooked!
EDIT: Just for fun, here's a comparison of the screen used pistol with the lettering on mine. (Credit to Jason Eaton for the original pic.) The original is on top of course.
Shawn recommended using thinned red paint into the thin drilled out depression in the clear Singlepoint tip, but I found some thin red coated wire in my spares box that fit very nicely into the hole! I cut off a section and pressed it down inside. The clear tip was completed by painting the slightly larger depression silver, then the base was painted black.
So that's where she sits this afternoon.
Then I'll find a display case and show it off next to my Nostromo AES helmet by Steve and Richie!
Thanks for reading,
Eric
") :thumbsup
:thumbsup