Need advice for Pirates of the Caribbean (ride) model display

blewis17

Master Member
RPF PREMIUM MEMBER
My favorite dark ride attraction of all time is the Pirates of The Caribbean attraction at the Disney parks. I've only experienced the Florida version and Anaheim (superior) versions. I especially love the Pirate's Grotto / Dead Man's Cove scenes toward the beginning of the ride (the more elaborate version is at Disneyland). In the early 1970s, MPC released official Disney branded tableaus inspired by these attraction scenes, which still fetch a pretty $$$ on eBay today.

95624ac4cf0d6e8cebf9188918312ff9-jpg.jpg


Lindberg, in their "Jolly Roger" line, acquired the original molds and removed the Disney branding and all direct references to the Pirates of the Caribbean, and has re-released the models over the past few years.

I've assembled a couple of these fun models....
dsc_0015-jpg.jpg


dsc_0013-jpg.jpg


...and I would like to try something a little more elaborate, but beyond what I have tried before.


I recently acquired the Lindberg version of this POTC kit:

Lind-HL615-2.jpg


Lind-HL615-11.jpg


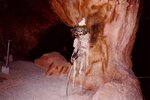
...and I would like to use this new kit to create an actual scene from the attraction(s)....

maxresdefault.jpg


a45b3367105e7afe0fb1e11f260fc6ae.jpg


9097374329_cd2f5d7589_o-56a386e45f9b58b7d0d271d1.jpg


So, I believe I can "Frankenstein" the two skeleton model kits to get a similar scene above. Some questions from a TOTAL NOOB to this:

1) What would be the best material as a base for the beach? I was think simple poly foam, covered with hobby model fine grain sand. Any recommendations? Model based sand looks like it gets pretty expensive.
2) What is the best adhesive to use to adhere the sand to the base?
3) Recommendations for the support cave "wall" behind the impaled pirate captain? If I use simple carved foam, I would next to seal the foam before painting, correct?
4) I've already looked for small scale crabs to decorate the beach (as seen in the attraction scene) but the scale for both the crab(s) and the seagull in the pirate's hat is not obvious. Any recs on where to obtain such small scale items?
 
Last edited:
1. You could use foam, and white glue, but I think the softness of the foam may loosen the sand when you finally place the pieces. I would use plaster over the foam. Plan out the placement of the figures beforehand if you plan on standing them up or supporting them with rod. I wouldn't worry too much about the coarseness of the sand. At that scale the sand would be about the consistency of flour. Regular playground sand will be fine, but you may have to run it through a flour sieve.
2. White glue will most likely be the best as it should not yellow over time.
3. You can use foam on the wall because chances are, there won't be a lot of repositioning there. Some paints may eat away the foam. Water based acrylics may be safer. You could always seal the foam, with white glue. There is a trick that if you use white glue thinly spread, and a lacquer paint, that it will eat way the foam in areas of little to no coverage giving you a rough or melted appearance. Results vary.
4. I really don't have an idea about small scale creatures. Toys will have to be a larger size so that there is no swallowing hazard so I wouldn't expect to find them in a store. You could get someone to 3d print the small creatures on a resin printer. You may be able to get more skeletons online if you search yeggi.com where you might be able to get some for free or a lower cost.

TazMan2000
 
Many modelers that you see on YT start with a solid base of wood or plastic then a sheet of foam like insulation foam.
Once carved coat with grout or plaster mixed with acrylic paint and Mod Podge.
Then sprinkle with sand (scaled for models or trains) spray with isopropyl alcohol then with watered down white glue (3-1)
If need be you and air brush to get the desired colors.
The same foam, grout, paint would also be used for the stone structures.

One of the channels everyone mentions is Luke Towan.
While he does HO train scale stuff the techniques apply.
Others would be
Boylei Hobby Time
Minibricks craft
Night Shift

For the smaller details you could search the net or even toy sections of stores or if all else fails, scratch build.
You could probable find someone to 3d print them if you don't have a printer.

For ride reference I would suggest Daveland and Gorillas don't blog (you'll have to dig around in this one)

I have a resin 1/8 scale female pirate figure that I've been expanding the base of. (also inspired by the ride)
So far I've made a shovel, lantern and some sea shells.
The base has a closed treasure chest that I opened and hollowed out and a skull that I added a partially buried skeleton to.
 
I have a resin 1/8 scale female pirate figure that I've been expanding the base of. (also inspired by the ride)
So far I've made a shovel, lantern and some sea shells.
The base has a closed treasure chest that I opened and hollowed out and a skull that I added a partially buried skeleton to.
Thanks for the info, everyone!

I would love to see you model progress!

Thinking I am going to pick up one more model to kit-bash while I can (The Pirate skeletal helmsman was the most popular of the recent Lindberg line and goes for over $100 on eBay now!)
 
This is where she's at right now.
Jaguar Pirate Girl 1.jpg

Jaguar pirate girl I picked up on another forum several years ago.
She was missing the sword an chain for her vest.

Base was enlarged with sheets of foam core with Durhams plaster over the top.
Unfortunately most of the plaster came off so I will be trying something different.

Skeleton body is made of sheet styrene and bits of model sprue covered with tissue and wood glue for the clothes.

Still more things to make including a hat for her since I plan to make her up like the Mark Davis painting from the ride (but with more clothes)
She already has the scarf and patch on the correct eye.
pirategirl.jpg

Painting entitled "Things To Come"
And yes this is the redhead that was being auctioned off (now a pyrate in the sanitized version of the ride)
 
I've acquired the two Lindberg kits and I am contemplating which skeletons to use for which scenes.... think I've got a plan, more to come.

I can't emphasize enough how great it is to see these POTC 50 year old kits back on the market.
 
OVERDUE UPDATE

So I grew up with the Florida version of the attraction, which has your passenger boat moving left to right across the scene, with the "pirate battle" remnants (3 skeletons and their "accoutrement") on your left. All three are impaled with swords. The Disneyland California version has the same scene but you move past right to left with the tableau on the RIGHT side of your boat. Both share some similarities:

1) there is a standing skeleton, impaled with a sword, and wearing a large hat in which a seagull has made a nest
2) there is a reclining pirate skeleton in a ditch, lying partially on a pirate flag, can be holding a gun; behind him is a lantern and a shovel
3) the third pirate is laying belly down in the sand, reaching outwards, carefully watched by a curious crab. Off to the side is a treasure chest.

My version is a hybrid of the two, but more similar to the Disney Florida layout below:

2022_Pirates_Zoom_2.jpg


Well, you live and learn. Since this was my first semi-serious attempt at a scratch built diorama, I picked up some $$$ craft foam for the base. Knowing what I know now, I should have ordered a more tight/less porous Styrofoam. I reinforced the bottom with corrugated cardboard and started to work.

IMG_7434.JPG


Covered everything with layers of Mod-Podge. I carved out a cave support column as seen in the ride, for which the standing impaled skeleton resides. Then started to test fit the pieces.

IMG_E7438.JPG
 
Last edited:
In the mid 2000s, Disney sold a nice set of POTC ride action figures, which came with LOTS of nice accessories, which I commandeered for this build as they are roughly the same scale.

Taking the re-issued Lindberg pirate kits, I started to piece together which 3 skeletons fit the scene best, hacked together the parts I needed to and started to paint:

IMG_E7445.JPG


IMG_E7458.JPG


IMG_E7466.JPG
 
Last edited:
Figuring out how to do the base and column support, using various paint and kitchen spices, along with play sand, to get that "beachy" look.

IMG_7435.JPG


IMG_7447.JPG
IMG_7439.JPG


IMG_7446.JPG


IMG_E7467.JPG


I Dremeled out the base of the plastic sandy hill insert (on the left above) and filled the hole with sand, to help seat my reclining pirate. Placed the lantern and shovel behind him, as in the attraction. Still need to add his eye patch and the pirate flag on which he lies...

IMG_7513.JPG


(I based him more on the Disneyland California version)
DisneylandPOTCDeadMansCove.jpg


Worked on the curious crab as well. This is a crab that came with one of the kits. You can TELL that back in the 1970s, MPC was using real attraction artifacts for their reimagined scenes. Problem is, they made this blue crab too large for scale. Oh well, it's original and I decided to use it.

invertebrate_blue-crab_molefranz-GettyImages_600x300.jpg


Crab+Anatomy.jpg


IMG_E7537.JPG
 
Last edited:
SO....

I'm ~ 60% done. Everything is roughly in place. But I've still got a lot of loose ends to tie up.

1) piecing the belly flopped pirate's arms together, and adding his feet
2) impaling the standing pirate
3) finishing the treasure chest and anchor
4) finish painting and detailing the base and column
5) adding the eye patch and flag to the reclining pirate
6) finish the crab (DONE)
7) Finding a decent, small enough bird to add to the standing pirate's hat

...but here's where I am to date...


IMG_7595.JPG


IMG_7594.JPG
 
I always wanted to tackle a ride diorama. I had the idea of actually making a snaking river where the guest boat would ride past and make an S bend with vignettes. Your idea is much better. Pirates was one of my favorite attractions, equal only to The Haunted Mansion. I have a complete set of original kits but don't feel comfortable building them. I had a set of sealed kits which I sold for the very fact I could never open them so I kept the open set to build. To my delight we now have the new releases. Sorry for runnin' on and on. Please keep posting pics so I can savagely plagiarize your work.
I love how your imagination works.
Cheers
 
My favorite dark ride attraction of all time is the Pirates of The Caribbean attraction at the Disney parks. I've only experienced the Florida version and Anaheim (superior) versions. I especially love the Pirate's Grotto / Dead Man's Cove scenes toward the beginning of the ride (the more elaborate version is at Disneyland). In the early 1970s, MPC released official Disney branded tableaus inspired by these attraction scenes, which still fetch a pretty $$$ on eBay today.
Always thought the same...

Even the audio in Florida is "tinny" compared to CA.

And the FL Haunted Mansion graveyard is lit too light - you can easily see the scrim.

I digress...

Great thread!
 
UPDATE

You know, it comes in fits and starts with these projects. Powered through a few "next steps" and I'm 80% there now.

IMG_7823.JPG


First, Santa brought me these cute little resin seagulls for Christmas. So I cut one off his post and filed it down to fit in the pirate's hat. \

IMG_7821.JPG


Perusing online photos from the Disneyland and Walt Disney World Pirate Groto scenes, there have been changes to the look of the 3 skeletons over the decades. Overall, mine is based on the Florida version, but I have incorporated some of the California details. I added some more greeblies around the reclining pirate to flesh out the scene, and placed him on the flag. Still have not decided whether to use a "regular" arm for his left side, or a pirate's hook arm that I have. Need to add his eyepatch as well.

IMG_7824.JPG


The standing impaled Pirate has a large black hat in Florida, and a reddish floppy hat in California. Each has a seagull that has made its nest in the hat. The California Pirate's clothes are faded and colorless, while the Florida pirate seems to have purple in his tattered remnants.

IMG_7825.JPG


A photo of an OLD version of the standing impaled pirate from the Florida version, but with faded clothing:

pirates-of-the-caribbean-14.jpg


When you encounter this scene in the Florida version, you can see the shipwreck behind this beach, and as you move left-to-right you round the corner and see the cursed Pirate Helmsman...

helmsman-disneyland-pirates-caribbean.jpg


This is MY version of the Pirate Helmsman (seen in my very first post at the top of this thread), which will go alongside this diorama:

dsc_0015-jpg-jpg.jpg
 

Attachments

  • pirates-of-the-caribbean-14.jpg
    pirates-of-the-caribbean-14.jpg
    27.6 KB · Views: 27
Last edited:
They keep tinkering with the rides.

When the ride first opened in CA the skeletons where real, from a medical school.
There where no quality fake skeletons available at the time.

Suposedly the skull above the Captain's bed is the only remaining real one left.
 
They keep tinkering with the rides.

When the ride first opened in CA the skeletons where real, from a medical school.
There where no quality fake skeletons available at the time.

Suposedly the skull above the Captain's bed is the only remaining real one left.

I've heard that as well. Although, a former cast member has posted some old photos on a site that shows at least one beach skull that also appears to be real.

When I was in high school in the 1980s, you could order real human skeletons for science class; we had a (female) one. Later in medical school, I had a disarticulated human skeleton in a small foot locker that you could take home to study. I had that thing in the corner of my house on more than one occasion. Bleached bones of course, nothing "gross" or morbid about it IMO.

Now, my anatomy lab with all the cadavers? That 's another story...
 
Well, I'm 90% there. Baby steps...


First, here's a low-res picture of the Disneyland / California version of the scene from many years ago. I "flipped" it left to right as a mirror image, to better approximate the layout of the Florida version (and my model):

pirate-grotto-2-john-mangani.jpg


...and updates to my model...

IMG_8030.JPG


IMG_8031.JPG
IMG_8032.JPG
IMG_8033.JPG
IMG_8034.JPG
 

Your message may be considered spam for the following reasons:

If you wish to reply despite these issues, check the box below before replying.
Be aware that malicious compliance may result in more severe penalties.
Back
Top