NASA ACES Helmet

whoooaahh dude that tinted visor makes the whole thing come to life. looking really nice..... i spy a nice little car in the reflection there too but cant quite identify it, a triumph possibly?
as for the tape i really love that detail but of course its your project so go with whatever you like.
 
whoooaahh dude that tinted visor makes the whole thing come to life. looking really nice..... i spy a nice little car in the reflection there too but cant quite identify it, a triumph possibly?
as for the tape i really love that detail but of course its your project so go with whatever you like.
I'll probably try the tape to see if I like it. Worst that can happen is I just peel it back off. Yeah the car is a 67 Triumph Spitfire, my parents bought it brand new along time ago and passed it along to me a few years back.

On the tinting I started with it pretty light and then just kept going darker and darker, because I thought it looked better. Plus it was still relatively easy to see out of even that dark.
 
Last edited:
I forgot to upload a couple videos of the visor pulls. The first is one that failed, I don't think the PETG was heated long enough, the second worked really good. The wet towel was an attempt to cool the PETG to reduce damage to the PLA visor buck. It did seem to work in minimizing the heat transfer to the buck without causing issues to the visor. I also attached a picture of the damage that one of the visor bucks sustained before I used the cooling. You can see the PLA shrinking down which required sanding and filling to prep the buck again.
 

Attachments

  • Poor Visor Pull.MOV
    55.5 MB
  • Good Visor Pull.MOV
    29.3 MB
  • damaged visor buck.JPG
    damaged visor buck.JPG
    1.9 MB · Views: 110
I forgot to upload a couple videos of the visor pulls. The first is one that failed, I don't think the PETG was heated long enough, the second worked really good. The wet towel was an attempt to cool the PETG to reduce damage to the PLA visor buck. It did seem to work in minimizing the heat transfer to the buck without causing issues to the visor. I also attached a picture of the damage that one of the visor bucks sustained before I used the cooling. You can see the PLA shrinking down which required sanding and filling to prep the buck again.
Looks good.
If you have other projects to vacuum form, you should make your frame, bigger than the box or make the box smaller so it's closer to your visor pattern size.
This way you can push the frame past the box and let the hot plastic make the seal. Your current seal has a lot of surface area and you have to make sure the frame is aligned and flat to get a seal. If you put a 1/4" radius on the top edges of the box, then you can push the frame past it and the plastic can stretch over the box some, which will help reduce webbing.

Another trick is to pull a piece of styrene over the pattern and trim it to the base of your pattern. (styrene is much easier to pull, as it stretches much easier than PETG) Then pull your other plastic over this. The styrene will smooth the pattern some and also offer some heat and stick resistance to your pattern.

The pattern damage looks to be the paint being affected by the heat. This is happens with rattle can paint.
Thanks Imgill for the advice, the vacuum forming process was pretty hit and miss, but after several attempts I did get some fairly good results on a couple visors.

Tinting the visors was a whole new experience too. Fortunately I had a few junk visors to test on, because I ruined them by not letting the dye completely dissolve prior to dipping the visor. This resulted in speckles of thick dye on some portions of the visor (see pic). I might do another round of visors in a thicker PETG and then try another round of tinting.
 

Attachments

  • IMG_2616.JPG
    IMG_2616.JPG
    1.6 MB · Views: 112
View attachment 1547691
2 of my outside visors came out really pretty nice. It wasn't without issues though. Apparently you need to wait for the dye packets to completely dissolve or the tinting is really uneven. Luckily I did all the dye work in the garage with plenty of protection on everything around me, because the dye gets EVERYWHERE. Super excited about how it turned out so far. Now thinking about if I'll put the reflective tape on the back of the helmet. Part of me says do it, but the other part that spent about 20 hours sanding, priming and painting it until it was like glass says not to. ;-)
Oh My Goodness. That helmet is looking super clean from these photos. How close are you to finishing this helmet? As far as I can see, it's done.
 
Oh My Goodness. That helmet is looking super clean from these photos. How close are you to finishing this helmet? As far as I can see, it's done.
Thank you. Yes it is mainly complete, I might give a go at some reflective tape on the back and some interior visual details could be added. I also
have a couple neck rings so that I can add one to a suit in the future. I'll put a video on shortly that shows all the parts articulating with visor movements.

NASA ACES 5.jpeg
NASA ACES 9.jpeg
NASA ACES 8.jpeg
 
These pictures give a good reference for the size of the helmet when it's on and shows a bit better the clarity of the visors. The neck ring isn't attached here, so airflow is not horrible, but I'm thinking I'll need some sort of air movement blowing up into the helmet if I'll be keeping it on for more than a few minutes.
 

Attachments

  • IMG_2759.jpg
    IMG_2759.jpg
    3.6 MB · Views: 192
  • IMG_2757.JPG
    IMG_2757.JPG
    1.7 MB · Views: 163
  • IMG_2755.JPG
    IMG_2755.JPG
    1.6 MB · Views: 172
  • IMG_2753.jpg
    IMG_2753.jpg
    2.4 MB · Views: 179
whoooaahh dude that tinted visor makes the whole thing come to life. looking really nice..... i spy a nice little car in the reflection there too but cant quite identify it, a triumph possibly?
as for the tape i really love that detail but of course its your project so go with whatever you like.
Were you able to make any progress on your ACES Helmet?
 
Were you able to make any progress on your ACES Helmet?
other than acquiring a few small pieces not really.... i havent really made progress on anything much on my workbench recently for many reasons.... im starting to consider outsourcing the 3d printed parts because im just literally fed up with having issues with my 3d printer again.
 
Hey Everybody!

It's me the maker of the 3d print files used here for this project.

I am relieved to announce that Version 3 of these 3d print files are live on my online store!

Here is the link for those who are interested.

I have revised my old 3d print files for the helmet to be as accurate to the real thing as I could. The package includes a 10 page assembly instructions PDF, a parts list, a screw setting guide, and links to online resources for making at home.

Wesley Tarr 3D NASA ACES Helmet 3D Print files.jpg
Wesley Tarr 3D NASA ACES Helmet 3D Print files 3.jpg
Wesley Tarr 3D NASA ACES Helmet 3D Print files 4.jpg


Let me know if anybody has questions about the files
W.T.
Wesley Tarr 3D
 
Hey Everybody!

It's me the maker of the 3d print files used here for this project.

I am relieved to announce that Version 3 of these 3d print files are live on my online store!

Here is the link for those who are interested.

I have revised my old 3d print files for the helmet to be as accurate to the real thing as I could. The package includes a 10 page assembly instructions PDF, a parts list, a screw setting guide, and links to online resources for making at home.

View attachment 1702787View attachment 1702791View attachment 1702792

Let me know if anybody has questions about the files
W.T.
Wesley Tarr 3D
I've got to reach out to Starforgeprinting he did a great job printing out my last helmet from you Wesley so really interested in building this one too.
 
Looking good. In one of the pictures you posted, there seems to be a "step" in the back of the helmet. The shell of the ACES is smooth.

The v-form pattern needs to be glass smooth. 600 grit at minimum. You cant go too smooth!
The best way I have found to smooth parts is with high-fill primers. But you have to let them dry completely, then wet sand your surfaces. Using copious amounts of water with allow you to sand faster & longer (with wet-dry sandpaper) and will give you a better finish. Do not gloss paint your pattern with a non-catalyzed paint. Rattle can paints generally get soft when heated and a gloss spray-paint is liable to stick to you hot plastic. Even with the pattern powdered with talc. (Baby powder) The high fill primers do not seem to have this issue of sticking, but you definitely want to talc your plastic and pattern first.

Also .030 PETG is way too thin. The real visor is .125" and at only .030" your visor will be very floppy. I would recommend no thinner than .060" but .090" would be better. To improver the optical quality, use the type of PETG that has a plastic film protective sheet (They may all be like this) and leave this film on your sheet (Inside) when forming. It should peal off easily after the visor has been formed. This will help with the clarity of your finished visor by keeping the removable film between your hot plastic and the tool.

It seems the early S1035 helmets has a bronze colored sun visor, and the newer Orion helmet may have a gray sun visor. So if you are doing an ACES version, the sun visor wants to be very dark bronze.


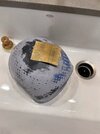
Here is a set of photos of the s1035 helmet (note the 3M- prismatic tape on the back)
View attachment 1536091
The prismatic tape was applied at Nasa, not at David Clark, it just the tape used on the large overhead highway signs, and is very expensive, also stiff and very hard to conform, even harder to remove, it got an acrylic adhesive........The new OCCS helmets have a blue conformal design with Artemis logo and reflects white.
 
Yes I connected the bailer bar together with an internal metal rod for support. The two pictures show the bailer bar in two pieces and then finally connected and primed. The visor bucks have been coming together well, but I don't know how smooth I need to make them? How fine of detail will transfer to the actual visor? I'm using PETG .030 thickness for the vacuum forming.
The Lever is actually 3/8" diameter, buy some stainless tubing and bend with a tubing cutter, you can make the fittings by hand and silver braze them on , this can then be sand blasted, now your as close to the real one....
 
Part way into building a NASA ACES helmet and decided to share the journey. This is my first attempt making something this complex so wish me luck. 3D print files were purchased from Wesley Tarr link HERE and I commissioned Michael with starforgeprinting link HERE. I'll say Wesley does indicate that "major assembly" is required, and I've watched Adam Savage's build videos of his NASA ACES helmet along with most of his other videos. The first several days have started off with an UNHOLY amount of sanding and priming.View attachment 1535297View attachment 1535298
If you want to make the visor and sunshade overlay to look more authentic, buy some silk screen fabric and clear 2 part acrylic adhesive and laminate between 2 pieces of glass, build to about .035" thick, then cut it out and bond to visor and the small crescents on sunshade.
 
So did wet sand in the kitchen sink, sure my wife loves me turning the kitchen into my workspace. :oops: 
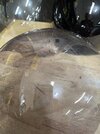
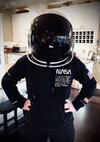
With only about 5 minutes of light wet sanding I did get good results reducing the orange peel across the entire helmet. I may go just a bit further. Started with 1000, then to 3000 then to 5000. Probably some bufffing/polishing will help too. Here is a shot of the rear of the helmet.

Not sure on clear coating yet....
Not sure why there's a step on the back of the shell, this the side view of that shell...........
 

Attachments

  • Shell.JPG
    Shell.JPG
    18.2 KB · Views: 6
The prismatic tape was applied at Nasa, not at David Clark, it just the tape used on the large overhead highway signs, and is very expensive, also stiff and very hard to conform, even harder to remove, it got an acrylic adhesive........The new OCCS helmets have a blue conformal design with Artemis logo and reflects white.

I was told the tape is applied by a Boeing contractor, who have a contract to maintain the helmets.
I found this out, because almost all the helmets have a different tape pattern, using individual pieces of tape, due to it's stiffness and I was asked how I got the tape on my replica so "neat and symmetrical" by the head of the crew rescue department.
All I did was make a strip pattern, with masking tape first. Started with a central strip, then wedge shaped strips on the side. I made sheet aluminum patterns of these pieces, and used these to knife cut the heavy tape. just mirroring the wedge shaped pieces to both sides of the center strip.
 
The Lever is actually 3/8" diameter, buy some stainless tubing and bend with a tubing cutter, you can make the fittings by hand and silver braze them on , this can then be sand blasted, now your as close to the real one....
3/8" is too thick I believe. I don't have my helmet in front of me, but I think it's 5/16" on the real helmets. This could be done with stainless steel fuel line and a tubing "bender". I would strongly suggest a cut out wood pattern of the bends, as is it very easy to get things turned around and bend something the incorrect way, or to the wrong radius.
2 or 3 pieces of 1/2" MDF or particle board would work well.
 

Your message may be considered spam for the following reasons:

If you wish to reply despite these issues, check the box below before replying.
Be aware that malicious compliance may result in more severe penalties.
Back
Top