My New Series Doctor Who Tardis Build (image heavy)

re: My New Series Dr Who Tardis Build (image heavy)

This has become my favourite thread here... can't wait to see the final product! Your attention to detail is awesome. :)
 
re: My New Series Dr Who Tardis Build (image heavy)

I love it! My ONLY concern is that the light for your windows and Police Box sign seems to be very white, while on the show it's always appeared with a VERY yellow tint to it (as well as the lantern on top). Will you be addressing that?
 
re: My New Series Dr Who Tardis Build (image heavy)

Its not just a prop but art!!! I have been planing to buid a dalek just dont have room to work on it. Cant waite to see the final pics.
great job
 
re: My New Series Dr Who Tardis Build (image heavy)

I love it! My ONLY concern is that the light for your windows and Police Box sign seems to be very white, while on the show it's always appeared with a VERY yellow tint to it (as well as the lantern on top). Will you be addressing that?

I haven't seen the smith prop look yellow, but I've not actually sat down and looked at every episode for backlight color temp on it, so it's definitely possible I just haven't noticed it. This photo below is what I see on the show, so to answer your question, no, I've been planning on them being white.

I do know the production wasn't consistent in use of a blue lighting gel on the Eccleston and Tennent Tardises, which used fluorescent bulbs and would make them inconsistent in color temperature.

Though, the farther I get on this, the more it appeals to me to make a hybrid design, rather than a specific doctor's Tardis.

smith-mag-photo.jpg
 
Last edited:
re: My New Series Dr Who Tardis Build (image heavy)

Beautiful! Can I ask, what are the dimensions for the sign on the pull out door that you came up with?

Thanks!

Sign door is 13-3/4" wide by 16-7/16" high and my visible sign is 11-1/2" x 13-11/16".

Which is a little skinny in aspect ratio based on the sign door photo above from Primrodo.
 
Last edited:
re: My New Series Dr Who Tardis Build (image heavy)

I've also been meaning to tell you that your watermark is awesome! :lol

Thanks, Chris Holoka, who does all the graphics on Rebelscum and Theforce.net did that for me some time ago. Came as a logo on a shop apron and shop clock for xmas.
 
Last edited:
re: My New Series Dr Who Tardis Build (image heavy)

After spending almost a whole day trying to use a different connector, I gave up on them.

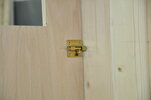
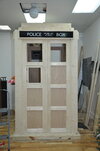
I then went back to the toggle bolt idea, and it turns out they really work great. I had worried they would not prevent the structure from racking, but after installing just the back wall today, I can tell they will do fine. And as a bonus they are a lot easier to locate and install. There a toggle bolt on the top and bottom and two on each side of the wall panels.

DSC_0996.JPG

DSC_0995.JPG

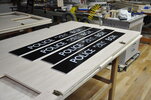
I also picked up my police sign graphics yesterday. These are vinyl over 1/4" sign white acrylic and will have a piece of 1/8" clear over the front of them.

DSC_0998.JPG
 
Last edited:
re: My New Series Dr Who Tardis Build (image heavy)

Today I finished installing the remaining two wall panels with their toggle bolts located and then set to building the remaining 7 window backlight boxes.

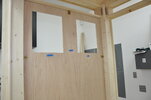
Here's what it looks like now with one of the police sign acrylics stuck in there. Thanks again to Primrodo for the cut file for the sign.

DSC_0999.JPG

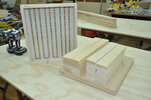
I machined all the pieces for the 7 boxes in a batch, and began assembling them.

DSC_1002.JPG

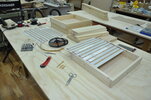
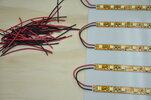
Cutting, attaching and wiring up the LED tape lights takes awhile. They come on 5 meter reels and have 100 groups of 3 lights, between which you can cut them with scissors. I'm using lengths of 8 sets of 3 lights. As it happens, sometimes where I need to cut the strip, there is a solder joint already there that is placed during manufacture, which causes me to have to clip a 3 light segment off the end so their solder joint is not where I need one. I think if I run out of contiguous 8 sets of lights, I'll solder my own joint in the strip of 8 sets, though I'd rather not.

I had been concerned about all the soldering, but it turns out it goes very fast when I first drop a pool of solder on the connectors at each end of the strip, and then after tinning the wires, just set them together and melt the solder really quickly.

I found that stripping the ends of the short jumper wires was tedious at best since they were so short and hard to hold. I remembered I had a mechanical single motion wire stripper, which works great and makes quick and easy work on them.

Here's where the lights are going together.

DSC_1008.JPG

A whole pile of jumpers for the lights.

DSC_1009.JPG

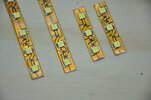
Some of the LED tape strips. You can see the solder locations on the ends.

DSC_1010.JPG

Next up, work on the exterior as I need to decide about weathering and painting.
 
Last edited:
re: My New Series Dr Who Tardis Build (image heavy)

Wow, this is looking really fantastic ! Insane attention to detail.

If you keep taking on big projects like this I might try and talk you out of those lonely R2 parts you have in the shop one of these days.
 
re: My New Series Dr Who Tardis Build (image heavy)

I'm leaning toward weathering the Tardis to look like the Eccleston and Tennent boxes were done, but using the Smith paint, which means a bit of a hybrid that I didn't expect to end up with.

This partly comes from my choice of #2 spruce for the wood, which I believe is the same as the Eccleston and Tennent boxes were made from, judging by this photo of the Eccleston prop under construction. (At least, I'm told that's which one it is)

Note it does appear to be made from the same type and quality of wood I'm using. Interestingly, my wood came right from Home Depot but is marked as sourced from Sweden.

unpainted-tardis.jpg


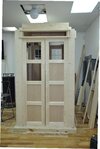
Overall photo of mine:

DSC_0957.jpg

This prop was heavily weathered in a process that wears away the soft part of the wood, leaving the harder portions standing very proud. In a soft wood like pine or spruce, this is pretty easy to do. A member of the Tardis Builders Group that has had some official involvement in Tardises described the process, and there are a couple photos below of it.

Essentially, the finished Tardis was subjected to a propane torch, basically burning the surface, which has the effect of making the soft portion of the wood easy to remove with a wire brush, creating the highly contrasting grain surface seen on the prop.

burnt-tardis.jpg


burnt-tardis-brush.jpg


I have been planning to weather mine in this manner as well, though something about the finish on the Smith Tardis had been bugging me that I couldn't resolve. When I started my build I was in a discussion about which wood the Smith Tardis was made from. To my eye, it's clearly an open grain wood, something really only found in a common hardwood, like oak or ash. This is not a grain pattern you'd ever find in pine or spruce. I was advised it was not built from oak or ash, and I set it aside and went with spruce.

As I've been building, a couple friends in the commercial woodworking world have had interest and I've shown them Smith reference photos, to which they have both said it could not be soft wood, and is most likely white oak. Which would make sense to me even cost-wise, as knot free (clear) common white oak is no more expensive than difficult to source clear spruce. IE, I can buy the oak at Home Depot, but clear spruce is only available at commercial cabinet lumber suppliers and expensive.

Here's a photo of the promo Smith Tardis at the BBC from last year.

bbc-promo-tardis.jpg


So, I find myself with a Smith design, built from Eccleston / Tennent wood, wood that I think needs to be weathered or it will look terrible when painted. A bit of a hybrid either way I go it seems.

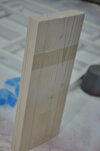
So, coming to this point in the last few days, I decided to test weathering the wood an easier way than burning and wire brushing. I tried out a sample using my blast cabinet with glass bead media loaded in it. It worked very fast and very well. Actually, almost too well, but I think if I go this way I can control the effectiveness of it by limiting pressure .

Here's the sample. I like the effect. It's hard to photograph and show it well, but you can see where I put a bit of tape across the board to distinguish treated and untreated surface.

I'm hoping it warms up a bit here by the end of the week as my next step will be to test using an outdoor blasting rig to see if I can control the weathering. If that works, I plan to move it outside and weather it assembled.
DSC_1007.JPG
 
Last edited:
re: My New Series Dr Who Tardis Build (image heavy)

I haven't seen the smith prop look yellow, but I've not actually sat down and looked at every episode for backlight color temp on it, so it's definitely possible I just haven't noticed it. This photo below is what I see on the show, so to answer your question, no, I've been planning on them being white.

I do know the production wasn't consistent in use of a blue lighting gel on the Eccleston and Tennent Tardises, which used fluorescent bulbs and would make them inconsistent in color temperature.

Though, the farther I get on this, the more it appeals to me to make a hybrid design, rather than a specific doctor's Tardis.

I definitely get what you're saying. I was thinking of one specific shot, with The Doctor and Amy at the end of The Eleventh Hour. I'll see if I can grab a shot of it real quick.

EDIT: It appears I've proven myself wrong. Only the top light should be yellow, all others should be white. Also managed to get a nice shot of the illuminated front panel for you.

tardis_light_2.jpg
 
Last edited:
re: My New Series Dr Who Tardis Build (image heavy)

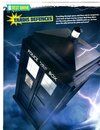
Thanks. That's definitely a yellow light on top, vs the windows. Do you recall if it's always yellow? I can't say I've ever tried to notice, but now I'll have to sort that out. The reference photo I've been using from the Doctor Who Adventures magazine has it white, maybe not exactly pure white as the windows, but not yellow for sure.

Good timing as I'm just about ready to work on the light and I have been planning to use the same LEDs as on my windows. Though I guess I can put a gel in front of the LEDs in the lantern.
 
re: My New Series Dr Who Tardis Build (image heavy)

I could swear that the light strobes whenever he was using the Tardis from yellow to white, or maybe that's thing windows..... I haven't watched Dr.Who in a little bit.
 
re: My New Series Dr Who Tardis Build (image heavy)

I think its just the light temperature on a regular bulb versus what the camera does.

IMG_8728.jpg


versus

IMG_8745.jpg


Taken same time.
 

Your message may be considered spam for the following reasons:

If you wish to reply despite these issues, check the box below before replying.
Be aware that malicious compliance may result in more severe penalties.
Back
Top