Thanks. That pic has had me stumped for ages lol.
You are using an out of date browser. It may not display this or other websites correctly.
You should upgrade or use an alternative browser.
You should upgrade or use an alternative browser.
ILM workshop painting style. Discussion and tips
- Thread starter NAZGÛL
- Start date
MonsieurTox
Master Member
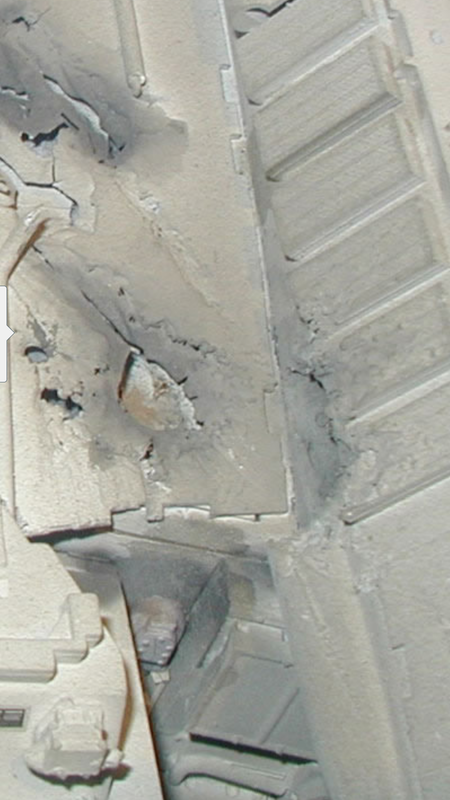
If ti was made the same way they did it on the 32", they did some large opening on the domes then added the plating and made the hole with the hot tool or maybe a solder iron.
Yeah I figured it was something like that Julien. Still looks pretty difficult. Those ILM guys really can cook!
MonsieurTox
Master Member
Yeah I figured it was something like that Julien. Still looks pretty difficult. Those ILM guys really can cook!
Yeah it's better to try on some scrap styrene first. I havent tried on my Falcon, I'm a bit scared to do some mess. Haha
In the pics of the Chronicles, the large openings on the hull can be seen before the plating was added. And there is also a pic after the plating has been done showing that this very panel was done with white styrene (they used black styrene for the other hull panels) so they new where the opening was and where to add those damages.
Wow! Very interesting! I might have to get that chronicles book.
MonsieurTox
Master Member
Wow! Very interesting! I might have to get that chronicles book.
Don't get me wrong, all this was about the 32" not the 5' !
Yeah but looking at it there does seem to be a hole underneath the styrene. Probably the same technique.
TazMan2000
Master Member
Yeah it's better to try on some scrap styrene first. I havent tried on my Falcon, I'm a bit scared to do some mess. Haha
In the pics of the Chronicles, the large openings on the hull can be seen before the plating was added. And there is also a pic after the plating has been done showing that this very panel was done with white styrene (they used black styrene for the other hull panels) so they new where the opening was and where to add those damages.
Either they knew, or decided to cover up a hole that wasn't in the original plan drawings. Someone in the shop could have dropped something on it, or damage could have been caused by handling. Instead of re-doing the job, (on a tight schedule) just cover it up as battle damage. I had that happen to me a couple of times. Make a new model and then...whoops! Off the table it falls and a piece breaks off. So much for the factory fresh paint finish. Let's make it a second hand ship.

TazMan2000
MonsieurTox
Master Member
Either they knew, or decided to cover up a hole that wasn't in the original plan drawings. Someone in the shop could have dropped something on it, or damage could have been caused by handling. Instead of re-doing the job, (on a tight schedule) just cover it up as battle damage. I had that happen to me a couple of times. Make a new model and then...whoops! Off the table it falls and a piece breaks off. So much for the factory fresh paint finish. Let's make it a second hand ship.
TazMan2000
I was talking about the 32" so it was planned ahead and on purpose
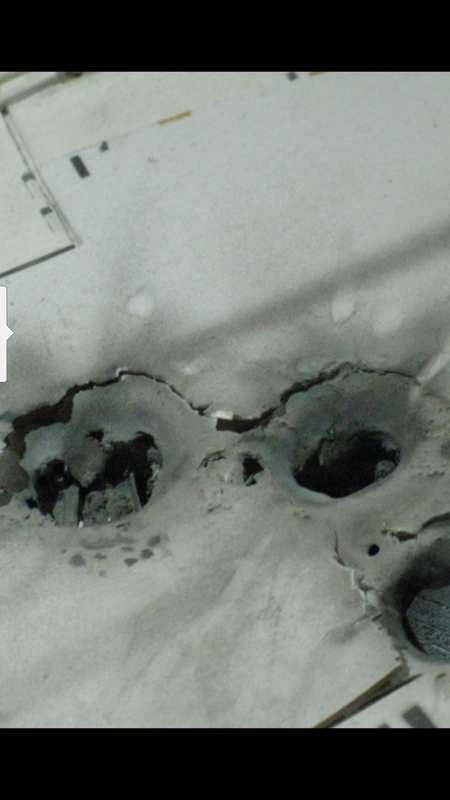
)But like Faustus said, there are great chances they did it the same way on the bigger Falcon. There's clearly a hole under the panel, if they'd have done the damages afterward (once the hull was plated), we would have seen the dome underneath or the thickness of the dome, but only see the thickness of the styrene panel.
Not only that,but I also think the damage was deliberate because it also extends.
Then you also have this where it actually looks like there's cloth underneath to me.

Then you also have this where it actually looks like there's cloth underneath to me.

Ktaylor
Sr Member
After reading this I kept the "keep it fast and sloppy" part in mind when I did this painting test on a piece of scratch build, all in all it took about 3 hours and that was mainly drying times inbetween the weathering, I basically just randomly sprinkled weather powders on and used a brush to streak them down, really quick not really caring too much where they went, using black and a rust color. Used some 320 grit sand paper ALOT and just hit most of the surfaces it really had the most effect I think, it really wore down the paint (it was painted black underneath which starts to show through and grey out the base color or all the way to black depending on how much you sand) I scratched most of the paint chips with a toothpick which was really easy because the paint had only dried about 30 mins and hadn't set yet.
-the main thing I noticed with the sanding was use the same piece of sandpaper when you sand a spot with some rust color leave it on and when you sand anohter area you will rub some of that color onto the other panel colors, this looked the most realistic to me and was a total accident that I will continue to do!!
the I just dabbed some rust colored wash along some edges and places, took some grey paint and oversprayed some of the panels using a piece of straigh edge styrene as a hand held mask and just work really quickly and randomly around the surface.
anyways I was really happy with how it turned out and learned alot about working fast and not over working stuff, for me this is the best result I have got so far by a long way! Looking forward to doing this on some actual models!
Tried doing some spattering by taking some Tamiya smoke rattle can paint and just barely push the nozzel until paint spits out, works well but needs some practice to not let too much come out as you can see in some of the big spots that splattered on here, some of these pics were taken before the final stuff was done if they seem to look different btw...
hope that helps some!
Kris
Man! That really looks the part! Great work! I'm gonna have to try those techniques. You should make a video. Very ILMish.
samster27
Well-Known Member
KTaylor, the test panels look really good, inline with ILM practices. I guess they needed fast weathering, couldn,t afford to spend time making it look perfect as the camera would ultimately not be dwelling on the paint job anyway. Its the same with the Gerry Anderson Century 21 crew. Fast weathering, easy methods that look great on camera but a bit messy when viewed close up, often like the models too!
But when all is said and done...they changed our lives and are our heroes. No doubt we on this site would all give our left testicles to have been in their position, to have worked on their projects.
I know I would.
But when all is said and done...they changed our lives and are our heroes. No doubt we on this site would all give our left testicles to have been in their position, to have worked on their projects.
I know I would.
Ktaylor
Sr Member
Thanks guys!
Yeah models for filming and models for viewing up close are 2 different things. I was always surprised when I saw their props and stuff in person. I think there is a balance to strike for sure when doing stuff for display- the ILM stuff just looks so amazing so get that down then clean up anything that looks off when you have something for display.
Some guys on a different forum where saying they would like to see some videos as well, I'm working on those now just been busy, I should be able to put something up in a couple weeks, I'll be sure and add them here as well for those that are interested.
Vacformedhero
Sr Member
has anyone ever approached the lucasfilm archives looking for a tour or if you could hire a professional photographer to shoot the models ?
VFX Freak
Sr Member
KTaylor. I love your practice weathering platform! A great idea and very nicely done. I look forward to seeing your videos.
I've been working on my second attempt at duplicating that ILM look. I finished an old MPC AT-AT recently, but this time I went for Red 3 with the 1/72nd scale Fine Molds kit. Here's the result:


I started with the black primer, then an almost white paint that I partially sanded down, and then layer upon layer of weathering and oversprays. I studied reference photos and did my best to duplicate what I saw.
I used acrylic washes for the overall dirtying down of the model, and then used enamel washes for pin-washes and panel lines because it flowed better. I also used the enamel washes for the little black splotches here and there.
I didn't use any pigments, but I made liberal use of the airbrush loaded with a concoction of Tamiya Smoke, Nato Black, and Flat Base which worked great.
A sharp needle and sanding sticks worked well to do all the little nicks and gouges which are almost everywhere on the filming model. Red 3 is really a grungy wreck!
As with the studio model, photographs minimize the actual weathering. In my hand the model looks much more heavily weathered than in these photos, but the camera cleans it up quite a bit. No wonder the ILM models are so heavily weathered. I wonder how many times they went back and added more weathering, more details, and more layers after doing test shots and discovering they looked way too clean?
I've learned a lot on this little kit. Now I feel like I'm ready to tackle my Studio Scale V4.
I've been working on my second attempt at duplicating that ILM look. I finished an old MPC AT-AT recently, but this time I went for Red 3 with the 1/72nd scale Fine Molds kit. Here's the result:
I started with the black primer, then an almost white paint that I partially sanded down, and then layer upon layer of weathering and oversprays. I studied reference photos and did my best to duplicate what I saw.
I used acrylic washes for the overall dirtying down of the model, and then used enamel washes for pin-washes and panel lines because it flowed better. I also used the enamel washes for the little black splotches here and there.
I didn't use any pigments, but I made liberal use of the airbrush loaded with a concoction of Tamiya Smoke, Nato Black, and Flat Base which worked great.
A sharp needle and sanding sticks worked well to do all the little nicks and gouges which are almost everywhere on the filming model. Red 3 is really a grungy wreck!
As with the studio model, photographs minimize the actual weathering. In my hand the model looks much more heavily weathered than in these photos, but the camera cleans it up quite a bit. No wonder the ILM models are so heavily weathered. I wonder how many times they went back and added more weathering, more details, and more layers after doing test shots and discovering they looked way too clean?
I've learned a lot on this little kit. Now I feel like I'm ready to tackle my Studio Scale V4.
You did a great job! If you need any more practice, you can always take a crack at my V3I've learned a lot on this little kit. Now I feel like I'm ready to tackle my Studio Scale V4.
Ktaylor
Sr Member
Yeah man that looks great VFXFreak!
I just took my vintage collection red 3 x-wing apart this weekend, gonna rebuild some of the parts here and there and try to get a nice paint up on it, it's a good size and a pretty good starting point considering it's a toy. I think with some minor work it can be a really nice display model.
Yeah I found the paint black first and sanding down the base color really goes a long way! I just wish it were easier to find black primer...
anyways your Xwing looks REALLY good and is inspiring me to get to work on this one! Thanks
Kris
VFX Freak
Sr Member
Thanks for the kind words, Ktaylor! I used Mr. Surfacer 1500 black primer, thinned with just a little Mr. Leveling Thinner to keep it from drying on the tip of the airbrush needle. I bought both on Amazon or eBay.
The primer worked great and dried hard enough that I didn't have to worry about sanding through to the plastic while sanding the basecoat, which I did with a 3600 grit polishing pad. Good luck with your paintjob.
Sent from my iPad using Tapatalk
The primer worked great and dried hard enough that I didn't have to worry about sanding through to the plastic while sanding the basecoat, which I did with a 3600 grit polishing pad. Good luck with your paintjob.
Sent from my iPad using Tapatalk
Last edited by a moderator:
KTaylor. I love your practice weathering platform! A great idea and very nicely done. I look forward to seeing your videos.
I've been working on my second attempt at duplicating that ILM look. I finished an old MPC AT-AT recently, but this time I went for Red 3 with the 1/72nd scale Fine Molds kit. Here's the result:
View attachment 536544View attachment 536543View attachment 536545View attachment 536547View attachment 536546View attachment 536548View attachment 536549
I started with the black primer, then an almost white paint that I partially sanded down, and then layer upon layer of weathering and oversprays. I studied reference photos and did my best to duplicate what I saw.
I used acrylic washes for the overall dirtying down of the model, and then used enamel washes for pin-washes and panel lines because it flowed better. I also used the enamel washes for the little black splotches here and there.
I didn't use any pigments, but I made liberal use of the airbrush loaded with a concoction of Tamiya Smoke, Nato Black, and Flat Base which worked great.
A sharp needle and sanding sticks worked well to do all the little nicks and gouges which are almost everywhere on the filming model. Red 3 is really a grungy wreck!
As with the studio model, photographs minimize the actual weathering. In my hand the model looks much more heavily weathered than in these photos, but the camera cleans it up quite a bit. No wonder the ILM models are so heavily weathered. I wonder how many times they went back and added more weathering, more details, and more layers after doing test shots and discovering they looked way too clean?
I've learned a lot on this little kit. Now I feel like I'm ready to tackle my Studio Scale V4.
hory chet that looks good!!! PLEASE do my Studio scale with yours... you can practice on mine. ^_^ ^_^
Similar threads
- Replies
- 10
- Views
- 563
- Replies
- 11
- Views
- 1,416
- Replies
- 50
- Views
- 5,874
- Replies
- 6
- Views
- 1,258