Moska
Sr Member
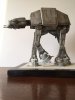
The idea of making a good model based on an MPC-ERTL kit, is often a project in which much of the work will be to make your own pieces from scratch. Still, we must recognize that parts of the kit are a good basis on which to work, although it is clear that all parts used from the original kit will need major improvements.
MAIN BODY
I used the pieces from the kit but the following improvement works were necessary:
- Panel lines: I Corrected its location when it was necessary and, above all, make them recesed or bas-relief. For this work I use templates that I made in computer pasted on the model using 3M spray adhesive. (image-001)

- The two hatches located at the front and rear sections of both sides, that in the IL&M model hide their anchor points: I cut them completely to place again but a little recessed under the rest of the surface and leaving its perimeter line something thicker than the other panel lines. (image-002)

- The "stairs" on both sides: Sanded completely and replaced with finer pieces made from scratch. (image-003)

- The "Drip gutters": Also sanded completely and replaced with parts made from scratch. At the time of paste, I corrected a error of the kit, since these parts must be symmetrical on both sides of the model. (image-004)

- Detail on the lower left corner of the front section of the right side made from scratch. (image-005)

- Top center area: I removed the main details and replaced them with pieces made from scratch. (image-006)

- Front side: I did a piece from scratch to correct its details and modify the neck position 5 mm lower. (image-007)

- Rear side: I placed the three shields that are omitted in the kit. (image-008)

BELLY CYLINDERS
- I placed inside it a home-made mechanism made with small brass tubes to articulate the legs.
- Rear Cylinder: I added the detail on both sides that are ommited in the kit, made from scratch. (image-009)

HEAD
- Panel lines: corrected and made them recesed.
- Detail on the right side made from scratch. (image-010)

- Rear side detailed as the original IL&M model. (image-011)

SIDE BLASTERS
- Detailed extra in the main body of weapons.
- Cannons replaced by metal parts. Finer and longer than those that come in the kit to match the originals.
- Shields made from scratch by copying the original model details. (image-012)

LOWER CANNONS
- The gun tubes have been replaced by metal pipes and now have the correct length.
- The front parts or ends of the cannons were made from scratch.
- Firing motion (forward and backward). (image-013)

NECK
- The only improvement was to add a small styrene rings pasted in the axes of the clamps. (image-014)

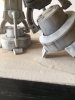
LEGS
As I wanted fully articulated legs and with all the moving parts as in the original model, the only option was to make them from scratch.
I needed to do a lot of pieces because the legs are hollow, and placed inside some gears mechanisms designed by me to make that pistons and central parts of the joints to move every time I turn some articulation, copying the movement of those parts as in the IL&M model. (images-015, 016 and 017)


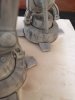
I detailed the soles of the feet and made the toe flaps also articulated to suit the terrain.
The only parts of the kit I used in the legs were the feet and the blocks of the "ankles".
I had to reform the pieces of the feet to reduce their height and to provide them with the panel lines and details showing the original model.
I separated the blocks of the "ankles" from the kit parts and detailed them with all the necessary elements. (image-018)

PAINTING
The model is painted with an airbrush using a mixture of acrylic Tamiya XF2 Matt White (1/2) and XF19 Sky Grey (1/1). To enrich the shades I have slightly changed the proportions in different areas of the model, and I've also used some ocher and bluish hues.
Once the paint is well dry, I left the airbrush and started the aging and weathering process with washes of black oil paint dissolved in diluent to Humbrol enamels. To make the vertical daubs that are repeated in many areas of the model I used black pastel color applied with a esfuminer and finished with small dots of black oil paint that are stretched and smoothed when passing over them, with a move from top to bottom, a moistened brush with clean solvent. The effects of ocher and rust are made with pastel colors applied with esfuminers and cotton swabs. Finally, bumps and scratches are drawn directly on the model with a soft (B) pencil and then a cotton swab is passed to mess a little the contours of those spots.
Finally, all the work is protected with several thin coats of matt varnish.
Thanks for looking")
Moska
MAIN BODY
I used the pieces from the kit but the following improvement works were necessary:
- Panel lines: I Corrected its location when it was necessary and, above all, make them recesed or bas-relief. For this work I use templates that I made in computer pasted on the model using 3M spray adhesive. (image-001)
- The two hatches located at the front and rear sections of both sides, that in the IL&M model hide their anchor points: I cut them completely to place again but a little recessed under the rest of the surface and leaving its perimeter line something thicker than the other panel lines. (image-002)
- The "stairs" on both sides: Sanded completely and replaced with finer pieces made from scratch. (image-003)
- The "Drip gutters": Also sanded completely and replaced with parts made from scratch. At the time of paste, I corrected a error of the kit, since these parts must be symmetrical on both sides of the model. (image-004)
- Detail on the lower left corner of the front section of the right side made from scratch. (image-005)
- Top center area: I removed the main details and replaced them with pieces made from scratch. (image-006)
- Front side: I did a piece from scratch to correct its details and modify the neck position 5 mm lower. (image-007)
- Rear side: I placed the three shields that are omitted in the kit. (image-008)
BELLY CYLINDERS
- I placed inside it a home-made mechanism made with small brass tubes to articulate the legs.
- Rear Cylinder: I added the detail on both sides that are ommited in the kit, made from scratch. (image-009)
HEAD
- Panel lines: corrected and made them recesed.
- Detail on the right side made from scratch. (image-010)
- Rear side detailed as the original IL&M model. (image-011)
SIDE BLASTERS
- Detailed extra in the main body of weapons.
- Cannons replaced by metal parts. Finer and longer than those that come in the kit to match the originals.
- Shields made from scratch by copying the original model details. (image-012)
LOWER CANNONS
- The gun tubes have been replaced by metal pipes and now have the correct length.
- The front parts or ends of the cannons were made from scratch.
- Firing motion (forward and backward). (image-013)
NECK
- The only improvement was to add a small styrene rings pasted in the axes of the clamps. (image-014)
LEGS
As I wanted fully articulated legs and with all the moving parts as in the original model, the only option was to make them from scratch.
I needed to do a lot of pieces because the legs are hollow, and placed inside some gears mechanisms designed by me to make that pistons and central parts of the joints to move every time I turn some articulation, copying the movement of those parts as in the IL&M model. (images-015, 016 and 017)
I detailed the soles of the feet and made the toe flaps also articulated to suit the terrain.
The only parts of the kit I used in the legs were the feet and the blocks of the "ankles".
I had to reform the pieces of the feet to reduce their height and to provide them with the panel lines and details showing the original model.
I separated the blocks of the "ankles" from the kit parts and detailed them with all the necessary elements. (image-018)
PAINTING
The model is painted with an airbrush using a mixture of acrylic Tamiya XF2 Matt White (1/2) and XF19 Sky Grey (1/1). To enrich the shades I have slightly changed the proportions in different areas of the model, and I've also used some ocher and bluish hues.
Once the paint is well dry, I left the airbrush and started the aging and weathering process with washes of black oil paint dissolved in diluent to Humbrol enamels. To make the vertical daubs that are repeated in many areas of the model I used black pastel color applied with a esfuminer and finished with small dots of black oil paint that are stretched and smoothed when passing over them, with a move from top to bottom, a moistened brush with clean solvent. The effects of ocher and rust are made with pastel colors applied with esfuminers and cotton swabs. Finally, bumps and scratches are drawn directly on the model with a soft (B) pencil and then a cotton swab is passed to mess a little the contours of those spots.
Finally, all the work is protected with several thin coats of matt varnish.
Thanks for looking
Moska